Tag Archives: Microsoft

I’m trying to find a way to save some Xbox 360 achievements that I’ve earned while my console was offline. Typically, just connecting to Xbox Live will sync up your gamertag and the offline achievements will be added to you profile. This works because, usually, the gamertag is associated with a single Xbox 360, which goes offline and then back online. My situation is different, and it seems like I’m going to lose my offline achievements.

The set up

I have a single gold account and two Xbox 360 consoles. One of these consoles is always online and is used exclusively for watching Netflix (because the drive tray is broken). The other console works fine for games, but is physically located where wired Ethernet isn’t available, and I haven’t purchased a wireless adapter. In order to get the same gamertag on both consoles, I used the recover gamertag feature to bring it down to the online console. This means that the Netflix gamertag is regularly connecting to Xbox Live while my gaming is done on the same gamertag, but offline.

Microsoft doesn’t seem to want to support this sort of arrangement, as it appears that gamertags are associated with individual Xbox consoles and that only the last-to-be-connected gamertag is seen as legit.

The problems

The first problem I’m facing is how to get all of these achievements that were earned offline sync’d up with my Live profile. One might reasonably think that simply connecting the offline Xbox to Xbox Live and logging in would do this, but Live sees the account as invalid (presumably because the account associated with the other box has connected more recently). Upon connecting to Xbox Live, I’m prompted to recover my gamertag, which I know from experience will erase my offline achievements (I’ll get the gamertag as it exists on the online console – which will also render the gamertag on the online console invalid).

I also tried to use a USB flash drive to move my gamer profile from the offline box to the online box. The move itself was successful, but when I tried to connect to Live, it again found the account to be invalid and invited me to recover my gamertag. I was able to move the gamer profile back to the USB drive, remove the drive, and then recover the online gamertag in order to keep using Netflix, but I was back to square one.

I haven’t yet tried moving the offline console’s hard drive with the gamertag to the online console. As of right now, this is the only thing I can think to try.

The second problem I’m facing is that the offline Xbox doesn’t yet have the new dashboard and some of my games have updates available that are supposed to fix some bugs. I’ve read that it should be possible to get these updates by creating a silver account and logging into Xbox Live under that account. That would be somewhat helpful, but unnecessary if I can solve the first problem.

I have a Windows XP guest running in VMWare Workstation 7 on a Windows 7 Ultimate host machine. This is working pretty well. The XP guest is nice and responsive. I have only one gripe. I’d like all of the buttons on my Logitech MX510 (the best mouse ever) to be mappable in the guest.

Starting from square one, I decided to try installing the current version of SetPoint in the guest OS. The installation went fine, but the usual functionality of the SetPoint settings utility was absent.

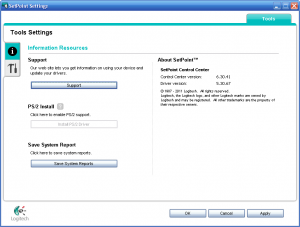
SetPoint Settings in an XP virtual machine

SetPoint Settings in an XP virtual machine

As shown in the screenshot, the SetPoint Settings utility displays only the Tools tab. It is missing the My Mouse tab (and if a keyboard were installed, I presume it would be missing the Keyboard tab, too).

After some Googling around, it appears to be a due to the way VMware approximates the physical mouse. VMware seems to treat USB mice connected to the host as PS/2 devices in the guest. SetPoint, then, doesn’t detect any Logitech hardware that it can configure.

The question of how to obtain SetPoint functionality in virtual machines is one that has been asked many, many times before, without a satisfactory answer. More on that in a little bit.

The best work around

Thankfully, it seems that, at least in the case of a Windows host and a Windows guest, installing SetPoint inside the virtual machine is not necessary. Installing it on the host seems to make all of the functionality available in the guest. This is the solution that I’m implementing now, and it is what I would recommend, provided you have rights to install software on the host.

Paths to follow if you want to pursue installing SetPoint inside a VMware virtual machine

I applaud your courage. There are a few settings that can be tweaked that may get you closer to a working installation.

Possible setting number one

From the post at http://coreygilmore.com/blog/2008/04/30/better-multi-button-mouse-support-with-vmware-fusion-and-workstation/

Add the following line to the virtual machine’s .vmx file:

mouse.vusb.enable = "TRUE"

From what I can tell, this setting allows me to use the Forward and Back buttons on the mouse, but does not make the mouse detectable by SetPoint. The remaining mouse buttons do nothing.

Possible setting number two

From the post at http://superuser.com/questions/35830/back-forward-mouse-buttons-do-not-work-in-vmware-workstation-6-5-guest-os/304583#304583

The solution given (which did not work for me) is to:

First add the following line to the virtual machine’s .vmx file:

usb.generic.allowHID = "TRUE"

An explanation of what this does, by a VMware associate, can be found in the thread at http://communities.vmware.com/thread/110919?start=15&tstart=0

If you’re feeling really adventurous and/or desperate, you can take out the mouse.vusb.enable line and add this option instead:

usb.generic.allowHID = “TRUE”

Then, you’ll notice that your main mouse and keyboard (if they are USB) are available to pass through into the guest via the USB devices menu.

The dangerous part here is that once you pass through the mouse, it is actually disconnected from the host, so you won’t be able to ungrab from the guest just by mousing out of the Fusion window. You can still ungrab with the keyboard (ctrl-cmd I believe is the shortcut?). If you actually pass through your keyboard and your mouse, you’ll be stuck in the guest and you’ll have to shut it down (or worse, reboot your physical machine).

This sounded like a great idea, and I was willing to set up a second, PS/2 mouse to control just the host, if necessary. Without connecting a second mouse, I tried passing the Logitech mouse as a USB device to the VM, just as I would an external hard drive, but VMware prevented this, with a warning message:

[Machine Name] – VMware Workstation
Cannot connect “Logitech USB-PS/2 Optical Mouse” to this virtual machine. The host requires this device for input.
[OK]

The second step would have been to go into Device Manager, click Actions, and then choose “Scan for hardware changes”.

I didn’t get to the second step, as I was too lazy to track down a PS/2 mouse to keep attached to the host, and I still wanted to find a software solution. I suspect, though, that this would be were to begin, were I to need to get SetPoint running in the guest OS.

Summary

While I wasn’t able to figure out how to install SetPoint on a guest OS, the workaround of installing SetPoint on the host OS seems to accomplish my goal.

I just picked up an old Dell Precision 690 workstation, which I intend to develop into a file server, a Windows IIS server, and an Ubuntu LAMP server. This monster was built in 2006, but it still has some neat specs and tons of capacity (7 PCI slots, 4 hard drive bays, etc…), should I want to expand further.

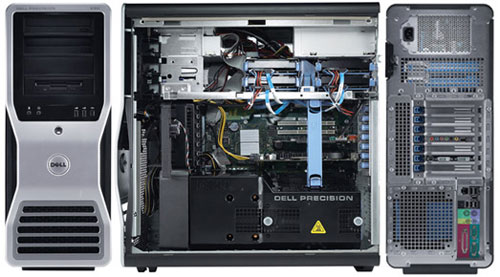
Dell Precision 690

Dell Precision 690 Workstation

The main specs

CPU: Dual Core Intel Xeon 5060 3.2GHz, 4M Cache, 1066 MHz FSB
RAM: 2GB DDR2 PC2-5300, CL=5, Fully Buffered, ECC, DDR2-667
HD: SAS Fujitsu MAX3073RC 73GB, 15000 RPM, 16MB Cache
Video: Nvidia Quadro NVS 285 PCI-Express, 128MB

This is not a normal tower

Right away, the size of this thing suggests it isn’t a normal tower. It’s about up to my knee and weights 70 lbs. It feels like it’s made with heavier gauge steel than the typical chassis, but that may be me projecting.

I immediately shopped around for more RAM, obviously. 2GB seems a little thin, even by 2006 standards, when considering the way everything else is high-end. The mainboard has 8 slots and supports up to 32GB, but I figure 6GB is a safe place to start.

The workstation has three enormous fans, like, big-as-your-hand big. Running it with the chassis open causes some sort of thermal protection system to kick in and it spins the fans up to the point that they were blowing stuff on the floor half-way across the room.

The CPU has a big, passive heat sink with six copper pipes and sits between two of those fans. I’m tempted to buy a second CPU, but I’ll hold off.

I’m still on the fence about the SCSI drive. It should be super fast, but I’m a little spoiled by the SSD in my machine at work, so it’s hard to get excited about a mechanical drive, even one running at 15k RPM.

The Nvidia Quadro card is also fanless, and has a bizarre DMS-59 connector. An adapter converts the DMS-59 connector into two DVI outputs.

The other day, I needed to extract a 7 GB zip file containing a VMware virtual machine onto the hard drive of a nearly stock 64-bit Windows 7 Professional machine. Because this machine did not have a third-party compression utility installed, I tried to extract it using Windows’ native zip utility, called Compressed Folders.

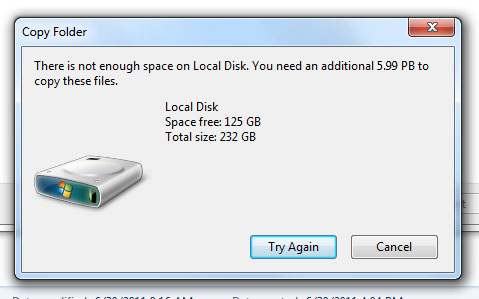
This failed with a pretty neat error.

You need an additional 5.99 PB to copy these files.

As you can see in the screenshot above, Windows reported that…

Copy Folder

There is not enough space on Local Disk. You need an additional 5.99 PB to copy these files.

Local Disk
Space free: 125 GB
Total size: 232 GB

[Try Again] [Cancel]

I found the 5.99 petabyte requirement pretty amusing, but I was in a hurry, so I downloaded the excellent 7-Zip, unpacked the file, and set about building the vm.

I had meant to write a post about the error message, but some time passed and I forgot all about it. Then, about three weeks later, someone else in the department tried to extract a copy of the file on a 32-bit Windows XP Professional machine and got the same error. At that point, I had to investigate.

The Compressed Folders native Windows utility seemed to be unable to accurately calculate the free space needed to extract the file. The file was admittedly pretty large, but was size the only reason?

According to the Wikipedia page on ZIP files, there are a number of known limitations of Compressed Folders.

ZIP64, AES Encryption, split or spanned archives, and Unicode entry encoding are not known to be readable or writable by the Compressed Folders feature in Windows XP or Windows Vista.

http://en.wikipedia.org/wiki/ZIP_(file_format)#Windows_compressed_folders

None of these things applied to my file, but I found a rather telling and simultaneously ambiguous (go figure) KB article at Microsoft Support: Compressed folder becomes corrupted when larger than 2 gigabytes.

According to various threads, the popular theory is that the problem stems from size limitations on compressed files. Windows Vista and later have a 4 GB limit (compressed and uncompressed size), while XP has a 2 GB limit.

Strangely, the same error appears before a copy process when the OS encounters a file that exceeds its maximum individual file size, which I can understand, but find a bit confusing in the context of a zip file. Certainly, both Windows 7 and XP (NTFS) were able to handle the file to begin with, and only had a problem when decompressing it.

My best guess is that the file was created using the Compressed Folders feature on XP. The file exceeded the maximum size limit for that version of Windows, but due to the bug described in MS KB article 301325, the file was created anyway using 32-bit headers. When the file was later opened by Compressed Folders, the 64-bit headers were read (as a file of that size would naturally use 64-bit headers), but that information was garbage, preventing Windows from accurately calculating the space required to extract.

If anyone has a more complete understanding of the cause of this error, please leave me a comment.

I’m running XAMPP 1.7.4 [PHP: 5.3.5] (not as a service) on 64-bit Windows 7 Professional.

I installed XAMPP to E:\xampp, and I have pinned the XAMPP Control Panel (xampp-control.exe) to the taskbar for easier access, but starting up xampp-control.exe from that shortcut throws an error:

XAMPP Control

XAMPP Component Status Check failure [3].

Current directory: E:\xampp

Run this program only from your XAMPP root directory.

[OK] [Cancel]

Strangely enough, I even get this error even when running xampp-control.exe from my XAMPP root directory, which really is E:\xampp.

The last post in the thread at http://www.apachefriends.org/f/viewtopic.php?f=16&t=44320&sid=a41029c6a36bbf5b3bb5817f37842340&start=60 offers a simple solution: change the Install_Dir value under HKEY_LOCAL_MACHINE to point to C:\xampp. According to the thread, the error message is due to a bug where the Install_Dir is checked against a hard-coded path on C:\. That may or may not be the case, but the suggested work-around seems to be effective.

Here’s a registry merge for Windows 7 64-bit that will make the change for you.

Windows Registry Editor Version 5.00

[HKEY_LOCAL_MACHINE\SOFTWARE\Wow6432Node\xampp]
"Install_Dir"="C:\\xampp"

Now xampp-control.exe launches without the error, and I haven’t noticed anything (PHP, MySQL, etc.) not working because of the bogus path.

Back in May of 2011, the Xbox.com forums were redesigned. The old forum’s content was transferred to a new subdomain at http://forumsarchive.xbox.com/ and left to rot.

What happened to all the stuff in the “old” forums?

For a limited time, all your posts from the previous version of the forums live on forumsarchive.xbox.com (will be available shortly after the new forums have gone live). They are available for you to go grab any FAQs, walkthroughs, and other valuable posts that you created, so you can repost them in the new forums.

http://forums.xbox.com/xbox_forums/forum_faq/f/6/p/3058/19910.aspx

That isn’t quite true, as I’ve found links in posts on ardamis.com to at least one thread that I’d started on the old forum that is missing from the archive, so there has obviously been some culling happening.

I suspect that not only were countless useful threads simply abandoned or even deleted, but probably millions of inbound links to xbox.com were left to 404.

Instead of redirecting all of the links to the old forum threads, visitors following those links now see an ugly IIS server error message.

Server Error in ‘/’ Application.

The resource cannot be found.

Description: HTTP 404. The resource you are looking for (or one of its dependencies) could have been removed, had its name changed, or is temporarily unavailable. Please review the following URL and make sure that it is spelled correctly.

Requested URL: /31685953/ShowPost.aspx

It’s stunning, actually, how poorly this transition was handled, and I’m not alone in thinking that. There are even threads on the new forum about how much better the old one was. I cannot picture any metric by which improvement is measured that would indicate this change was successful. And I would love to know how the decision was made to let tons of inbound links 404. Who on earth would allow this to happen to their site?

One of my most popular articles at ardamis.com was a description of the slow death of my Xbox 360 at the hands of FFXIII, which thankfully didn’t link to the forum threads that it referenced for support. All those threads on how either a) Final Fantasy XIII broke dozens of Xbox 360s, or b) dozens of Xbox 360s just happened to break as people were playing Final Fantasy XIII, disappeared. But I’ve begun a new one, for posterity (and not because I still play the game, which I found to be a huge disappointment). So, to keep the flame of discontent burning, here’s the link to the new thread on Final Fantasy XIII freezing on Xbox 360.

On the upside, a quick look at the HTML of the new pages suggests that the links are not nofollowed, which is something else I found interesting about the old forums.

It’s widely known that Microsoft allows anyone to install and use any version of Windows 7 for 30 days without having to enter a product activation key. By using the slmgr -rearm command, this 30-day trial period can be extended three times for a total of 120 days before the installation must be activated to continue functioning.

It is less known, perhaps, that Microsoft has implemented a similar method for delaying the activation of Office 2010 for up to 180 days. The steps below are from the Deploy volume activation of Office 2010 instructions on TechNet.

To rearm your Office 2010 installation

  1. Make sure all Office 2010 applications are closed.
  2. Open an elevated command prompt.
  3. Go to %installdir%\%Program Files%\Common Files\Microsoft Shared\OfficeSoftwareProtectionPlatform. If you installed the 32-bit edition of Office 2010 on a 64-bit operating system, %Program Files% is the Program Files (x86) folder.
  4. Run ospprearm.exe.

(The italics are mine, as I was tripped up for awhile by looking for ospprearm.exe under C:\Program Files\, rather than the Program Files (x86) folder.)

The Office 2010 rearm delays the activation requirement for 30 days, and it can be used five times, for a total of 180 days of activation-free use.

Back in February, 2010, I posted instructions on how to create a bootable USB drive that can install any version of Windows 7. As of yesterday, ISOs of updated versions of Windows 7 with SP1 have been made available to Microsoft TechNet and MSDN subscribers.

If you want to update your install media with the ‘slipstreamed’ version, grab a torrent and then check it against the official Windows 7 SHA1 and ISO/CRC hashes.

The filenames for the 5/12/2011 versions of Windows 7 Ultimate are below.

Windows 7 Ultimate with Service Pack 1 (x64) – DVD (English): en_windows_7_ultimate_with_sp1_x64_dvd_u_677332.iso
(http://thepiratebay.org/torrent/6391716/Windows_7_x64_SP1_MSDN_Technet_May_2011_Refresh)

Windows 7 Ultimate with Service Pack 1 (x86) – DVD (English): en_windows_7_ultimate_with_sp1_x86_dvd_u_677460.iso

Nearly a year ago, I wrote a post on how to detect and fix Word add-in problems with a macro and batch file, in a Windows XP and Office 2007 environment.

This was sufficiently effective, but it was also overly complicated, requiring four separate components:

  1. an autoexec Word 2007 macro that runs each time Word is opened
  2. a batch file that runs the registry merge file and writes an entry to a log file
  3. the registry merge file that contains the correct LoadBehavior settings for the add-ins
  4. a text file that acts as a log

This month, I decided to rewrite the macro to handle the registry changes and write to the log file. It was also a good opportunity to dig a bit deeper into VBA, and I also wanted to confirm that it would work in a more modern environment of Windows 7 and Office 2010 (that code is near the bottom of the post). The new system has only two components:

  1. an autoexec Word 2007 macro that runs each time Word is opened
  2. a text file that acts as a log

Background

First, a bit of background.

Many of the problems with Word 2007 are due to Word’s handling of add-ins. When something unexpected happens in Word, and Word attributes the problem to an add-in, Word will react by flagging it and prompting the user for a decision the next time Word opens. Depending on the severity of the problem and the user’s response, the add-in can be either ‘hard-disabled’ or ‘soft-disabled’.

Microsoft explains the differences between Hard Disabled vs Soft Disabled in a MSDN article at: http://msdn.microsoft.com/en-us/library/ms268871(VS.80).aspx.

I’ve explained a bit about the process by which Word disables add-ins at the end of this post, and I’ve written a shorter post about the basics behind the registry keys responsible for disabling add-ins.

Handling disabled add-ins programmatically

A Word macro can access the condition of an add-in via an Application.COMAddIns object, and it can read and write to the registry. This allows us to tell when an add-in has been disabled and re-enabled it.

My macro has some admittedly hackish parts that need to be cleaned up, there is the matter of unsetting variables to be addressed, and it could certainly be made more elegant, but it works. Note that a file named addinslog.txt must exist in the %TEMP% directory in order for the macro to write the log file. This is what the Word 2007 macro looks like, using the COM add-in installed with Adobe Acrobat 8 Standard as the required add-in…

Option Explicit

' Set up a function to search for a key and return true or false
Public Function KeyExists(key)
    Dim objShell
    On Error Resume Next
    Set objShell = CreateObject("WScript.Shell")
        objShell.RegRead (key)
    Set objShell = Nothing
    If Err = 0 Then KeyExists = True
End Function
    

Sub AutoExec()
'
' FixMissingAddins Macro
' Display a message box with any critical but not 'Connected' COM add-ins, then fix them programatically
'
' Oliver Baty
' June, 2010 - April, 2011
'
' Information on the Application.COMAddIns array
' http://msdn.microsoft.com/en-us/library/aa831759(v=office.10).aspx
'
' Running macros automatically
' http://support.microsoft.com/kb/286310
'
' Using Windows Scripting Shell (WshShell) to read from and write to the local registry
' http://technet.microsoft.com/en-us/library/ee156602.aspx

   
' Declare the WshShell variable (this is used to edit the registry)
    Dim WshShell
    
' Declare the fso and logFile variables (these are used to write to a txt file)
    Dim fso
    Dim logFile

' Create an instance of the WScript Shell object
    Set WshShell = CreateObject("WScript.Shell")
   
' Declare some other variables
   Dim MyAddin As COMAddIn
   Dim stringOfAddins As String
   Dim listOfDisconnectedAddins As String
   Dim requiredAddIn As Variant
   Dim msg As String

   
' Notes on deleting registry keys and values in VB
' http://www.vbforums.com/showthread.php?t=425483
' http://www.tek-tips.com/viewthread.cfm?qid=674375
' http://www.robvanderwoude.com/vbstech_registry_wshshell.php

' Create a string containing the names of all 'Connected' COM add-ins named "stringOfAddins"
   For Each MyAddin In Application.COMAddIns
      If MyAddin.Connect = True Then
          stringOfAddins = stringOfAddins & MyAddin.ProgID & " - "
      End If
   Next
   
' Create an array to hold the names of the critical (required) add-ins named "requiredAddIns"
' Example: change to "Dim requiredAddIns(0 To 4)" if the macro is checking 5 total add-ins)
   Dim requiredAddIns(0 To 0) As String
   
' Add each required AddIn to the array
   requiredAddIns(0) = "PDFMaker.OfficeAddin"
'   requiredAddIns(1) = ""
'   requiredAddIns(2) = ""
'   requiredAddIns(3) = ""
'   requiredAddIns(4) = ""
   
' Cycle through the array of required add-ins, and see if they exist in the connected add-ins list
   For Each requiredAddIn In requiredAddIns
      If InStr(stringOfAddins, requiredAddIn) Then
        ' The required add-in is in the string of connected add-ins
         msg = msg
      Else
        ' The required add-in is not in the string of connected add-ins, so add the add-in name to a string named "listOfDisconnectedAddins"
         msg = msg & requiredAddIn & vbCrLf
         listOfDisconnectedAddins = requiredAddIn & " " & listOfDisconnectedAddins
         listOfDisconnectedAddins = Trim(listOfDisconnectedAddins)
      End If
   Next
   
' If the msg variable is not blank (it contains at least one add-in's name) handle it, otherwise, do nothing
   If msg = "" Then
        ' There are no critical, unconnected add-ins (yay!)
        ' The script can now exit
   Else
        ' There are critical add-ins that are not connected, so handle this
        MsgBox "The following critical Word Add-In(s) are disabled: " & vbCrLf & vbCrLf & msg & vbCrLf & vbCrLf & "To correct this problem, please save any documents you are working on, then close Word and reopen Word."

            ' I find it extremely hackish to check for each possible key and delete it if found... need to research how to delete the tree
            ' One potential obstacle to this method is that I've seen a DocumentRecovery subkey under Resiliency (only once, while editing this macro), that I haven't researched yet
            
            
            ' Note: Since the WSH Shell has no Enumeration functionality, you cannot
            '       use the WSH Shell object to delete an entire "tree" unless you
            '       know the exact name of every subkey.
            '       If you don't, use the WMI StdRegProv instead.
            ' http://www.robvanderwoude.com/vbstech_registry_wshshell.php

            ' More info on WMI StdRegProv at:
            ' http://msdn.microsoft.com/en-us/library/aa393664(v=vs.85).aspx
            
        ' This is hackish, but it effectively deletes a registry key, if it exists
        If KeyExists("HKEY_CURRENT_USER\Software\Microsoft\Office\12.0\Word\Resiliency\DisabledItems\") Then
            WshShell.RegDelete "HKCU\Software\Microsoft\Office\12.0\Word\Resiliency\DisabledItems\"
        ElseIf KeyExists("HKEY_CURRENT_USER\Software\Microsoft\Office\12.0\Word\Resiliency\StartupItems\") Then
            WshShell.RegDelete "HKCU\Software\Microsoft\Office\12.0\Word\Resiliency\StartupItems\"
        ElseIf KeyExists("HKEY_CURRENT_USER\Software\Microsoft\Office\12.0\Word\Resiliency\") Then
            WshShell.RegDelete "HKCU\Software\Microsoft\Office\12.0\Word\Resiliency\"
        End If
        
        ' To be completely thorough, we can also set the desired LoadBehavior for certain add-ins
        ' This can be done selectively, and only if the LoadBehavior was incorrect, but the quick and dirty way would be to just force the values
        
        WshShell.RegWrite "HKLM\SOFTWARE\Microsoft\Office\Word\Addins\PDFMaker.OfficeAddin\LoadBehavior", 3, "REG_DWORD"

        ' Release the WshShell object
        Set WshShell = Nothing
        
        ' Declare a few variables for the log file
        Dim user, machine, datetime, output
        
        Set WshShell = CreateObject("WScript.Shell")
        user = WshShell.ExpandEnvironmentStrings("%USERNAME%")
        machine = WshShell.ExpandEnvironmentStrings("%COMPUTERNAME%")
        temp = WshShell.ExpandEnvironmentStrings("%TEMP%")
        ' Convert the slashes in Now to hyphens to prevent a fatal error
        datetime = Replace(Now, "/", "-")
        ' Create the string that will be written to the log file
        output = datetime + ", " + user + ", " + machine + ", " + listOfDisconnectedAddins

        ' Write the event to a log file
        logfile = temp + "\addinslog.txt"
        ' http://msdn.microsoft.com/en-us/library/2z9ffy99(v=vs.85).aspx
        ' http://www.devguru.com/technologies/vbscript/quickref/filesystemobject_opentextfile.html
        Set fso = CreateObject("Scripting.FileSystemObject")
        Set logFile = fso.OpenTextFile(logfile, 8, True)
        logFile.WriteLine (output)
        logFile.Close
        Set logFile = Nothing
        Set fso = Nothing
        
        ' Should we clear the variables?
        
        ' Release the WshShell object
        Set WshShell = Nothing
   End If
   
   ' Ardamis.com - We're in your macros, fixing your COM add-ins.
End Sub
While working on this, I found that there were some gaps in my understanding of the sequence of events that occur when Word 2007 disables a COM add-in. Please comment if you find that any of this is inaccurate or incomplete.

What happens when Word launches

A critical key to the whole business of Word add-ins is HKEY_CURRENT_USER\Software\Microsoft\Office\12.0\Word\Resiliency

When Word launches, it looks for data under the Resiliency key and a subkey: HKEY_CURRENT_USER\Software\Microsoft\Office\12.0\Word\Resiliency\StartupItems

If the StartupItems subkey contains a REG_BINARY value that corresponds to an add-in, Word throws the familiar warning:

Microsoft Office Word
Word experienced a serious problem with the ‘[addin name]’ add-in. If you have seen this message multiple times, you should disable this add-in and check to see if an update is available. Do you want to disable this add-in?
[Yes] [No]

Choosing No at the prompt removes the Resiliency key and allows Word to continue to launch, leaving the LoadBehavior for that add-in unchanged.

Choosing No also writes an Error event to the Application Event Viewer log:

Event Type:	Error
Event Source:	Microsoft Office 12
Event Category:	None
Event ID:	2000
Date:		5/23/2011
Time:		3:15:29 PM
User:		N/A
Computer:	[WORKSTATION_NAME]
Description:
Accepted Safe Mode action : Microsoft Office Word.

For more information, see Help and Support Center at http://go.microsoft.com/fwlink/events.asp.

Choosing Yes at the prompt removes the StartupItems subkey and creates a new DisabledItems subkey. This DisabledItems subkey will contain a different REG_BINARY value, the data of which contains information about the disabled add-in.

Choosing Yes also writes an Error event to the Application Event Viewer log:

Event Type:	Error
Event Source:	Microsoft Office 12
Event Category:	None
Event ID:	2001
Date:		5/23/2011
Time:		3:12:36 PM
User:		N/A
Computer:	[WORKSTATION_NAME]
Description:
Rejected Safe Mode action : Microsoft Office Word.

For more information, see Help and Support Center at http://go.microsoft.com/fwlink/events.asp.

At this point, the add-in is ‘hard-disabled’, but not ‘soft-disabled’.

Word then continues to launch, but without loading the add-in.

To see which add-ins have been hard-disabled, click on the Office Button | Word Options | Add-Ins, and scroll down to “Disabled Application Add-ins”.

To see which add-ins have been soft-disabled, click on the Office Button | Word Options | Add-Ins. Select “COM Add-Ins” in the Manage menu and click Go.

Word is somewhat tricky in this regard, as the add-in will not have a checkmark, but the LoadBehavior registry value will be unchanged. At any other time, the presence of a checkmark is an indication of the LoadBehavior, but when an add-in has been hard-disabled, the box will always be unchecked.

What users can do at this point

Going through Word Options and enabling the hard-disabled COM add-in will remove the Resiliency key. This may not make the add-in immediately available in Word, however.

To immediately load the add-in and gain its functionality, you can check the box. Otherwise, close and reopen Word, which will cause Word to launch with the add-in’s specified LoadBehavior.

In case you were curious about the keyboard shortcuts used to enable the first disabled add-in in the list of disabled add-ins (maybe you wanted to do something with SendKeys, for example), they are:
Alt+F, I, A, A, Tab, Tab, Tab, D, Enter, G, Space, Alt+E, C, Alt+F4.

In summary, deleting the Resiliency key after the “serious problem” prompt, then closing and reopening Word, returns Word to a normal operating state.

What I intend to accomplish with the macro is to re-enable the hard-disabled add-in, return any LoadBehavior values back to the desired settings, then prompt the user to save their work and close and reopen Word.

This should return Word to a working state.

Word 2010 on 64-bit Windows 7

As a bonus, here’s the same macro, with some minor adjustments to run in Word 2010 on Windows 7 64-bit, with Adobe Acrobat 9 Pro’s COM add-in acting as one of the required add-ins. The OneNote add-in is not enabled in Word by default, and the macro below does not attempt to enable it, but does consider it a required add-in. This is done to demonstrate the pop-up window. Note that a file named addinslog.txt must exist in the %TEMP% directory in order for the macro to write the log file.

Option Explicit

' Set up a function to search for a key and return true or false
Public Function KeyExists(key)
    Dim objShell
    On Error Resume Next
    Set objShell = CreateObject("WScript.Shell")
        objShell.RegRead (key)
    Set objShell = Nothing
    If Err = 0 Then KeyExists = True
End Function

Sub AutoExec()
'
' FixMissingAddins Macro
' Display a message box with any critical but not 'Connected' COM add-ins, then fix them programatically
'
' Oliver Baty
' June, 2010 - April, 2011
'
' Information on the Application.COMAddIns array
' http://msdn.microsoft.com/en-us/library/aa831759(v=office.10).aspx
'
' Running macros automatically
' http://support.microsoft.com/kb/286310
'
' Using Windows Scripting Shell (WshShell) to read from and write to the local registry
' http://technet.microsoft.com/en-us/library/ee156602.aspx

' Declare the WshShell variable (this is used to edit the registry)
    Dim WshShell

' Declare the fso and logFile variables (these are used to write to a txt file)
    Dim fso
    Dim logfile

' Create an instance of the WScript Shell object
    Set WshShell = CreateObject("WScript.Shell")

' Declare some other variables
   Dim MyAddin As COMAddIn
   Dim stringOfAddins As String
   Dim listOfDisconnectedAddins As String
   Dim requiredAddIn As Variant
   Dim msg As String

' Notes on deleting registry keys and values in VB
' http://www.vbforums.com/showthread.php?t=425483
' http://www.tek-tips.com/viewthread.cfm?qid=674375
' http://www.robvanderwoude.com/vbstech_registry_wshshell.php

' Create a string containing the names of all 'Connected' COM add-ins named "stringOfAddins"
   For Each MyAddin In Application.COMAddIns
      If MyAddin.Connect = True Then
          stringOfAddins = stringOfAddins & MyAddin.ProgID & " - "
      End If
   Next

' Create an array to hold the names of the critical (required) add-ins named "requiredAddIns"
' Example: change to "Dim requiredAddIns(0 To 4)" if the macro is checking 5 total add-ins)
   Dim requiredAddIns(0 To 1) As String

' Add each required AddIn to the array
   requiredAddIns(0) = "PDFMaker.OfficeAddin"
   requiredAddIns(1) = "OneNote.WordAddinTakeNotesService"
'   requiredAddIns(2) = ""
'   requiredAddIns(3) = ""
'   requiredAddIns(4) = ""

' Cycle through the array of required add-ins, and see if they exist in the connected add-ins list
   For Each requiredAddIn In requiredAddIns
      If InStr(stringOfAddins, requiredAddIn) Then
        ' The required add-in is in the string of connected add-ins
         msg = msg
      Else
        ' The required add-in is not in the string of connected add-ins, so add the add-in name to a string named "listOfDisconnectedAddins"
         msg = msg & requiredAddIn & vbCrLf
         listOfDisconnectedAddins = requiredAddIn & " " & listOfDisconnectedAddins
         listOfDisconnectedAddins = Trim(listOfDisconnectedAddins)
      End If
   Next

' If the msg variable is not blank (it contains at least one add-in's name) handle it, otherwise, do nothing
   If msg = "" Then
        ' There are no critical, unconnected add-ins (yay!)
        ' The script can now exit
   Else
        ' There are critical add-ins that are not connected, so handle this
        MsgBox "The following critical Word Add-In(s) are disabled: " & vbCrLf & vbCrLf & msg & vbCrLf & vbCrLf & "To correct this problem, please save any documents you are working on, then close Word and reopen Word."

            ' I find it extremely hackish to check for each possible key and delete it if found... need to research how to delete the tree
            ' One potential obstacle to this method is that I've seen a DocumentRecovery subkey under Resiliency (only once, while editing this macro), that I haven't researched yet

            ' Note: Since the WSH Shell has no Enumeration functionality, you cannot
            '       use the WSH Shell object to delete an entire "tree" unless you
            '       know the exact name of every subkey.
            '       If you don't, use the WMI StdRegProv instead.
            ' http://www.robvanderwoude.com/vbstech_registry_wshshell.php

            ' More info on WMI StdRegProv at:
            ' http://msdn.microsoft.com/en-us/library/aa393664(v=vs.85).aspx

        ' This is hackish, but it effectively deletes a registry key, if it exists
        If KeyExists("HKEY_CURRENT_USER\Software\Microsoft\Office\14.0\Word\Resiliency\DisabledItems\") Then
            WshShell.RegDelete "HKCU\Software\Microsoft\Office\14.0\Word\Resiliency\DisabledItems\"
        ElseIf KeyExists("HKEY_CURRENT_USER\Software\Microsoft\Office\14.0\Word\Resiliency\StartupItems\") Then
            WshShell.RegDelete "HKCU\Software\Microsoft\Office\14.0\Word\Resiliency\StartupItems\"
        ElseIf KeyExists("HKEY_CURRENT_USER\Software\Microsoft\Office\14.0\Word\Resiliency\") Then
            WshShell.RegDelete "HKCU\Software\Microsoft\Office\14.0\Word\Resiliency\"
        End If

        ' To be completely thorough, we can also set the desired LoadBehavior for certain add-ins
        ' This can be done selectively, and only if the LoadBehavior was incorrect, but the quick and dirty way would be to just force the values

        WshShell.RegWrite "HKCU\Software\Microsoft\Office\Word\Addins\PDFMaker.OfficeAddin\LoadBehavior", 3, "REG_DWORD"

        ' Release the WshShell object
        Set WshShell = Nothing

        ' Declare a few variables for the log file
        Dim user, machine, temp, datetime, output

        Set WshShell = CreateObject("WScript.Shell")
        user = WshShell.ExpandEnvironmentStrings("%USERNAME%")
        machine = WshShell.ExpandEnvironmentStrings("%COMPUTERNAME%")
        temp = WshShell.ExpandEnvironmentStrings("%TEMP%")
        ' Convert the slashes in Now to hyphens to prevent a fatal error
        datetime = Replace(Now, "/", "-")
        ' Create the string that will be written to the log file
        output = datetime + ", " + user + ", " + machine + ", " + listOfDisconnectedAddins

        ' Write the event to a log file
        logfile = temp + "\addinslog.txt"
        ' http://msdn.microsoft.com/en-us/library/2z9ffy99(v=vs.85).aspx
        ' http://www.devguru.com/technologies/vbscript/quickref/filesystemobject_opentextfile.html
        Set fso = CreateObject("Scripting.FileSystemObject")
        Set logfile = fso.OpenTextFile(logfile, 8, True)
        logfile.WriteLine (output)
        logfile.Close
        Set logfile = Nothing
        Set fso = Nothing
        
        ' Should we clear the variables?

        ' Release the WshShell object
        Set WshShell = Nothing
   End If

   ' Ardamis.com - We're in your macros, fixing your COM add-ins.
End Sub
I had set up a hard drive with two Windows XP installations on separate partitions and used GRUB to choose between them at boot. Eventually, I needed only one of these installations and wanted to clone/copy it to a separate drive. I happened to have an old copy of Ghost 2003, so I used that to clone the partition I wanted to keep.

But when I tried to boot that install, all I got was the word GRUB on an otherwise blank screen after the POST.

I did some Googling and found the How to remove GRUB loader!? post at ntcompatible.com.

Basically, you can get around this problem by replacing the boot sector and MBR.

  1. Boot into Recovery Console with the XP install media by choosing the Repair option
  2. Choose the installation to work on
  3. At the command prompt (assuming your installation is on C:), enter: fixboot c:
  4. Proceed through any warnings
  5. At the command prompt, enter: map
  6. Record the name of the device on which you will be writing the new master boot record
  7. At the command prompt, enter: fixmbr [device_name] (where the device name is something like DeviceHardDisk0
  8. Proceed through any warnings
  9. Exit Recovery Console and reboot

Resources: Windows XP Professional Product Documentation – fixboot and Windows XP Professional Product Documentation – fixmbr