Tag Archives: templates

I like Akismet, and it’s undeniably effective in stopping the vast majority of spam, but it adds a huge number of comments to the database and a very small percentage of comments still get through to my moderation queue.

It’s annoying to find comments in my moderation queue, but what I really object to is the thousands of records that are added to the database each month that I don’t see.

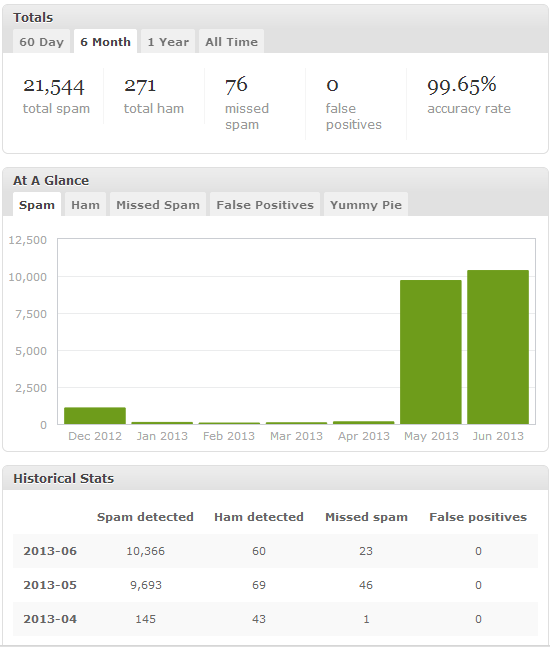
In the screenshot below, January through April show very few spam comments being detected by Akismet. This is because I was using my cache-friendly method for reducing WordPress comment spam to block spam comments even before Akismet analyzed them.

Akismet stats

In May, I moved hosting providers to asmallorange.com and started with a fresh install of WordPress without implementing my custom spam method, which admittedly was not ideal because it involved changing core files. This left only Akismet between the spammers and my WordPress database. Since that time, instead of 150 or fewer spam comments per month making it into my WordPress database, Akismet was on pace to let in over 10,000.

So, in the spirit of fresh starts and doing things the right way, I created a WordPress plug-in that uses the same timestamp method. It’s actually exactly the same JavaScript and PHP code, just in plug-in form, so it’s not bound to any core files or theme files.

Google’s Panda update and Google+ has motivated me to start using more cutting-edge technology at ardamis.com, starting with a new theme that makes better use of HTML5 and microformats.

I rather like the look of the current theme, but one of the metrics that Panda is supposedly weighting is bounce rate. Google Analytics indicates that the vast majority of my visitors arrive via organic search on Google while looking for answers to a particular problem. Whether or not they find their answer at ardamis.com, they tend not to click to other pages on the site. This isn’t bad, it’s just the way it works. I happen to be the same sort of user – generally looking for specific information and not casually surfing around a web site.

In the prior WordPress theme, I moved my navigation from the traditional location of along side the article to the bottom of the page, below the article. This cleaned up the layout tremendously and focused all the attention on the article, but it also made it even more likely that a visitor would bounce.

For the 2012 redesign, I moved the navigation back to the side and really concentrated on providing more obvious links to the About, Portfolio, Colophon and Contact pages.

I’ve been a fan of the HTML5 Boilerplate template for starting off hand-coded sites, and I’ve once again cherry-picked elements from it to use as a foundation. If you’re interested in a running start, you may try out the very nice Boilerplate WordPress theme by Aaron T. Grogg.

The latest version of the theme also faithfully follows the sometimes idiosyncratic whims of Google Webmaster Tools’ Rich Text Snippet Testing Tool. Look, no warnings.

Update 2015-01-02: About a month ago, in early December, 2014, Google announced that it was working on a new anti-spam API that is intended to replace the traditional CAPTCHA challenge as a method for humans to prove that they are not robots. This is very good news.
This week, I noticed that Akismet is adding a hidden input field to the comment form that contains a timestamp (although the plugin’s PHP puts the initial INPUT element within a P element set to DISPLAY:NONE, when the plugin’s JavaScript updates the value with the current timestamp, the INPUT element jumps outside of that P element). The injected code looks something like this:
<input type=”hidden” id=”ak_js” name=”ak_js” value=”1420256728989″>
I haven’t yet dug into the Akismet code to discover what it’s doing with the timestamp, but I’d be pleased if Akismet is attempting to differentiate humans from bots based on behavior.
Update 2015-01-10: To test the effectiveness of the current version of Akismet, I disabled the anti-spam plugin described in this post on 1/2/2015 and re-enabled it on 1/10/2015. In the span of 8 days, Akismet identified 1,153 spam comments and missed 15 more. These latest numbers continue to support my position that Akismet is not enough to stop spam comments.

In the endless battle against WordPress comment spam, I’ve developed and then refined a few different methods for preventing spam from getting to the database to begin with. My philosophy has always been that a human visitor and a spam bot behave differently (after all, the bots we’re dealing with are not Nexus-6 model androids here), and an effective spam-prevention method should be able to recognize the differences. I also have a dislike for CAPTCHA methods that require a human visitor to prove, via an intentionally difficult test, that they aren’t a bot. The ideal method, I feel, would be invisible to a human visitor, but still accurately identify comments submitted by bots.

Spam on ardamis.com in early 2012 - before and after

Spam on ardamis.com - before and after

A brief history of spam fighting

The most successful and simple method I found was a server-side system for reducing comment spam by using a handshake method involving timestamps on hidden form fields that I implemented in 2007. The general idea was that a bot would submit a comment more quickly than a human visitor, so if the comment was submitted too soon after the post page was loaded, the comment was rejected. A human caught in this trap would be able to click the Back button on the browser, wait a few seconds, and resubmit. This proved to be very effective on ardamis.com, cutting the number of spam comments intercepted by Akismet per day to nearly zero. For a long time, the only problem was that it required modifying a core WordPress file: wp-comments-post.php. Each time WordPress was updated, the core file was replaced. If I didn’t then go back and make my modifications again, I would lose the spam protection until I made the changes. As it became easier to update WordPress (via a single click in the admin panel) and I updated it more frequently, editing the core file became more of a nuisance.

A huge facepalm

When Google began weighting page load times as part of its ranking algorithm, I implemented the WP Super Cache caching plugin on ardamis.com and configured it to use .htaccess and mod_rewrite to serve cache files. Page load times certainly decreased, but the amount of spam detected by Akismet increased. After a while, I realized that this was because the spam bots were submitting comments from static, cached pages, and the timestamps on those pages, which had been generated server-side with PHP, were already minutes old when the page was requested. The form processing script, which normally rejects comments that are submitted too quickly to be written by a human visitor, happily accepted the timestamps. Even worse, a second function of my anti-spam method also rejected comments that were submitted 10 minutes or more after the page was loaded. Of course, most of the visitors were being served cached pages that were already more than 10 minutes old, so even legitimate comments were being rejected. Using PHP to generate my timestamps obviously was not going to work if I wanted to keep serving cached pages.

JavaScript to the rescue

Generating real-time timestamps on cached pages requires JavaScript. But instead of a reliable server clock setting the timestamp, the time is coming from the visitor’s system, which can’t be trusted to be accurate. Merely changing the comment form to use JavaScript to generate the first timestamp wouldn’t work, because verifying a timestamp generated on the client-side against one generated server-side would be disastrous.

Replacing the PHP-generated timestamps with JavaScript-generated timestamps would require substantial changes to the system.

Traditional client-side form validation using JavaScript happens when the form is submitted. If the validation fails, the form is not submitted, and the visitor typically gets an alert with suggestions on how to make the form acceptable. If the validation passes, the form submission continues without bothering the visitor. To get our two timestamps, we can generate a first timestamp when the page loads and compare it to a second timestamp generated when the form is submitted. If the visitor submits the form too quickly, we can display an alert showing the number of seconds remaining until the form can be successfully submitted. This client-side validation should hopefully be invisible to most visitors who choose to leave comments, but at the very least, far less irritating than a CAPTCHA system.

It took me two tries to get it right, but I’m going to discuss the less successful method first to point out its flaws.

Method One (not good enough)

Here’s how the original system flowed.

  1. Generate a first JS timestamp when the page is loaded.
  2. Generate a second JS timestamp when the form is submitted.
  3. Before the form contents are sent to the server, compare the two timestamps, and if enough time has passed, write a pre-determined passcode to a hidden INPUT element, then submit the form.
  4. After the form contents are sent to the server, use server-side logic to verify that the passcode is present and valid.

The problem was that it seemed that certain bots could parse JavaScript enough to drop the pre-determined passcode into the hidden form field before submitting the form, circumventing the timestamps completely and defeating the system.

Because the timestamps were only compared on the client-side, it also failed to adhere to one of the basic tenants of form validation – that the input must be checked on both the client-side and the server-side.

Method Two (better)

Rather than having the server-side validation be merely a check to confirm that the passcode is present, method two compares the timestamps a second time on the server side. Instead of a single hidden input, we now have two – one for each timestamp. This is intended to prevent a bot from figuring out the ultimate validation mechanism by simply parsing the JavaScript. Finally, the hidden fields are not in the HTML of the page when it’s sent to the browser, but are added to the form via jQuery, which makes it easier to implement and may act as another layer of obfuscation.

  1. Generate a first JS timestamp when the page is loaded and write it to a hidden form field.
  2. Generate a second JS timestamp when the form is submitted and write it to a hidden form field.
  3. Before the form contents are sent to the server, compare the two timestamps, and if enough time has passed, submit the form (client-side validation).
  4. On the form processing page, use server-side logic to compare the timestamps a second time (server-side validation).

This timestamp handshake works more like it did in the proven-effective server-side-only method. We still have to pass something from the comment form to the processing script, but it’s not too obvious from the HTML what is being done with it. Furthermore, even if a bot suspects that the timestamps are being compared, there is no telling from the HTML what the threshold is for distinguishing a valid comment from one that is invalid. (The JavaScript could be parsed by a bot, but the server-side check cannot be, making it possible to require a slightly longer amount of time to elapse in order to pass the server-side check.)

The same downside plagued me

For a long time, far longer than I care to admit, I stubbornly continued to modify the core file wp-comments-post.php to provide the server-side processing. But creating the timestamps and parsing them with a plug-in turned out to be a simple matter of two functions, and in June of 2013 I finally got around to doing it the right way.

The code

The plugin, in all its simplicity, is only 100 lines. Just copy this code into a text editor, save it as a .php file (the name isn’t important) and upload it to the /wp-content/plugins directory and activate it. Feel free to edit it however you like to suit your needs.

<?php

/*
Plugin Name: Timestamp Comment Filter
Plugin URI: //ardamis.com/2011/08/27/a-cache-proof-method-for-reducing-comment-spam/
Description: This plugin measures the amount of time between when the post page loads and the comment is submitted, then rejects any comment that was submitted faster than a human probably would or could.
Version: 0.1
Author: Oliver Baty
Author URI: //ardamis.com

    Copyright 2013  Oliver Baty  (email : obbaty@gmail.com)

    This program is free software; you can redistribute it and/or modify
    it under the terms of the GNU General Public License as published by
    the Free Software Foundation; either version 2 of the License, or
    (at your option) any later version.

    This program is distributed in the hope that it will be useful,
    but WITHOUT ANY WARRANTY; without even the implied warranty of
    MERCHANTABILITY or FITNESS FOR A PARTICULAR PURPOSE.  See the
    GNU General Public License for more details.

    You should have received a copy of the GNU General Public License
    along with this program; if not, write to the Free Software
    Foundation, Inc., 59 Temple Place, Suite 330, Boston, MA  02111-1307  USA
*/

// http://wordpress.stackexchange.com/questions/6723/how-to-add-a-policy-text-just-before-the-comments
function ard_add_javascript(){

	?>
	
<script type="text/javascript" src="//ajax.googleapis.com/ajax/libs/jquery/1.7.1/jquery.min.js"></script>
<script type="text/javascript">
$(document).ready(function(){
    ardGenTS1();
});
 
function ardGenTS1() {
    // prepare the form
    $('#commentform').append('<input type="hidden" name="ardTS1" id="ardTS1" value="1" />');
    $('#commentform').append('<input type="hidden" name="ardTS2" id="ardTS2" value="1" />');
    $('#commentform').attr('onsubmit', 'return validate()');
    // set a first timestamp when the page loads
    var ardTS1 = (new Date).getTime();
    document.getElementById("ardTS1").value = ardTS1;
}
 
function validate() {
    // read the first timestamp
    var ardTS1 = document.getElementById("ardTS1").value;
//  alert ('ardTS1: ' + ardTS1);
    // generate the second timestamp
    var ardTS2 = (new Date).getTime();
    document.getElementById("ardTS2").value = ardTS2;
//  alert ('ardTS2: ' + document.getElementById("ardTS2").value);
    // find the difference
    var diff = ardTS2 - ardTS1;
    var elapsed = Math.round(diff / 1000);
    var remaining = 10 - elapsed;
//  alert ('diff: ' + diff + '\n\n elapsed:' + elapsed);
    // check whether enough time has elapsed
    if (diff > 10000) {
        // submit the form
        return true;
    }else{
        // display an alert if the form is submitted within 10 seconds
        alert("This site is protected by an anti-spam feature that requires 10 seconds to have elapsed between the page load and the form submission. \n\n Please close this alert window.  The form may be resubmitted successfully in " + remaining + " seconds.");
        // prevent the form from being submitted
        return false;
    }
}
</script>
	
	<?php
}

add_action('comment_form_before','ard_add_javascript');

// http://wordpress.stackexchange.com/questions/89236/disable-wordpress-comments-api
function ard_parse_timestamps(){

	// Set up the elapsed time, in miliseconds, that is the threshold for determining whether a comment was submitted by a human
	$intThreshold = 10000;
	
	// Set up a message to be displayed if the comment is blocked
	$strMessage = '<strong>ERROR</strong>:  this site uses JavaScript validation to reduce comment spam by rejecting comments that appear to be submitted by an automated method.  Either your browser has JavaScript disabled or the comment appeared to be submitted by a bot.';
	
	$ardTS1 = ( isset($_POST['ardTS1']) ) ? trim($_POST['ardTS1']) : 1;
	$ardTS2 = ( isset($_POST['ardTS2']) ) ? trim($_POST['ardTS2']) : 2;
	$ardTS = $ardTS2 - $ardTS1;
	 
	if ( $ardTS < $intThreshold ) {
	// If the difference of the timestamps is not more than 10 seconds, exit
		wp_die( __($strMessage) );
	}
}
add_action('pre_comment_on_post', 'ard_parse_timestamps');

?>

That’s it. Not so bad, right?

Final thoughts

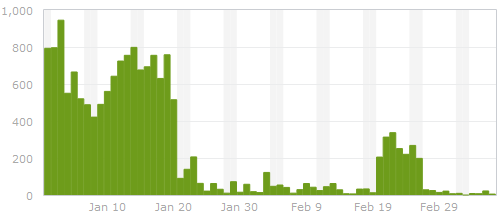
The screen-shot at the beginning of the post shows the number of spam comments submitted to ardamis.com and detected by Akismet each day from the end of January, 2012, to the beginning of March, 2012. The dramatic drop-off around Jan 20 was when I implemented the method described in this post. The flare-up around Feb 20 was when I updated WordPress and forgot to replace the modified core file for about a week, illustrating one of the hazards of changing core files.

If you would rather not add any hidden form fields to the comment form, you could consider appending the two timestamps to the end of the comment_post_ID field. Because its contents are cast as an integer in wp-comments-post.php when value of the $comment_post_ID variable is set, WordPress won’t be bothered by the extra data at the end of the field, so long as the post ID comes first and is followed by a space. You could then just explode the contents of the comment_post_ID field on the space character, then compare the last two elements of the array.

If you don’t object to meddling with a core file in order to obtain a little extra protection, you can rename the wp-comments-post.php file and change the path in the comment form’s action attribute. I’ve posted logs showing that some bots just try to post spam directly to the wp-comments-post.php file, so renaming that file is an easy way to cut down on spam. Just remember to come back and delete the wp-comments-post.php file each time you update WordPress.

Nearly a year ago, I wrote a post on how to detect and fix Word add-in problems with a macro and batch file, in a Windows XP and Office 2007 environment.

This was sufficiently effective, but it was also overly complicated, requiring four separate components:

  1. an autoexec Word 2007 macro that runs each time Word is opened
  2. a batch file that runs the registry merge file and writes an entry to a log file
  3. the registry merge file that contains the correct LoadBehavior settings for the add-ins
  4. a text file that acts as a log

This month, I decided to rewrite the macro to handle the registry changes and write to the log file. It was also a good opportunity to dig a bit deeper into VBA, and I also wanted to confirm that it would work in a more modern environment of Windows 7 and Office 2010 (that code is near the bottom of the post). The new system has only two components:

  1. an autoexec Word 2007 macro that runs each time Word is opened
  2. a text file that acts as a log

Background

First, a bit of background.

Many of the problems with Word 2007 are due to Word’s handling of add-ins. When something unexpected happens in Word, and Word attributes the problem to an add-in, Word will react by flagging it and prompting the user for a decision the next time Word opens. Depending on the severity of the problem and the user’s response, the add-in can be either ‘hard-disabled’ or ‘soft-disabled’.

Microsoft explains the differences between Hard Disabled vs Soft Disabled in a MSDN article at: http://msdn.microsoft.com/en-us/library/ms268871(VS.80).aspx.

I’ve explained a bit about the process by which Word disables add-ins at the end of this post, and I’ve written a shorter post about the basics behind the registry keys responsible for disabling add-ins.

Handling disabled add-ins programmatically

A Word macro can access the condition of an add-in via an Application.COMAddIns object, and it can read and write to the registry. This allows us to tell when an add-in has been disabled and re-enabled it.

My macro has some admittedly hackish parts that need to be cleaned up, there is the matter of unsetting variables to be addressed, and it could certainly be made more elegant, but it works. Note that a file named addinslog.txt must exist in the %TEMP% directory in order for the macro to write the log file. This is what the Word 2007 macro looks like, using the COM add-in installed with Adobe Acrobat 8 Standard as the required add-in…

Option Explicit

' Set up a function to search for a key and return true or false
Public Function KeyExists(key)
    Dim objShell
    On Error Resume Next
    Set objShell = CreateObject("WScript.Shell")
        objShell.RegRead (key)
    Set objShell = Nothing
    If Err = 0 Then KeyExists = True
End Function
    

Sub AutoExec()
'
' FixMissingAddins Macro
' Display a message box with any critical but not 'Connected' COM add-ins, then fix them programatically
'
' Oliver Baty
' June, 2010 - April, 2011
'
' Information on the Application.COMAddIns array
' http://msdn.microsoft.com/en-us/library/aa831759(v=office.10).aspx
'
' Running macros automatically
' http://support.microsoft.com/kb/286310
'
' Using Windows Scripting Shell (WshShell) to read from and write to the local registry
' http://technet.microsoft.com/en-us/library/ee156602.aspx

   
' Declare the WshShell variable (this is used to edit the registry)
    Dim WshShell
    
' Declare the fso and logFile variables (these are used to write to a txt file)
    Dim fso
    Dim logFile

' Create an instance of the WScript Shell object
    Set WshShell = CreateObject("WScript.Shell")
   
' Declare some other variables
   Dim MyAddin As COMAddIn
   Dim stringOfAddins As String
   Dim listOfDisconnectedAddins As String
   Dim requiredAddIn As Variant
   Dim msg As String

   
' Notes on deleting registry keys and values in VB
' http://www.vbforums.com/showthread.php?t=425483
' http://www.tek-tips.com/viewthread.cfm?qid=674375
' http://www.robvanderwoude.com/vbstech_registry_wshshell.php

' Create a string containing the names of all 'Connected' COM add-ins named "stringOfAddins"
   For Each MyAddin In Application.COMAddIns
      If MyAddin.Connect = True Then
          stringOfAddins = stringOfAddins & MyAddin.ProgID & " - "
      End If
   Next
   
' Create an array to hold the names of the critical (required) add-ins named "requiredAddIns"
' Example: change to "Dim requiredAddIns(0 To 4)" if the macro is checking 5 total add-ins)
   Dim requiredAddIns(0 To 0) As String
   
' Add each required AddIn to the array
   requiredAddIns(0) = "PDFMaker.OfficeAddin"
'   requiredAddIns(1) = ""
'   requiredAddIns(2) = ""
'   requiredAddIns(3) = ""
'   requiredAddIns(4) = ""
   
' Cycle through the array of required add-ins, and see if they exist in the connected add-ins list
   For Each requiredAddIn In requiredAddIns
      If InStr(stringOfAddins, requiredAddIn) Then
        ' The required add-in is in the string of connected add-ins
         msg = msg
      Else
        ' The required add-in is not in the string of connected add-ins, so add the add-in name to a string named "listOfDisconnectedAddins"
         msg = msg & requiredAddIn & vbCrLf
         listOfDisconnectedAddins = requiredAddIn & " " & listOfDisconnectedAddins
         listOfDisconnectedAddins = Trim(listOfDisconnectedAddins)
      End If
   Next
   
' If the msg variable is not blank (it contains at least one add-in's name) handle it, otherwise, do nothing
   If msg = "" Then
        ' There are no critical, unconnected add-ins (yay!)
        ' The script can now exit
   Else
        ' There are critical add-ins that are not connected, so handle this
        MsgBox "The following critical Word Add-In(s) are disabled: " & vbCrLf & vbCrLf & msg & vbCrLf & vbCrLf & "To correct this problem, please save any documents you are working on, then close Word and reopen Word."

            ' I find it extremely hackish to check for each possible key and delete it if found... need to research how to delete the tree
            ' One potential obstacle to this method is that I've seen a DocumentRecovery subkey under Resiliency (only once, while editing this macro), that I haven't researched yet
            
            
            ' Note: Since the WSH Shell has no Enumeration functionality, you cannot
            '       use the WSH Shell object to delete an entire "tree" unless you
            '       know the exact name of every subkey.
            '       If you don't, use the WMI StdRegProv instead.
            ' http://www.robvanderwoude.com/vbstech_registry_wshshell.php

            ' More info on WMI StdRegProv at:
            ' http://msdn.microsoft.com/en-us/library/aa393664(v=vs.85).aspx
            
        ' This is hackish, but it effectively deletes a registry key, if it exists
        If KeyExists("HKEY_CURRENT_USER\Software\Microsoft\Office\12.0\Word\Resiliency\DisabledItems\") Then
            WshShell.RegDelete "HKCU\Software\Microsoft\Office\12.0\Word\Resiliency\DisabledItems\"
        ElseIf KeyExists("HKEY_CURRENT_USER\Software\Microsoft\Office\12.0\Word\Resiliency\StartupItems\") Then
            WshShell.RegDelete "HKCU\Software\Microsoft\Office\12.0\Word\Resiliency\StartupItems\"
        ElseIf KeyExists("HKEY_CURRENT_USER\Software\Microsoft\Office\12.0\Word\Resiliency\") Then
            WshShell.RegDelete "HKCU\Software\Microsoft\Office\12.0\Word\Resiliency\"
        End If
        
        ' To be completely thorough, we can also set the desired LoadBehavior for certain add-ins
        ' This can be done selectively, and only if the LoadBehavior was incorrect, but the quick and dirty way would be to just force the values
        
        WshShell.RegWrite "HKLM\SOFTWARE\Microsoft\Office\Word\Addins\PDFMaker.OfficeAddin\LoadBehavior", 3, "REG_DWORD"

        ' Release the WshShell object
        Set WshShell = Nothing
        
        ' Declare a few variables for the log file
        Dim user, machine, datetime, output
        
        Set WshShell = CreateObject("WScript.Shell")
        user = WshShell.ExpandEnvironmentStrings("%USERNAME%")
        machine = WshShell.ExpandEnvironmentStrings("%COMPUTERNAME%")
        temp = WshShell.ExpandEnvironmentStrings("%TEMP%")
        ' Convert the slashes in Now to hyphens to prevent a fatal error
        datetime = Replace(Now, "/", "-")
        ' Create the string that will be written to the log file
        output = datetime + ", " + user + ", " + machine + ", " + listOfDisconnectedAddins

        ' Write the event to a log file
        logfile = temp + "\addinslog.txt"
        ' http://msdn.microsoft.com/en-us/library/2z9ffy99(v=vs.85).aspx
        ' http://www.devguru.com/technologies/vbscript/quickref/filesystemobject_opentextfile.html
        Set fso = CreateObject("Scripting.FileSystemObject")
        Set logFile = fso.OpenTextFile(logfile, 8, True)
        logFile.WriteLine (output)
        logFile.Close
        Set logFile = Nothing
        Set fso = Nothing
        
        ' Should we clear the variables?
        
        ' Release the WshShell object
        Set WshShell = Nothing
   End If
   
   ' Ardamis.com - We're in your macros, fixing your COM add-ins.
End Sub
While working on this, I found that there were some gaps in my understanding of the sequence of events that occur when Word 2007 disables a COM add-in. Please comment if you find that any of this is inaccurate or incomplete.

What happens when Word launches

A critical key to the whole business of Word add-ins is HKEY_CURRENT_USER\Software\Microsoft\Office\12.0\Word\Resiliency

When Word launches, it looks for data under the Resiliency key and a subkey: HKEY_CURRENT_USER\Software\Microsoft\Office\12.0\Word\Resiliency\StartupItems

If the StartupItems subkey contains a REG_BINARY value that corresponds to an add-in, Word throws the familiar warning:

Microsoft Office Word
Word experienced a serious problem with the ‘[addin name]’ add-in. If you have seen this message multiple times, you should disable this add-in and check to see if an update is available. Do you want to disable this add-in?
[Yes] [No]

Choosing No at the prompt removes the Resiliency key and allows Word to continue to launch, leaving the LoadBehavior for that add-in unchanged.

Choosing No also writes an Error event to the Application Event Viewer log:

Event Type:	Error
Event Source:	Microsoft Office 12
Event Category:	None
Event ID:	2000
Date:		5/23/2011
Time:		3:15:29 PM
User:		N/A
Computer:	[WORKSTATION_NAME]
Description:
Accepted Safe Mode action : Microsoft Office Word.

For more information, see Help and Support Center at http://go.microsoft.com/fwlink/events.asp.

Choosing Yes at the prompt removes the StartupItems subkey and creates a new DisabledItems subkey. This DisabledItems subkey will contain a different REG_BINARY value, the data of which contains information about the disabled add-in.

Choosing Yes also writes an Error event to the Application Event Viewer log:

Event Type:	Error
Event Source:	Microsoft Office 12
Event Category:	None
Event ID:	2001
Date:		5/23/2011
Time:		3:12:36 PM
User:		N/A
Computer:	[WORKSTATION_NAME]
Description:
Rejected Safe Mode action : Microsoft Office Word.

For more information, see Help and Support Center at http://go.microsoft.com/fwlink/events.asp.

At this point, the add-in is ‘hard-disabled’, but not ‘soft-disabled’.

Word then continues to launch, but without loading the add-in.

To see which add-ins have been hard-disabled, click on the Office Button | Word Options | Add-Ins, and scroll down to “Disabled Application Add-ins”.

To see which add-ins have been soft-disabled, click on the Office Button | Word Options | Add-Ins. Select “COM Add-Ins” in the Manage menu and click Go.

Word is somewhat tricky in this regard, as the add-in will not have a checkmark, but the LoadBehavior registry value will be unchanged. At any other time, the presence of a checkmark is an indication of the LoadBehavior, but when an add-in has been hard-disabled, the box will always be unchecked.

What users can do at this point

Going through Word Options and enabling the hard-disabled COM add-in will remove the Resiliency key. This may not make the add-in immediately available in Word, however.

To immediately load the add-in and gain its functionality, you can check the box. Otherwise, close and reopen Word, which will cause Word to launch with the add-in’s specified LoadBehavior.

In case you were curious about the keyboard shortcuts used to enable the first disabled add-in in the list of disabled add-ins (maybe you wanted to do something with SendKeys, for example), they are:
Alt+F, I, A, A, Tab, Tab, Tab, D, Enter, G, Space, Alt+E, C, Alt+F4.

In summary, deleting the Resiliency key after the “serious problem” prompt, then closing and reopening Word, returns Word to a normal operating state.

What I intend to accomplish with the macro is to re-enable the hard-disabled add-in, return any LoadBehavior values back to the desired settings, then prompt the user to save their work and close and reopen Word.

This should return Word to a working state.

Word 2010 on 64-bit Windows 7

As a bonus, here’s the same macro, with some minor adjustments to run in Word 2010 on Windows 7 64-bit, with Adobe Acrobat 9 Pro’s COM add-in acting as one of the required add-ins. The OneNote add-in is not enabled in Word by default, and the macro below does not attempt to enable it, but does consider it a required add-in. This is done to demonstrate the pop-up window. Note that a file named addinslog.txt must exist in the %TEMP% directory in order for the macro to write the log file.

Option Explicit

' Set up a function to search for a key and return true or false
Public Function KeyExists(key)
    Dim objShell
    On Error Resume Next
    Set objShell = CreateObject("WScript.Shell")
        objShell.RegRead (key)
    Set objShell = Nothing
    If Err = 0 Then KeyExists = True
End Function

Sub AutoExec()
'
' FixMissingAddins Macro
' Display a message box with any critical but not 'Connected' COM add-ins, then fix them programatically
'
' Oliver Baty
' June, 2010 - April, 2011
'
' Information on the Application.COMAddIns array
' http://msdn.microsoft.com/en-us/library/aa831759(v=office.10).aspx
'
' Running macros automatically
' http://support.microsoft.com/kb/286310
'
' Using Windows Scripting Shell (WshShell) to read from and write to the local registry
' http://technet.microsoft.com/en-us/library/ee156602.aspx

' Declare the WshShell variable (this is used to edit the registry)
    Dim WshShell

' Declare the fso and logFile variables (these are used to write to a txt file)
    Dim fso
    Dim logfile

' Create an instance of the WScript Shell object
    Set WshShell = CreateObject("WScript.Shell")

' Declare some other variables
   Dim MyAddin As COMAddIn
   Dim stringOfAddins As String
   Dim listOfDisconnectedAddins As String
   Dim requiredAddIn As Variant
   Dim msg As String

' Notes on deleting registry keys and values in VB
' http://www.vbforums.com/showthread.php?t=425483
' http://www.tek-tips.com/viewthread.cfm?qid=674375
' http://www.robvanderwoude.com/vbstech_registry_wshshell.php

' Create a string containing the names of all 'Connected' COM add-ins named "stringOfAddins"
   For Each MyAddin In Application.COMAddIns
      If MyAddin.Connect = True Then
          stringOfAddins = stringOfAddins & MyAddin.ProgID & " - "
      End If
   Next

' Create an array to hold the names of the critical (required) add-ins named "requiredAddIns"
' Example: change to "Dim requiredAddIns(0 To 4)" if the macro is checking 5 total add-ins)
   Dim requiredAddIns(0 To 1) As String

' Add each required AddIn to the array
   requiredAddIns(0) = "PDFMaker.OfficeAddin"
   requiredAddIns(1) = "OneNote.WordAddinTakeNotesService"
'   requiredAddIns(2) = ""
'   requiredAddIns(3) = ""
'   requiredAddIns(4) = ""

' Cycle through the array of required add-ins, and see if they exist in the connected add-ins list
   For Each requiredAddIn In requiredAddIns
      If InStr(stringOfAddins, requiredAddIn) Then
        ' The required add-in is in the string of connected add-ins
         msg = msg
      Else
        ' The required add-in is not in the string of connected add-ins, so add the add-in name to a string named "listOfDisconnectedAddins"
         msg = msg & requiredAddIn & vbCrLf
         listOfDisconnectedAddins = requiredAddIn & " " & listOfDisconnectedAddins
         listOfDisconnectedAddins = Trim(listOfDisconnectedAddins)
      End If
   Next

' If the msg variable is not blank (it contains at least one add-in's name) handle it, otherwise, do nothing
   If msg = "" Then
        ' There are no critical, unconnected add-ins (yay!)
        ' The script can now exit
   Else
        ' There are critical add-ins that are not connected, so handle this
        MsgBox "The following critical Word Add-In(s) are disabled: " & vbCrLf & vbCrLf & msg & vbCrLf & vbCrLf & "To correct this problem, please save any documents you are working on, then close Word and reopen Word."

            ' I find it extremely hackish to check for each possible key and delete it if found... need to research how to delete the tree
            ' One potential obstacle to this method is that I've seen a DocumentRecovery subkey under Resiliency (only once, while editing this macro), that I haven't researched yet

            ' Note: Since the WSH Shell has no Enumeration functionality, you cannot
            '       use the WSH Shell object to delete an entire "tree" unless you
            '       know the exact name of every subkey.
            '       If you don't, use the WMI StdRegProv instead.
            ' http://www.robvanderwoude.com/vbstech_registry_wshshell.php

            ' More info on WMI StdRegProv at:
            ' http://msdn.microsoft.com/en-us/library/aa393664(v=vs.85).aspx

        ' This is hackish, but it effectively deletes a registry key, if it exists
        If KeyExists("HKEY_CURRENT_USER\Software\Microsoft\Office\14.0\Word\Resiliency\DisabledItems\") Then
            WshShell.RegDelete "HKCU\Software\Microsoft\Office\14.0\Word\Resiliency\DisabledItems\"
        ElseIf KeyExists("HKEY_CURRENT_USER\Software\Microsoft\Office\14.0\Word\Resiliency\StartupItems\") Then
            WshShell.RegDelete "HKCU\Software\Microsoft\Office\14.0\Word\Resiliency\StartupItems\"
        ElseIf KeyExists("HKEY_CURRENT_USER\Software\Microsoft\Office\14.0\Word\Resiliency\") Then
            WshShell.RegDelete "HKCU\Software\Microsoft\Office\14.0\Word\Resiliency\"
        End If

        ' To be completely thorough, we can also set the desired LoadBehavior for certain add-ins
        ' This can be done selectively, and only if the LoadBehavior was incorrect, but the quick and dirty way would be to just force the values

        WshShell.RegWrite "HKCU\Software\Microsoft\Office\Word\Addins\PDFMaker.OfficeAddin\LoadBehavior", 3, "REG_DWORD"

        ' Release the WshShell object
        Set WshShell = Nothing

        ' Declare a few variables for the log file
        Dim user, machine, temp, datetime, output

        Set WshShell = CreateObject("WScript.Shell")
        user = WshShell.ExpandEnvironmentStrings("%USERNAME%")
        machine = WshShell.ExpandEnvironmentStrings("%COMPUTERNAME%")
        temp = WshShell.ExpandEnvironmentStrings("%TEMP%")
        ' Convert the slashes in Now to hyphens to prevent a fatal error
        datetime = Replace(Now, "/", "-")
        ' Create the string that will be written to the log file
        output = datetime + ", " + user + ", " + machine + ", " + listOfDisconnectedAddins

        ' Write the event to a log file
        logfile = temp + "\addinslog.txt"
        ' http://msdn.microsoft.com/en-us/library/2z9ffy99(v=vs.85).aspx
        ' http://www.devguru.com/technologies/vbscript/quickref/filesystemobject_opentextfile.html
        Set fso = CreateObject("Scripting.FileSystemObject")
        Set logfile = fso.OpenTextFile(logfile, 8, True)
        logfile.WriteLine (output)
        logfile.Close
        Set logfile = Nothing
        Set fso = Nothing
        
        ' Should we clear the variables?

        ' Release the WshShell object
        Set WshShell = Nothing
   End If

   ' Ardamis.com - We're in your macros, fixing your COM add-ins.
End Sub
A collection of web development tools for building better sites more easily.

Frameworks and scripts

HTML5 Boilerplate is the professional badass’s base HTML/CSS/JS template for a fast, robust and future-proof site.

scriptsrc.net is a collection of script tags of the latest versions of a range of JavaScript libraries.

Modernizr adds classes to the <html> element which allow you to target specific browser functionality in your stylesheet. You don’t actually need to write any Javascript to use it.

Images

placehold.it is a quick and simple image placeholder service.

Text manipulation

TextFixer is a collection of online text tools. Remove line breaks from text, alphabetize text, capitalize the first letter of sentences, remove whitespaces, and uppercase text or lowercase text.

XHTML

HTML Minifier will minify HTML (or XHTML), and any CSS or JS included in your markup.

CSS

CSS3 Generator is an awesome code generator for CSS3 snippets, and shows the minimum browser versions required to display the effects.

proCSSor is an advanced CSS prettifier with tons of formatting options.

JavaScript

Online javascript beautifier will reformat and reindent bookmarklets, ugly javascript, unpack scripts packed by the popular Dean Edward’s packer, as well as deobfuscate scripts processed by javascriptobfuscator.com. The source code for the latest version is always available on github, and you can download the beautifier for local use (zip, tar.gz) as well.

Fonts and Typography

Fontshop.com has written A Field Guide to Typography to get you excited about fonts and typography.

Typetester is an online app for comparing different fonts for the screen, you can test up to three fonts at a time and choose the one you like. Its primary role is to make web designer’s life easier.

A quick chart of the fonts common to all versions of Windows and the Mac equivalents, or a more extensive matrix of fonts bundled with Mac and Windows operating systems, Microsoft Office and Adobe Creative Suite.

<html>ipsum has Lorem ipsum already wrapped in HTML tags. Pre-made paragraphs, lists, etc…

More resources at: 50 Useful Design Tools For Beautiful Web Typography and 21 Typography and Font Web Apps You Can’t Live Without.

Colors

Color Scheme Designer.

Markup

Google Webmaster Tools’ Rich Snippets Testing Tool.

Use the Rich Snippets Testing Tool to check that Google can correctly parse your structured data markup and display it in search results.

Update 5.5.11: I’ve written a better macro that doesn’t require a separate batch file and registry merge file. Please check out the new post at:

Programmatically re-enabling Word COM add-ins

A few months ago, I wrote a post on fixing Word 2007 add-in issues with a registry merge. In this post, I’ll take that idea a little further and explain how to automatically detect and fix add-ins through the use of a macro that runs each time Word is opened and a batch file that runs the registry merge file. All the end-user needs to do to repair the missing functionality is close and reopen Word.

The idea is that, in a corporate environment, there are certain important add-ins that must be running in order for Word to work normally. A good example would be an add-in that integrates Word with a document management system. Should that integration be lost because the add-in failed to load, data may be lost. Because there is no way to force Word to load certain add-ins, and there is no built-in function in Word for warning users when critically important don’t load, I decided to come up with a method for alerting the user to the problem and then fixing it with as little inconvenience as possible.

The example code in this post assumes the workstation is running Office 2007 on Windows XP (32-bit). I would think that the method could be adapted to other environments (Windows 7, Office 2010) without too much trouble. I’ve tried to note where differences come up on Windows 7 and 64-bit operating systems.

The process has four components:

  • an autoexec Word 2007 macro that runs each time Word is opened
  • a batch file that runs the registry merge file and writes an entry to a log file
  • the registry merge file that contains the correct LoadBehavior settings for the add-ins
  • a text file that acts as a log

The macro can be added to Normal.dotm or saved to a new .dotm file placed in the startup directory. The .bat batch file, .reg registry file, and .txt log file can be put anywhere, but in this example, they will be saved to a new folder C:\Word Add-ins fix\.

In the code examples below, I’ll be using the Acrobat PDFMaker Office COM Addin as the add-in that must always be loaded. This plugin is installed with Acrobat versions 8.1 and above and adds an Acrobat tab to the ribbon.

The macro

The first thing to do is to collect some information on the COM add-ins that are currently installed. Microsoft Support provides a simple macro for listing all of the COM add-ins at Some COM add-ins are not listed in the COM Add-Ins dialog box in Word. I recommend using this macro to identify the ProgID of your add-ins. The text to the left of the hyphen is the add-in’s Description and the text to the right of the hyphen is the ProgID.

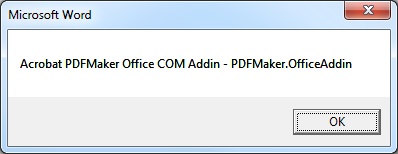
Running the macro from the Microsoft site shows us that the ProgID for the Acrobat PDFMaker Office COM Addin is PDFMaker.OfficeAddin.

In Microsoft jargon, an add-in with a LoadBehavior of 3 is ‘Connected’. The COMAddIn object has a property called Connect that will be True if the add-in is Connected and False if it is not. The macro first checks the Connect property of each add-in and writes the ProgID of each Connected add-in to a string. It then checks to see if the string contains a match for each of the required add-ins. If the required add-in does not exist in the string, the macro will display a message to the user and fire the batch file to reset the LoadBehavior. It also passes the names of any not connected add-ins to the batch file as a parameter, so that information can be logged.

I found this article from MSDN on the COMAddIn object very helpful.

Sub AutoExec()
'
' FindMissingAddins Macro
' Display a message box with any critical but not 'Connected' COM add-ins
'

   Dim msg As String
   
   Dim MyAddin As COMAddIn
   Dim i As Integer, stringOfAddins As String
   
   For Each MyAddin In Application.COMAddIns
      If MyAddin.Connect = True Then
          stringOfAddins = stringOfAddins & MyAddin.ProgID & " - "
      End If
   Next
   
' Update the number of elements in the array
' Example: change to "requiredAddIns(0 To 4)" if you were checking 5 total add-ins)
   Dim requiredAddIns(0 To 0) As String
   
' Add each required AddIn to the array
   requiredAddIns(0) = "PDFMaker.OfficeAddin"
'   requiredAddIns(1) = ""
'   requiredAddIns(2) = ""
'   requiredAddIns(3) = ""
'   requiredAddIns(4) = ""
   
   For Each requiredAddIn In requiredAddIns
      If InStr(stringOfAddins, requiredAddIn) Then
         msg = msg
      Else
         msg = msg & requiredAddIn & vbCrLf
         listOfDisconnectedAddins = requiredAddIn & " " & listOfDisconnectedAddins
         listOfDisconnectedAddins = Trim(listOfDisconnectedAddins)
      End If
   Next
   
   If msg = "" Then
   Else
        MsgBox "The following important add-ins are not running: " & vbCrLf & vbCrLf & msg & vbCrLf & vbCrLf & "Please save your work, then close and reopen Word."
' Run a batch file that corrects the add-in problems in the registry and pass the list of unconnected add-ins as an argument
        Shell """C:\Word Add-ins fix\fixWordAddins.bat"" """ & listOfDisconnectedAddins & """"
   End If
   
End Sub

Edit the macro to fit your environment. You will need to specify each required add-in’s ProgID in the requiredAddIns array and update the number of add-ins in the array’s definition. The macro needs to be named AutoExec in order to run when Word starts.

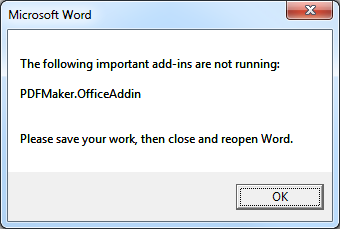
This is the message that the user will receive if the macro finds that a required add-in is not Connected.

Clicking OK runs the batch file and closes the window.

The batch file

The batch file is called by the macro when any of the add-ins are not registered and currently connected. The batch file references the .reg file that contains the correct LoadBehavior settings and writes an event to the log with information on the username, the machine name, the datetime that the problem was discovered and which add-in(s) were not connected.

Copy the code and save it as fixWordAddins.bat to the C:\Word Add-ins fix\ directory or wherever you want.

:: A batch file for running a registry merge to set the LoadBehavior for Word add-ins
::
@echo off

REGEDIT /S "C:\Word Add-ins fix\fixWordAddins.reg"

:: Let's create a little log file and output which user ran the script and at what date and time
:: Set some variables for the date. US format - not localized!
@For /F "tokens=2,3,4 delims=/ " %%A in ('Date /t') do @( 
	Set Month=%%A
	Set Day=%%B
	Set Year=%%C
)

:: Set some variables for the time.
@For /F "tokens=1,2,3 delims=/: " %%A in ('Time /t') do @( 
	Set Hours=%%A
	Set Minutes=%%B
	Set Meridiem=%%C
)

:: Output to a log file
@echo %username% at %computername% on %Month%/%Day%/%Year% at %Hours%:%Minutes% %Meridiem% (%1) >> "C:\Word Add-ins fix\log.txt"

The registry merge

Add-ins can be ‘hard-disabled’ or ‘soft-disabled’ by Word 2007. Please see my post at fixing Word 2007 add-in issues with a registry merge for more information about what this means. The following registry merge will address both issues.

The registry merge will have to be edited for your environment, too. First, find the LoadBehavior value in the the registry for each of your add-ins in either of two locations:
HKEY_LOCAL_MACHINE\SOFTWARE\Microsoft\Office\Word\Addins\
HKEY_CURRENT_USER\Software\Microsoft\Office\Word\Addins\

If you don’t find your add-in in either of those locations, search the registry for the ProgID.

A LoadBehavior of 3 = loaded (this corresponds to a checked box in Word Options/Add-Ins)
A LoadBehavior of 2 = not loaded (this corresponds to an unchecked box in Word Options/Add-Ins)

The only add-ins that you need to worry about here are those that you want to always run (those that normally have a LoadBehavior of 3). Export those keys and add them to the .reg file.

Copy the code and save it as fixWordAddins.reg to the C:\Word Add-ins fix\ directory or wherever you want. Edit it for the add-ins you wish to load.

Windows Registry Editor Version 5.00

[-HKEY_CURRENT_USER\Software\Microsoft\Office\12.0\Word\Resiliency]

[-HKEY_LOCAL_MACHINE\SOFTWARE\Microsoft\Office\12.0\Word\Resiliency]

[HKEY_LOCAL_MACHINE\SOFTWARE\Microsoft\Office\Word\Addins\PDFMaker.OfficeAddin]
"LoadBehavior"=dword:00000003

On 64-bit versions of Windows, the add-ins can be found in:
HKEY_LOCAL_MACHINE\SOFTWARE\Wow6432Node\Microsoft\Office\Word\Addins\

The log file

If the log file doesn’t already exist, the batch file will create it. Each time the batch file runs, it adds a line to the end of the log file.

An entry will look something like this:

USERNAME at MACHINENAME on 06/17/2010 at 01:02 PM ("PDFMaker.OfficeAddin")

Caveats

The macros in a *.dotm can’t be edited if that template was opened from the startup location. Open a copy in another location, make your changes and save, and then overwrite the version in the startup location.

Windows 7

Note that in Windows 7, the UAC needs your permission to run a .bat file.

The Word startup location in Windows 7 (put any custom *.dotm files here):
\AppData\Roaming\Microsoft\Word\STARTUP

The default location of Normal.dotm in Windows 7:
\AppData\Roaming\Microsoft\Templates

I’ve been collecting links to good WordPress templates for a long time. Because I’ve been asked a few times recently if I can recommend some templates, I’m putting them together here.

Huge, isolated, animated slideshow

I really like these themes for focusing almost exclusively on one’s portfolio. They feature a massive, animated slideshow that keeps the visitor’s attention on the images. In some cases, a shadow underneath the slideshow, combined with the animation, creates a 3-D effect to put the portfolio right in the visitor’s face.

Confined slideshow

These themes are a bit more modest than the first collection. They still accentuate a portfolio of images, but in a less flashy way. The slideshow exists within a defined banner area, so the look is a little more traditional. These templates would be a better fit for businesses.

Partial-banner image rotation

These themes use only part of the banner to display a rotating group of images, leaving an area for text next to the images. This allows a short message or tagline to get equal placement. These are the most conservative themes.

Creative themes

This last group of themes break with the conventions of the above themes and use full-screen-width or otherwise larger-than-normal images that rotate behind the other elements of the site. Undeniably attention-grabbing, but also slower to load.

Single page

These are single-page web sites. These types of pages are great as business cards or resumes, or as place holders while a larger site is developed.

The rest

I like these, too, but they don’t fit in any of the above categories.

This post illustrates a method of centering the thumbnails in the album view of the PHP image gallery Plogger. The method automatically adjusts for thumbnails of varying widths and pages containing less than a full row of images.

This method should work in any theme that uses the unordered list derived from the default Plogger theme and that has a fixed and determinable width for the element ‘ul.slides’.

Overview of the method

In brief, the template file album.php is edited to add a PHP script that figures out how many thumbnails are in the first row and then adjusts the left margin of each ‘li.thumbnail’ in order to keep the same amount of space on either side of each image. The user is required to manually set 3 variables: $center_thumbs, $total_space and $thumb_padding, and the script does the rest.

Line-by-line documentation

Below is all of the relevant code, to be placed into the theme file ‘album.php’.

<?php plogger_load_picture();
// Set variables for the thumbnails
$capt = plogger_get_picture_caption();
$date = plogger_get_picture_date();
// Find thumbnail width
$thumb_info = plogger_get_thumbnail_info();
$thumb_width = $thumb_info[0]; // The width of the thumbnail image, in pixels.
$thumb_height = $thumb_info[1];	// The height of the thumbnail image, in pixels.
		
// Set album page options
$center_thumbs = 'true'; // When the value of "$center_thumbs" is set to 'true', the theme will center the thumbnail images 
$total_space = 798; // Set the value of $total_space to equal the width, in pixels, of the interior of 'ul.slides' (i.e. after deducting for any padding)
$thumb_padding = 33; // Set the value of $thumb_padding to equal the sum of all padding and borders on 'ul.slides li.thumbnail', the thumbnail image and the anchor tag (this can be tricky to calculate)

$thumbs_on_page = $GLOBALS["available_pictures"]; 
$actual_thumb_width = $thumb_width + $thumb_padding; 
$max_thumbs_per_row = floor($total_space / $actual_thumb_width); 
($thumbs_on_page < $max_thumbs_per_row)? $thumbs_per_row = $thumbs_on_page : $thumbs_per_row = $max_thumbs_per_row ; 
$avail_space = $total_space - ($thumbs_per_row * $actual_thumb_width); 
$left_margin = floor($avail_space / ($thumbs_per_row + 1)); 
?>


<li class="thumbnail"<?php if ($center_thumbs == 'true') echo 'style="margin-left: ' . $left_margin . 'px"'; ?>>

Here’s how the whole thing works, with each code section followed by a description of what’s happening:

$center_thumbs = 'true'; // When the value of "$center_thumbs" is set to 'true', the theme will center the thumbnail images 
$total_space = 798; // Set the value of $total_space to equal the width, in pixels, of the interior of 'ul.slides' (e.g.: after deducting for any padding)
$thumb_padding = 33; // Set the value of $thumb_padding to equal the sum of all padding and borders on 'ul.slides li.thumbnail', the thumbnail image and the anchor tag (this can be tricky to calculate)

The centering feature can be toggled on and off by setting $center_thumbs to ‘true’ or any other value. The user will need to specify integer values for $total_space and $thumb_padding, as described in the commented lines.

$thumbs_on_page = $GLOBALS["available_pictures"];

The number of available pictures on the current page is assigned to the $thumbs_on_page variable.

$actual_thumb_width = $thumb_width + $thumb_padding;

The actual width of each ‘li.thumbnail’ is calculated and saved as the variable $actual_thumb_width. The width of the thumbnail image is available to the theme as $thumb_width, but the user must specify a value for $thumb_padding, which is an integer equal to the sum of all of the padding and borders on the thumbnail image, the surrounding anchor tag, and the ul list item ‘.thumbnail’. This can be rather tricky to calculate, so you may want to increase your figure by a few pixels just to be safe.

$max_thumbs_per_row = floor($total_space / $actual_thumb_width);

The maximum possible number of thumbnails per row is calculated by dividing the useable width of ‘ul.slides’ by the actual width of a ‘li.thumbnail’, then rounding down the quotient to the next lowest integer using the PHP function floor(). For example, if the quotient of $total_space / $actual_thumb_width is 4.9, $max_thumbs_per_row would equal 4, because 5 thumbnails would be wider than the available space.

($thumbs_on_page < $max_thumbs_per_row)? $thumbs_per_row = $thumbs_on_page : $thumbs_per_row = $max_thumbs_per_row ;

The actual number of thumbs in the first row is calculated and assigned to $thumbs_per_row using a ternary operator. If the number of thumbs on the current page is less than the maximum number possible in a single row, it follows that the row isn’t full, and the number of thumbs on the page is assigned to the variable $thumbs_per_row. However, if the number of thumbs on the page is equal to or greater than the maximum number possible in a single row, it follows that the first row contains the maximum number possible, and so the thumbs will be spaced as though every row is full. Doing it this way maintains the grid, but if one wanted partially filled rows to be centered according to the number of remaining images, that would be possible.

$avail_space = $total_space - ($thumbs_per_row * $actual_thumb_width);

The amount of white space, $avail_space, is calculated by subtracting from the total usable space the sum of the widths of the thumbs in the first row.

$left_margin = floor($avail_space / ($thumbs_per_row + 1));

Finally, the number of pixels for the left margin of each ‘li.thumbnail’, $left_margin, is calculated by dividing $avail_space by the sum of 1 plus the number of thumbs in the first row, and then rounding down the quotient to the next lowest integer. The number of thumbs must be increased by 1 to account for the white space to the right of the last thumbnail.

In practice, the white space to the right of last thumbnail may be a few pixels wider or narrower than the left margins, but this deviation should be limited to within 4 or 5 pixels.

Apricot is a text-heavy and graphic-light, widget- and tag-supporting minimalist WordPress theme built on a Kubrick foundation. Apricot validates as XHTML 1.0 Strict and uses valid CSS. It natively supports the excellent Other Posts From Cat and the_excerpt Reloaded plugins, should you want to install them.

WordPress version 2.3 introduces native support for ‘tags’, a method of organizing posts according to key words. Apricot has been updated to use this native tag system. The tag cloud will appear in the sidebar and the tags for each post appear above the meta data.

I used Apricot on this site for over a year, making little tweaks and adjustments the whole time, so the theme is pretty thoroughly tested in a variety of different browsers and resolutions. While the markup is derived from the WordPress default theme, Kubrick, I’ve added a few modifications of my own. I’ve listed some of these changes below.

header.php

  • Title tag reconfigured to display “Page Title | Site Name”

single.php

  • Post title is now wrapped in H1 tags
  • Metadata shows when the post was last modified (if ever)
  • Added links to social bookmarking/blog indexing sites: Del.icio.us, Digg, Furl, Google Bookmarks, and Technorati
    I’ve published a fix for the Sociable plugin, which I’m now using instead of hard-coded links
  • If the Other Posts From Cat plugin is active, the theme will use it
  • Comments by the post’s author can be styled independently

page.php

  • Displays the page’s last modified date (instead of date of publication)

index.php

  • Displays the full text of the latest post and an excerpt from each of the next nine most recent posts
  • Native support for the_excerpt Reloaded plugin, if active

sidebar.php

  • Displays tag cloud, if tags are enabled

search.php

  • If no results found, displays the site’s most recent five posts

404.php

  • Displays the site’s most recent five posts

footer.php

  • Archive and index page titles + blog name wrapped in H1 tags

Screen shot

Apricot - A WordPress theme by Ardamis.com

Search engine optimization

Apricot takes care of most of the on-page factors that Google values highly. It places the post’s title at the beginning of the title tag and in a H1 tag near the top of the page. It is free of extraneous markup and the navigation is easily spiderable. It generates what I think is a pretty logical site structure from the various post and category pages, though I have yet to study the effect of the new tagging system.

I’ve had a few top-ranked pages with this and other structurally similar layouts. Your mileage with the search engines may vary, but the layout uses fundamentally sound structural markup, which should give your site a good start.

Download

Download the theme from http://wordpress.org/extend/themes/apricot or from the link below.

Download the Apricot WordPress Theme

What if I want to use an image as a header?

Lots of people would rather use a graphic as a header, including me, but the WordPress guys insist on each theme uploaded to http://wordpress.org/extend/themes/ display the blog title and tag line.

If you want to replace the blog title and tag line with an image, download this zip file and follow these instructions (also included in readme.txt).

1. Make a PNG image, name it “header.png” and upload it to the /wp-content/themes/apricot/images/ folder. It should be 800px wide by 130px tall, or less.

2. Replace the original Apricot theme’s header.php file with the header.php file from this folder.

Download the Apricot Image Header

I was tired of seeing the majority of my posts’ comments feeds show up in Google’s Supplemental Index, so I changed all the individual posts’ comments RSS links to rel=”nofollow”. This should at least cause Googlebot to stop passing PageRank through those links, but what I really want is for Googlebot to stop spidering the individual posts’ comment feeds, in hopes that they’ll eventually be removed from the index. To see only those pages of a site that are in the Supplemental Index, use this neat little search feature: site:DOMAIN.com *** -view. For example, to see which pages of Ardamis.com are in the SI, I’d search for: site:ardamis.com *** -view. This is much easier than the old way of scanning all of the indexed pages and picking them out by hand.

To change all the individual posts’ comments feed links to rel=”nofollow”, open ‘wp-includesfeed-functions.php’ and add rel=”nofollow” to line 84 (in WordPress version 2.0.6), as so:

echo "<a href="$url" rel="nofollow">$link_text</a>";

One could use the robots.txt file to disallow Googlebot from all /feed/ directories, but this would also restrict it from the general site’s feed and the all-inclusive /comments/feed/, and I’d like the both of these feeds to continue to be spidered. Another, minor consequence of using robots.txt to restrict Googlebot is that Google Sitemaps will warn you of “URLs restricted by robots.txt”.

To deny all spiders from any /feed/ directory, add the following to your robots.txt file:

User-agent:*
Disallow: /feed/

To deny just Googlebot from any /feed/ directory, use:

User-agent: Googlebot
Disallow: /feed/

For whatever reason, the whole-site comments feed at //ardamis.com/comments/feed/ does not appear among my indexed pages, while the nearly empty individual post feeds are indexed. Also, the general site feed at //ardamis.com/feed/ is in the Supplemental Index. It’s a mystery to me why.