Tag Archives: downloads

So I finally watched The Social Network over the weekend, and it’s made me feel jealous and a bit guilty.

In a meager effort to console myself for so far failing to be a billionaire, I’m assembling the short list of web-application type things I’ve built here.

  1. A dice roller: rollforit. Enter a name, create a room, invite your friends, and start rolling dice. For people who want to play pen and paper, table-top RPG dice games with their distant friends.
  2. A URL shortener: Minifi.de. Minifi.de comes with an API and a bookmarklet. It really works, too! The technical explanation has more details.
  3. A social networking site: Snapbase. Snapbase is a social site that shows you what’s going on in your city or anywhere in the world as pictures are uploaded by your friends and neighbors. The application extracts location information from the EXIF data embedded in images and displays recent images taken near your present location.
  4. A trouble-ticketing system for an IT help desk or technical support center. It’s really pretty extensive, with asset management, user accounts, salted encrypted passwords, and all sorts of nifty things. I really must write a full description of it at some point, but until then, the documentation is the next best thing.
  5. An account-based invoice tracking and access system for grouping invoices according to clients, then sharing invoice history with those clients and allowing them to easily pay outstanding invoices via Paypal.
  6. An account-based invoice access system where clients can view paid and unpaid invoices, and even easily pay an outstanding invoice via Paypal. I actually use this almost every day.
  7. A simple method for protecting a download using a unique URL that can be emailed to authorized users. The URL can be set to expire after a certain amount of time or any number of downloads.
  8. An update to the above download protection script to protect multiple downloads, generate batches of keys, leave notes about who received the key, the ability to specify per-key the allowable number of downloads and age, and some basic reporting.
  9. An HTML auction template generator called Simple Auction Wizard. It helps you create HTML auction templates for eBay, and uses SWFUpload and tinyMCE.

I have another project in the works that promises to be more financially viable, but the most clever thing on that list is Snapbase. It’s in something akin to alpha right now; barely usable. I really wish I had the time to pursue it.

Back in February, 2010, I posted instructions on how to create a bootable USB drive that can install any version of Windows 7. As of yesterday, ISOs of updated versions of Windows 7 with SP1 have been made available to Microsoft TechNet and MSDN subscribers.

If you want to update your install media with the ‘slipstreamed’ version, grab a torrent and then check it against the official Windows 7 SHA1 and ISO/CRC hashes.

The filenames for the 5/12/2011 versions of Windows 7 Ultimate are below.

Windows 7 Ultimate with Service Pack 1 (x64) – DVD (English): en_windows_7_ultimate_with_sp1_x64_dvd_u_677332.iso
(http://thepiratebay.org/torrent/6391716/Windows_7_x64_SP1_MSDN_Technet_May_2011_Refresh)

Windows 7 Ultimate with Service Pack 1 (x86) – DVD (English): en_windows_7_ultimate_with_sp1_x86_dvd_u_677460.iso

Because the page at http://www.nullsoft.com/free/netmon/ has been down every time I’ve tried to visit it lately, I’ve decided to reproduce it here, along with the download of the NetMon application. Below is the content of the page, with the link updated to the file hosted at ardamis.com.

introduction

This is a slightly useful network monitor graphing thing for Win32.
It just sits in its own window, pinging a host, and giving you a
graph of how long it takes each time.

Because all great (err) things should be free, this should be too.
Not only that, we’re pretty much giving away all rights to it, giving
you the source, and letting you do what you want with it (see the
license below).

features

  • Host configuration
  • Hops configuration
  • Refresh rate configuration
  • Graph scale configuration
  • Configurable text for window
  • Automatic start-on-system-start
  • Static window size (120×40)
  • Small memory footprint

license

Copyright (C) 1999-2000 Nullsoft, Inc.

This software is provided ‘as-is’, without any express or implied
warranty. In no event will the authors be held liable for any damages
arising from the use of this software.

Permission is granted to anyone to use this software for any purpose,
including commercial applications, and to alter it and redistribute it
freely, subject to the following restrictions:

1. The origin of this software must not be misrepresented; you must not
claim that you wrote the original software. If you use this software
in a product, an acknowledgment in the product documentation would be
appreciated but is not required.
2. Altered source versions must be plainly marked as such, and must not be
misrepresented as being the original software.
3. This notice may not be removed or altered from any source distribution.

Note that this license is borrowed from zlib.

download

Current version: 0.4 (8/1/00)
Download: netmon04.exe

version history

v0.4 (8/1/00)

  • first public release

File compression is possible on Apache web hosts that do not have mod_gzip or mod_deflate enabled, and it’s easier than you might think.

A great explanation of why compression helps the web deliver a better user experience is at betterexplained.com.

Two authoritative articles on the subject are Google’s Performance Best Practices documentation | Enable compression and Yahoo’s Best Practices for Speeding Up Your Web Site | Gzip Components.

Compressing PHP files

If your Apache server does not have mod_gzip or mod_deflate enabled (Godaddy and JustHost shared hosting, for example), you can use PHP to compress pages on-the-fly. This is still preferable to sending uncompressed files to the browser, so don’t worry about the additional work the server has to do to compress the files at each request.

Option 1: PHP.INI using zlib.output_compression

The zlib extension can be used to transparently compress PHP pages on-the-fly if the browser sends an “Accept-Encoding: gzip” or “deflate” header. Compression with zlib.output_compression seems to be disabled on most hosts by default, but can be enabled with a custom php.ini file:

[PHP]

zlib.output_compression = On

Credit: http://php.net/manual/en/zlib.configuration.php

Check with your host for instructions on how to implement this, and whether you need a php.ini file in each directory.

Option 2: PHP using ob_gzhandler

If your host does not allow custom php.ini files, you can add the following line of code to the top of your PHP pages, above the DOCTYPE declaration or first line of output:

<?php if (substr_count($_SERVER['HTTP_ACCEPT_ENCODING'], 'gzip')) ob_start("ob_gzhandler"); else ob_start(); ?>

Credit: GoDaddy.com

For WordPress sites, this code would be added to the top of the theme’s header.php file.

According to php.net, using zlib.output_compression is preferred over ob_gzhandler().

For WordPress or other CMS sites, an advantage of zlib.output_compression over the ob_gzhandler method is that all of the .php pages served will be compressed, not just those that contain the global include (eg.: header.php, etc.).

Running both ob_gzhandler and zlib.output_compression at the same time will throw a warning, similar to:

Warning: ob_start() [ref.outcontrol]: output handler ‘ob_gzhandler’ conflicts with ‘zlib output compression’ in /home/path/public_html/ardamis.com/wp-content/themes/mytheme/header.php on line 7

Compressing CSS and JavaScript files

Because the on-the-fly methods above only work for PHP pages, you’ll need something else to compress CSS and JavaScript files. Furthermore, these files typically don’t change, so there isn’t a need to compress them at each request. A better method is to serve pre-compressed versions of these files. I’ll describe a few different ways to do this, but in both cases, you’ll need to add some lines to your .htaccess file to send user agents the gzipped versions if they support the encoding. This requires that Apache’s mod_rewrite be enabled (and I think it’s almost universally enabled).

Option 1: Compress locally and upload

CSS and JavaScript files can be gzipped on the workstation, then uploaded along with the uncompressed files. Use a utility like 7-Zip (quite possibly the best compression software around, and it’s free) to compress the CSS and JavaScript files using the gzip format (with extension *.gz), then upload them to your server.

For Windows users, here is a handy command to compress all the .css and .js files in the current directory and all sub directories (adjust the path to the 7-Zip executable, 7z.exe, as necessary):

for /R %i in (*.css *.js) do "C:\Program Files (x86)\7-Zip\7z.exe" a -tgzip "%i.gz" "%i" -mx9

Note that the above command is to be run from the command line. The batch file equivalent would be:

for /R %%i in (*.css *.js) do "C:\Program Files (x86)\7-Zip\7z.exe" a -tgzip "%%i.gz" "%%i" -mx9

Option 2: Compress on the server

If you have shell access, you can run a command to create a gzip copy of each CSS and JavaScript file on your site (or, if you are developing on Linux, you can run it locally):

find . -regex ".*\(css\|js\)$" -exec bash -c 'echo Compressing "{}" && gzip -c --best "{}" > "{}.gz"' \;

This may be a bit too technical for many people, but is also much more convenient. It is particularly useful when you need to compress a large number of files (as in the case of a WordPress installation with multiple plugins). Remember to run it every time you automatically update WordPress, your theme, or any plugins, so as to replace the gzip’d versions of any updated CSS and JavaScript files.

The .htaccess (for both options)

Add the following lines to your .htaccess file to identify the user agents that can accept the gzip encoded versions of these files.

<files *.js.gz>
  AddType "text/javascript" .gz
  AddEncoding gzip .gz
</files>
<files *.css.gz>
  AddType "text/css" .gz
  AddEncoding gzip .gz
</files>
RewriteEngine on
#Check to see if browser can accept gzip files.
ReWriteCond %{HTTP:accept-encoding} gzip
RewriteCond %{HTTP_USER_AGENT} !Safari
#make sure there's no trailing .gz on the url
ReWriteCond %{REQUEST_FILENAME} !^.+\.gz$
#check to see if a .gz version of the file exists.
RewriteCond %{REQUEST_FILENAME}.gz -f
#All conditions met so add .gz to URL filename (invisibly)
RewriteRule ^(.+) $1.gz [QSA,L]

Credit: opensourcetutor.com

I’m not sure it’s still necessary to exclude Safari.

For added benefit, minify the CSS and JavaScript files before gzipping them. Google’s excellent Page Speed Firefox/Firebug Add-on makes this very easy. Yahoo’s YUI Compressor is also quite good.

Verify that your content is being compressed

Use the nifty Web Page Content Compression Verification tool at http://www.whatsmyip.org/http_compression/ to confirm that your server is sending the compressed files.

Speed up page load times for returning visitors

Compression is only part of the story. In order to further speed page load times for your returning visitors, you will want to send the correct headers to leverage browser caching.

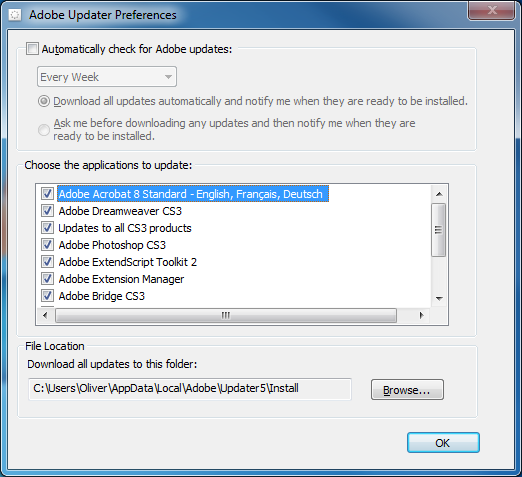
By default, the Adobe Updater application that is installed along side various Adobe products like Acrobat and Photoshop is set to check for updates automatically. Specifically, it’s set to check for updates to all installed Adobe products every week, and to download all updates and then notify you when they are ready to be installed. In this post, I’ll explain how to disable this feature by editing a settings file while avoiding the GUI.

Adobe Updater Preferences

Adobe Updater Preferences

In a managed environment, an administrator may not want any software to update itself for any number of reasons. The automatic check can be switched off in the Adobe Updater preferences, but it can be a nuisance to find and requires as many as 9 clicks.

Adobe Updater can be launched from within Adobe products by clicking Help | Check for Updates (note that in some products, the path is Help | Updates, but in either case, you can use the keystroke Alt+H, U). Click Preferences, then uncheck the box next to Automatically check for Adobe updates and click OK, then close the Adobe Updater window. You may have to click Quit in a subsequent window before the application closes.

For a more direct route, the Adobe Updater executable installed with Reader 9 resides at
C:\Program Files (x86)\Common Files\Adobe\Updater6\AdobeUpdater.exe on a 64-bit Windows 7 machine, and at
C:\Program Files\Common Files\Adobe\Updater6\AdobeUpdater.exe on a 32-bit Windows XP machine.

All of the configurable settings are saved to a file named AdobeUpdaterPrefs.dat in the user profile, rather than as registry keys. The .dat file extension suggests a binary file, but it’s actually just an XML document that can be opened in any text editor.

The preferences file resides at
C:\Users\[USERNAME]\AppData\Local\Adobe\Updater6\AdobeUpdaterPrefs.dat on a 64-bit Windows 7 machine, and at
C:\Documents and Settings\[USERNAME]\Local Settings\Application Data\Adobe\Updater6\AdobeUpdaterPrefs.dat on a 32-bit Windows XP machine.

The minimum lines that need to exist for the file to be valid and for “Automatically check for Adobe updates” to be disabled are:

<?xml version="1.0" encoding="UTF-8" ?>
<AdobeUpdater>
<AutoCheck>0</AutoCheck>
</AdobeUpdater>

To disable the auto update check programmatically, this file can be saved as AdobeUpdaterPrefs.dat and a script used to later overwrite the file in the user profile. A rather geekier approach would be to use a batch file to rename AdobeUpdaterPrefs.dat and then write a new file. I prefer the latter method because it requires only a single file and because it could be easily modified to insert lines that would change other settings, such as the location of the aum.log log file or the download directory, which are located in the user profile by default.

A batch file to back-up and then remake the file might look like this:

:: A batch file for writing a new Adobe Updater settings file "AdobeUpdaterPrefs.dat"
:: If an AdobeUpdaterPrefs.dat exists, it is edited and then the next next location is checked, until the script has iterated through all locations
@echo off

%SystemDrive%
cd\
SETLOCAL EnableDelayedExpansion

:: Check each location and if the file is found, pass the directory and a label (to the next path to be searched or to an EXIT command) to the function

:XPUpdater6
@echo.
echo Checking for "%USERPROFILE%\Local Settings\Application Data\Adobe\Updater6\AdobeUpdaterPrefs.dat"
if exist "%USERPROFILE%\Local Settings\Application Data\Adobe\Updater6\AdobeUpdaterPrefs.dat" (call:REWRITE "%USERPROFILE%\Local Settings\Application Data\Adobe\Updater6",XPUpdater5) else (@echo The AdobeUpdaterPrefs.dat file was not found.)

:XPUpdater5
@echo.
echo Checking for "%USERPROFILE%\Local Settings\Application Data\Adobe\Updater5\AdobeUpdaterPrefs.dat"
if exist "%USERPROFILE%\Local Settings\Application Data\Adobe\Updater5\AdobeUpdaterPrefs.dat" (call:REWRITE "%USERPROFILE%\Local Settings\Application Data\Adobe\Updater5",OUT) else (@echo The AdobeUpdaterPrefs.dat file was not found.)

:OUT
@pause
exit

:REWRITE
:: Configure Adobe Update to not check for updates
:: Move to the correct directory
cd %~1
:: Delete any temp file that this script may have created in the past
if exist AdobeUpdaterPrefs.dat.temp del AdobeUpdaterPrefs.dat.temp
:: Backup the old file
rename AdobeUpdaterPrefs.dat AdobeUpdaterPrefs.dat.temp
:: Write a new minimum settings file (the other data will be filled in when Auto Updater runs)
echo ^<?xml version="1.0" encoding="UTF-8" ?^> >> AdobeUpdaterPrefs.txt
echo ^<AdobeUpdater^> >> AdobeUpdaterPrefs.txt
echo ^<AutoCheck^>0^</AutoCheck^> >> AdobeUpdaterPrefs.txt
echo ^</AdobeUpdater^> >> AdobeUpdaterPrefs.txt
:: Rename the new file
rename AdobeUpdaterPrefs.txt AdobeUpdaterPrefs.dat
@echo The AdobeUpdaterPrefs.dat file was found and modified.
:: Go to the next location in the list
goto :%~2
goto :EOF

File locations in Windows 7

Note that in Windows 7, “%USERPROFILE%\AppData\Local\” and “%USERPROFILE%\Local Settings\Application Data\” contain the same data. A file added to a subdirectory in one location will appear in the corresponding subdirectory in the other location. So this script will work on Windows 7 because of 7’s backwards compatibility.

If you wanted to the script to run using Windows 7’s native C:\Users\… directory structure and did not care about the loss of compatibility with XP, you could use the following script instead.

:: A batch file for writing a new Adobe Updater settings file "AdobeUpdaterPrefs.dat"
:: If an AdobeUpdaterPrefs.dat exists, it is edited and then the next next location is checked, until the script has iterated through all locations
@echo off

%SystemDrive%
cd\
SETLOCAL EnableDelayedExpansion

:: Check each location and if the file is found, pass the directory and a label (to the next path to be searched or to an EXIT command) to the function

:WIN7Updater6
@echo.
echo Checking for "%USERPROFILE%\AppData\Local\Adobe\Updater6\AdobeUpdaterPrefs.dat"
if exist "%USERPROFILE%\AppData\Local\Adobe\Updater6\AdobeUpdaterPrefs.dat" (call:REWRITE "%USERPROFILE%\AppData\Local\Adobe\Updater6",WIN7Updater5) else (@echo The AdobeUpdaterPrefs.dat file was not found.)

:WIN7Updater5
@echo.
echo Checking for "%USERPROFILE%\AppData\Local\Adobe\Updater5\AdobeUpdaterPrefs.dat"
if exist "%USERPROFILE%\AppData\Local\Adobe\Updater5\AdobeUpdaterPrefs.dat" (call:REWRITE "%USERPROFILE%\AppData\Local\Adobe\Updater5",OUT) else (@echo The AdobeUpdaterPrefs.dat file was not found.)

:OUT
@pause
exit

:REWRITE
:: Configure Adobe Update to not check for updates
:: Move to the correct directory
cd %~1
:: Delete any temp file that this script may have created in the past
if exist AdobeUpdaterPrefs.dat.temp del AdobeUpdaterPrefs.dat.temp
:: Backup the old file
rename AdobeUpdaterPrefs.dat AdobeUpdaterPrefs.dat.temp
:: Write a new minimum settings file (the other data will be filled in when Auto Updater runs)
echo ^<?xml version="1.0" encoding="UTF-8" ?^> >> AdobeUpdaterPrefs.txt
echo ^<AdobeUpdater^> >> AdobeUpdaterPrefs.txt
echo ^<AutoCheck^>0^</AutoCheck^> >> AdobeUpdaterPrefs.txt
echo ^</AdobeUpdater^> >> AdobeUpdaterPrefs.txt
:: Rename the new file
rename AdobeUpdaterPrefs.txt AdobeUpdaterPrefs.dat
@echo The AdobeUpdaterPrefs.dat file was found and modified.
:: Go to the next location in the list
goto :%~2
goto :EOF

Additional benefits

Modifying the preferences file could have other benefits as well. Imagine the time and disk space that could saved by having all of those incremental Adobe updates saved to a network location, rather than downloading them to each workstation.

Adobe Flash Player is frequently updated, which makes it difficult to keep a large user-base on the current version. This post is a collection of useful links for managing Flash Player.

Adobe Flash Player Version Information

This page reports the version of Flash Player currently running on the browser, along with the latest available version.
http://www.adobe.com/software/flash/about/

Install the latest version of Flash Player

To install the latest version of Flash Player, visit http://get.adobe.com/flashplayer/.

How to download the offline Flash Player installer

To download the offline Flash Player installer (*.exe) for Internet Explorer or Chrome, Firefox, Safari and Opera:

  1. Go to the download page at
    http://get.adobe.com/flashplayer/.
  2. Click on the link:
    Different operating system or browser?
  3. Select an operating system from the menu and click Continue.
  4. Select your browser.
  5. Click on the “Agree and install now” button to initiate the download.
  6. Run the installer file.
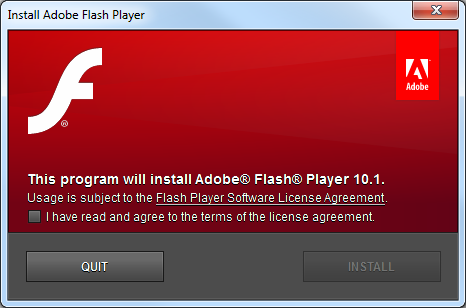
Install Adobe Flash Player

Install Adobe Flash Player

The direct link to the current version of the Flash Player installer (for Windows) for Chrome, Firefox, Safari and Opera:
http://fpdownload.adobe.com/get/flashplayer/current/install_flash_player.exe

The direct link to the current version of the Flash Player installer (for Windows) for Internet Explorer:
http://fpdownload.adobe.com/get/flashplayer/current/install_flash_player_ax.exe

Flash RSS Feeds

Recent documents: http://www.adobe.com/support/flashplayer/rss/recent.documents.xml
Top issues: http://www.adobe.com/support/flashplayer/rss/top.issues.static.xml
Developer Center: http://rss.adobe.com/developer_center_flashplayer_tutorials.rss?locale=en_US
Flash Player news: http://rss.adobe.com/resources_flashplayer.rss?locale=en_US

Distribute Adobe Flash Player

You may post Adobe Flash Player on company intranet sites or local networks.
The Adobe Flash Player is available for for distribution and use beyond single-user installations. This includes, for example, distributing to workstations within your department or organization, or on fixed media with your software product or multimedia experience.

http://www.adobe.com/products/players/fpsh_distribution1.html

Adobe Flash Player Settings Manager

The Settings Manager is a special control panel that runs on your local computer but is displayed within and accessed from the Adobe website. Adobe does not have access to the settings that you see in the Settings Manager or to personal information on your computer.

To change your settings, click the tabs to see different panels, then click the options in the Settings Manager panels that you see on the web page.

http://www.macromedia.com/support/documentation/en/flashplayer/help/settings_manager.html

How to disable notification of Flash Player updates

Flash Player is notoriously insecure, so I’d recommend keeping it up-to-date.

Right-click on any Flash content, select Global Settings, and click the Global Notifications Settings panel link in the Flash Player Settings Manager.

Note: The Settings Manager is a Flash application that displays Flash Player settings which are stored on your computer only. Adobe does not store or track this information on its servers nor does it pass this information to third parties.

Deselect the “Notify me When an Update to Adobe Flash Player is available.” option to stop receiving notifications.

Close the Settings Manager browser window. Flash Player automatically remembers the new settings.

Error messages in Internet Explorer

“Internet Explorer has encountered a problem with an add-on and needs to close. The following add-on was running when this problem occurred: Flash10a.ocx”

http://kb2.adobe.com/cps/408/kb408620.html

I wanted to connect a non-wireless device (an Xbox 360) to a spare AirPort Extreme Base Station (AEBS) via ethernet cable, then join the Airport Extreme to an existing wireless network created by a non-Apple (D-Link) wireless router. After much searching, it appears that the ethernet ports on the AEBS will not function when the AWD is connected to a wireless network created by a non-Apple device, such as a D-Link wireless router.

But, I was able to find lots of useful links, which I’ve posted here for future reference.

Default AirPort Base Station passwords are “public.”

Resetting an AirPort Base Station or Time Capsule FAQ (with pictures of the different models)
http://support.apple.com/kb/HT3728

AirPort Utility 5.5.3 for Windows
Post Date: June 14, 2011
http://support.apple.com/kb/DL1391

Time Capsule and AirPort Extreme Base Station Firmware Update 7.5.1
Post Date: March 31, 2010
http://support.apple.com/kb/DL965

AirPort Extreme Firmware Update 5.7 for Windows (AirPort Extreme 802.11g – drop shaped)
Post Date: January 03, 2006
http://support.apple.com/kb/DL411

All about Time Capsule, AirPort Extreme, and AirPort Express base station firmware updates
http://support.apple.com/kb/HT1218

To download and install any available firmwares on your AWD, simply open AirPort Utility. An alert indicates that an update is available (if one is). Click the Update button. If you are updating more than one base station, click Show Details to select the base stations you want to update.

AirPort + Time Capsule (General support page)
http://www.apple.com/support/airport/

Using the AirPort Admin Utility to create a WDS network with multiple base stations
http://support.apple.com/kb/HT4262

AirPort Extreme Base Station Setup Guide
http://manuals.info.apple.com/en/airportextremebasestationsetupguide.pdf

AirPort: Slow 802.11n connection speed when connected using older WEP or WPA security mechanisms
(Use WPA2 Personal authentication)
http://support.apple.com/kb/TS3361

I thought it would be handy to have some direct downloads to the Citrix XenApp web client software for Windows, particularly as the Citrix people can’t settle on a name for their product and the web site changes every 15 minutes.

Citrix Online Plug-in – Web | Version 12.1
Release Date: 10/28/2010
Windows 7, XP, Vista, 2003, & 2008
13.4 MB

Citrix Online Plug-in – Version 11.2
Release Date: 9/29/2009
Windows 7, XP, Vista, 2003, & 2008
11 MB
Download CitrixOnlinePluginWeb11.2.exe from ardamis.com

XenApp Plugin (Client) – Version 11.0.150
Release Date: 11/11/2009
Windows 2000, XP, Vista, 2003, & 2008
4.9 MB
Download XenAppWebPlugin11.0.150.exe from ardamis.com

I completely hosed a few SanDisk Cruzer Micro USB 2.0 2 GB Flash Drives at work when I deleted the original contents of the drives, installed the CruzerPro software that had shipped with some older Cruzer Professional drives, and then used the CruzerPro application to password protect the drives. This process rendered the drives completely unusable and unable to be formatted.

The problems

Clicking the drive letter in Windows Explorer returns the following error message:

Please insert a disk into drive X:.

Attempting to format the drive returns the warning:

There is no disk in drive X.
Insert a disk, and then try again.

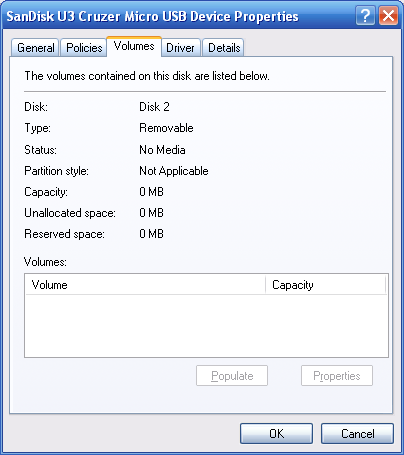
This is what the drives looked like once I’d thoroughly broken them.

SanDisk U3 Cruzer Micro USB Device Properties

SanDisk U3 Cruzer Micro USB Device Properties

The drive properties show:
Type: Removable Disk
File system: Unknown
Used space 0 bytes
Free space 0 bytes
Capacity 0 bytes

The Volumes tab shows:
Type: Removable
Status: No Media
Partition style: Not Applicable
Capacity: 0 MB
Unallocated space: 0 MB
Reserved space: 0 MB

Opening the Disk Management component of the Computer Management console shows that the drive is connected, but there is no unallocated space to partition or format.

Other things about the disk look normal. It shows up in the Device Manager as working correctly, without any warnings, for example.

I Googled around and found that many, many people were running into this problem where the drive starts reporting 0 bytes capacity and can not be formatted. Of the dozens of pages that I read, no one found a fix for the problem. The most common solution offered was to return the drive to the manufacturer for replacement. Well, I wasn’t going to publicize my mistake and return the drives, I was going to repair them.

Software that didn’t help

Feel free to skip this part if you’re not interested in reading about the many dead-ends I explored.

I knew of one nifty program that had helped me out a few times before, so I tried running the HP USB Disk Storage Format Tool v2.1.8, but attempting to format the drive with this utility returned the following error message:

There is no media in the specified device.

Someone suggested using this thing called “Apacer Repair v2.9.1.1” to reformat the drive, so I tried that, but the software only reported “USB Flash Disk not found!” when I ran it.

Someone else recommended FreeCommander, but that failed to open the drive, too.

I tried the free trial of the utility from http://www.flashmemorytoolkit.com/, but it reported the same information as Windows XP – that the device contained a disk with 0 bytes capacity. Maybe the full version could have done more, but I put that on the back burner.

A number of people suggested attacking it with partitioning software, which I wasn’t looking forward to doing, but was willing to try.

Another last resort was going to be using the Windows XP Recovery Console’s fixboot and fixmbr commands, which got me out of a pinch when I screwed up a partition.

What I should have tried to begin with

Then I had an idea. I had a clean drive that had escaped my earlier bungling. I plugged it in, copied the contents to my desktop and tried to run the U3 LaunchPad software. Nothing happened, so I started looking more closely at the files. One of the files was called SanDiskFormatExtension.dll, which sounded promising. Now I just needed to figure out how to run the SanDisk installer to reformat the drive. I tried all of the .exe’s and .msi’s that shipped with the drive, but nothing wanted to run from the folder on my desktop.

Just as I was running out of options, I opened the autorun.inf file and found a very interesting entry:

[Update]
URL=http://u3.sandisk.com/download/lp_installer.asp?custom=1.6.1.2&brand=PelicanBFG

The fix

So, with nothing to lose, I pasted http://u3.sandisk.com/download/lp_installer.asp?custom=1.6.1.2&brand=PelicanBFG into Internet Explorer, thinking that it would at least get me some new files that might allow me to reformat the drive. I followed a few prompts and lo, the U3 Launchpad Installer software launched and restored the drive to its factory settings of 2 GB capacity formatted as FAT. It even replaced the original U3 files, making it truly good-as-new.

I’m astonished that this information isn’t more widely available, particularly on the SanDisk support site and forums, as this 0 capacity problem seems to affect a good number of drives and there are many threads where this issue remains unresolved.

Note that the page at http://u3.sandisk.com/download/lp_installer.asp?custom=1.6.1.2&brand=PelicanBFG requires you to install an ActiveX component, so you must use Internet Explorer.

Otherwise, you can download the latest version of the U3 Launchpad Installer executable from the Sandisk KB.

Of course, if you’re not using a SanDisk drive, it’s rather unlikely that this software will fix your drive, but maybe your device’s manufacturer has something similar. There are also a number of good ideas in the comments below, so definitely read through them for more options.

If you’re trying to restore the drive’s contents or recover files, the all of the methods described on this page will format (erase) the drive and are not for you. Good luck.

I needed to convert a physical Windows XP Professional machine running ZENworks into a VMware virtual machine, but only after removing the unique identifiers like the Windows’ SID and ZENworks’ GUID, so that I could later make multiple copies of the VM without them all writing to the same ZENworks object. After weighing my options, I decided that it wouldn’t be practical to hot clone the physical machine. The best method would be to unregister the ZENworks object, uninstall the Adaptive Agent, pull it off the network, reinstall the Adaptive Agent, and then sysprep -reseal -shutdown the machine. This would leave me with a hard drive with a XP installation ready to generate new IDs the next time it was powered on. But as you well know, the VMware vCenter Converter Standalone app can only perform P2V hot cloning. Cold cloning requires the VMware Cold Clone Boot ISO, which is only available to VMware Converter Enterprise license-holders.

After some Googling around, I came across this thing called MOA, Multi-Operating system Administration. Basically, it creates a LiveCD that runs the free VMware Converter on top of a Windows Server 2003 kernel. It’s very, very nice and developed by an obvious super-genius. Just how cool is it? How about the ability to boot a physical box and start the originally installed system as a virtual machine?

Here are the steps I took to build my free cold clone boot CD.

Creating the cold clone boot CD

This builds a LiveCD using Windows Server 2003 that can then run VMware vCenter Converter Standalone 3.0.3 (previously known as VMware Converter Starter Edition) in order to cold clone a hard drive.

Caveats

The version of Windows running in the LiveCD should be the same as, or later than, the version of the Windows machine you want to convert to a VM.

VMware recommends, when cold cloning using their boot CD, that the source physical machine have 364MB of memory, with a minimum of 264MB. MOA recommends, for the Bandit version ISO, that the physical machine have at least 512MB and preferably 1GB or more.

Required files

Download moa241-setup.exe (2.7MB) from
http://sanbarrow.com/phpBB2/viewtopic.php?t=1544
You will need to sign up at the forums to gain access to the download.

Download X13-05665.img (596MB) (Windows Server 2003) from
http://download.microsoft.com/download/E/5/C/E5C2CA69-28C9-492A-8F57-BDA0010616E5/X13-05665.img

Download VMware-converter-3.0.3-89816.exe (30.1MB) from
http://download3.vmware.com/software/converter/VMware-converter-3.0.3-89816.exe

Put all three files in the same folder (with no spaces in the folder name) on a NTFS-formatted disk. MOA will refer to this as the ‘building directory’.

Assemble the ISO

Run moa241-setup.exe.
In the application menu, click moa -> create MOA core.

If you have put the X13-05665.img file into the root of the building directory, MOA will extract the files automatically. If the X13-05665.img file is in a different location or if you are using a different OS to build the LiveCD, MOA setup asks for the location of your Windows-sources. This must be a 32-bit OS, like XP or Server 2003. If you have the files on a CD or mounted using Daemon-tools, just select the drive letter; if you have them extracted somewhere on your hard disk, point to the directory one level higher than the I386 directory.

The MOA setup app asks a few questions about the environment you want to build. Answer these very quickly, as they appear to have a default answer which will be selected automatically after a very short timeout (maybe like 10 seconds).

The MOA setup runs a nifty little DOS app that downloads another 20.34MB of core files. It will ask if you want to download drivers, which is another 17MB download. After another few questions, it runs PE Builder v3.1.10a.

The MOA setup then asks if you want to install VMware Converter 3.0.3 (the default is no, so quickly click yes). After which, it asks you if you want the converter to autostart (default is no, which is fine).

A standard image ISO is created automatically. You can also create a Bandit image ISO, which seems to be what most people use. In my case, the standard image is 374,622KB, while the Bandit image is 296,810KB. The Bandit version should also be faster than the standard version.

The ISO files are saved to iso-out. Burn to CD or DVD using whatever method you prefer.

Booting from the LiveCD

When booting from the Bandit image, you will get the following message, “can’t find vmware – starting plan B”, which makes it seem like something is wrong.

An Open File dialogue box then opens in the ramdisk vm folder and displays “can’t find vmware files in default location – please select a different path”. It’s looking for a Workstation or VMware Player installation here, not the Converter. Just click Cancel.

Another Open File dialogue box will open, stating “still can’t find VMware – you may want to mount a wim”. Click Cancel again.

After a few more seconds, MOA will be finished booting up and the GUI will minimize. Click the taskbar button to open it back up, then right-click the button with the image of the desktop PC with the VMware logo on the screen and select “start converter” from the menu. A Browse for Folder dialogue box will open. Browse to X:/moahome/vm/converter/ and click OK. VMware Converter will launch.

If things are not going as expected, the developer has made a video tutorial showing a boot into MOA followed by a cold cloning operation, located at http://sanbarrow.com/moa23/coldclone-howto/coldclone-howto.html

I saved my new virtual machine to a second physical disk, then put that drive into another machine with VMware Server 1.0.9 already installed and copied over the three vm files.

I started VMware Server and clicked Open Existing Virtual Machine, but when I tried to add the new vm to the inventory, VMware Server Console popped up an error: Unable to add virtual machine “D:Virtual Machinescoldclonetestcoldclonetest.vmx” to the inventory. Configuration file was created by a VMware product with more features than this version.

Some quick Googling led to the fix:

Open the virtual machine’s two ~1 KB configuration files in a text editor.

In the *.vmx file, change

virtualHW.version = "6"
to
virtualHW.version = "4"

In the *.vmdk file, change

ddb.virtualHWVersion = "6"
to
ddb.virtualHWVersion = "4"

After I made those changes, the virtual machine powered on and booted into XP, running all the expected install scripts and generating unique Windows and ZENworks identifiers. I’ve also successfully cold cloned a Windows 2000 machine using the same boot CD.

MOA on a bootable USB drive

If you would prefer to use a bootable USB drive instead of a LiveCD, here are some tips for getting MOA onto a USB drive: http://sanbarrow.com/phpBB2/viewtopic.php?t=1250