Tag Archives: application

Nearly a year ago, I wrote a post on how to detect and fix Word add-in problems with a macro and batch file, in a Windows XP and Office 2007 environment.

This was sufficiently effective, but it was also overly complicated, requiring four separate components:

  1. an autoexec Word 2007 macro that runs each time Word is opened
  2. a batch file that runs the registry merge file and writes an entry to a log file
  3. the registry merge file that contains the correct LoadBehavior settings for the add-ins
  4. a text file that acts as a log

This month, I decided to rewrite the macro to handle the registry changes and write to the log file. It was also a good opportunity to dig a bit deeper into VBA, and I also wanted to confirm that it would work in a more modern environment of Windows 7 and Office 2010 (that code is near the bottom of the post). The new system has only two components:

  1. an autoexec Word 2007 macro that runs each time Word is opened
  2. a text file that acts as a log

Background

First, a bit of background.

Many of the problems with Word 2007 are due to Word’s handling of add-ins. When something unexpected happens in Word, and Word attributes the problem to an add-in, Word will react by flagging it and prompting the user for a decision the next time Word opens. Depending on the severity of the problem and the user’s response, the add-in can be either ‘hard-disabled’ or ‘soft-disabled’.

Microsoft explains the differences between Hard Disabled vs Soft Disabled in a MSDN article at: http://msdn.microsoft.com/en-us/library/ms268871(VS.80).aspx.

I’ve explained a bit about the process by which Word disables add-ins at the end of this post, and I’ve written a shorter post about the basics behind the registry keys responsible for disabling add-ins.

Handling disabled add-ins programmatically

A Word macro can access the condition of an add-in via an Application.COMAddIns object, and it can read and write to the registry. This allows us to tell when an add-in has been disabled and re-enabled it.

My macro has some admittedly hackish parts that need to be cleaned up, there is the matter of unsetting variables to be addressed, and it could certainly be made more elegant, but it works. Note that a file named addinslog.txt must exist in the %TEMP% directory in order for the macro to write the log file. This is what the Word 2007 macro looks like, using the COM add-in installed with Adobe Acrobat 8 Standard as the required add-in…

Option Explicit

' Set up a function to search for a key and return true or false
Public Function KeyExists(key)
    Dim objShell
    On Error Resume Next
    Set objShell = CreateObject("WScript.Shell")
        objShell.RegRead (key)
    Set objShell = Nothing
    If Err = 0 Then KeyExists = True
End Function
    

Sub AutoExec()
'
' FixMissingAddins Macro
' Display a message box with any critical but not 'Connected' COM add-ins, then fix them programatically
'
' Oliver Baty
' June, 2010 - April, 2011
'
' Information on the Application.COMAddIns array
' http://msdn.microsoft.com/en-us/library/aa831759(v=office.10).aspx
'
' Running macros automatically
' http://support.microsoft.com/kb/286310
'
' Using Windows Scripting Shell (WshShell) to read from and write to the local registry
' http://technet.microsoft.com/en-us/library/ee156602.aspx

   
' Declare the WshShell variable (this is used to edit the registry)
    Dim WshShell
    
' Declare the fso and logFile variables (these are used to write to a txt file)
    Dim fso
    Dim logFile

' Create an instance of the WScript Shell object
    Set WshShell = CreateObject("WScript.Shell")
   
' Declare some other variables
   Dim MyAddin As COMAddIn
   Dim stringOfAddins As String
   Dim listOfDisconnectedAddins As String
   Dim requiredAddIn As Variant
   Dim msg As String

   
' Notes on deleting registry keys and values in VB
' http://www.vbforums.com/showthread.php?t=425483
' http://www.tek-tips.com/viewthread.cfm?qid=674375
' http://www.robvanderwoude.com/vbstech_registry_wshshell.php

' Create a string containing the names of all 'Connected' COM add-ins named "stringOfAddins"
   For Each MyAddin In Application.COMAddIns
      If MyAddin.Connect = True Then
          stringOfAddins = stringOfAddins & MyAddin.ProgID & " - "
      End If
   Next
   
' Create an array to hold the names of the critical (required) add-ins named "requiredAddIns"
' Example: change to "Dim requiredAddIns(0 To 4)" if the macro is checking 5 total add-ins)
   Dim requiredAddIns(0 To 0) As String
   
' Add each required AddIn to the array
   requiredAddIns(0) = "PDFMaker.OfficeAddin"
'   requiredAddIns(1) = ""
'   requiredAddIns(2) = ""
'   requiredAddIns(3) = ""
'   requiredAddIns(4) = ""
   
' Cycle through the array of required add-ins, and see if they exist in the connected add-ins list
   For Each requiredAddIn In requiredAddIns
      If InStr(stringOfAddins, requiredAddIn) Then
        ' The required add-in is in the string of connected add-ins
         msg = msg
      Else
        ' The required add-in is not in the string of connected add-ins, so add the add-in name to a string named "listOfDisconnectedAddins"
         msg = msg & requiredAddIn & vbCrLf
         listOfDisconnectedAddins = requiredAddIn & " " & listOfDisconnectedAddins
         listOfDisconnectedAddins = Trim(listOfDisconnectedAddins)
      End If
   Next
   
' If the msg variable is not blank (it contains at least one add-in's name) handle it, otherwise, do nothing
   If msg = "" Then
        ' There are no critical, unconnected add-ins (yay!)
        ' The script can now exit
   Else
        ' There are critical add-ins that are not connected, so handle this
        MsgBox "The following critical Word Add-In(s) are disabled: " & vbCrLf & vbCrLf & msg & vbCrLf & vbCrLf & "To correct this problem, please save any documents you are working on, then close Word and reopen Word."

            ' I find it extremely hackish to check for each possible key and delete it if found... need to research how to delete the tree
            ' One potential obstacle to this method is that I've seen a DocumentRecovery subkey under Resiliency (only once, while editing this macro), that I haven't researched yet
            
            
            ' Note: Since the WSH Shell has no Enumeration functionality, you cannot
            '       use the WSH Shell object to delete an entire "tree" unless you
            '       know the exact name of every subkey.
            '       If you don't, use the WMI StdRegProv instead.
            ' http://www.robvanderwoude.com/vbstech_registry_wshshell.php

            ' More info on WMI StdRegProv at:
            ' http://msdn.microsoft.com/en-us/library/aa393664(v=vs.85).aspx
            
        ' This is hackish, but it effectively deletes a registry key, if it exists
        If KeyExists("HKEY_CURRENT_USER\Software\Microsoft\Office\12.0\Word\Resiliency\DisabledItems\") Then
            WshShell.RegDelete "HKCU\Software\Microsoft\Office\12.0\Word\Resiliency\DisabledItems\"
        ElseIf KeyExists("HKEY_CURRENT_USER\Software\Microsoft\Office\12.0\Word\Resiliency\StartupItems\") Then
            WshShell.RegDelete "HKCU\Software\Microsoft\Office\12.0\Word\Resiliency\StartupItems\"
        ElseIf KeyExists("HKEY_CURRENT_USER\Software\Microsoft\Office\12.0\Word\Resiliency\") Then
            WshShell.RegDelete "HKCU\Software\Microsoft\Office\12.0\Word\Resiliency\"
        End If
        
        ' To be completely thorough, we can also set the desired LoadBehavior for certain add-ins
        ' This can be done selectively, and only if the LoadBehavior was incorrect, but the quick and dirty way would be to just force the values
        
        WshShell.RegWrite "HKLM\SOFTWARE\Microsoft\Office\Word\Addins\PDFMaker.OfficeAddin\LoadBehavior", 3, "REG_DWORD"

        ' Release the WshShell object
        Set WshShell = Nothing
        
        ' Declare a few variables for the log file
        Dim user, machine, datetime, output
        
        Set WshShell = CreateObject("WScript.Shell")
        user = WshShell.ExpandEnvironmentStrings("%USERNAME%")
        machine = WshShell.ExpandEnvironmentStrings("%COMPUTERNAME%")
        temp = WshShell.ExpandEnvironmentStrings("%TEMP%")
        ' Convert the slashes in Now to hyphens to prevent a fatal error
        datetime = Replace(Now, "/", "-")
        ' Create the string that will be written to the log file
        output = datetime + ", " + user + ", " + machine + ", " + listOfDisconnectedAddins

        ' Write the event to a log file
        logfile = temp + "\addinslog.txt"
        ' http://msdn.microsoft.com/en-us/library/2z9ffy99(v=vs.85).aspx
        ' http://www.devguru.com/technologies/vbscript/quickref/filesystemobject_opentextfile.html
        Set fso = CreateObject("Scripting.FileSystemObject")
        Set logFile = fso.OpenTextFile(logfile, 8, True)
        logFile.WriteLine (output)
        logFile.Close
        Set logFile = Nothing
        Set fso = Nothing
        
        ' Should we clear the variables?
        
        ' Release the WshShell object
        Set WshShell = Nothing
   End If
   
   ' Ardamis.com - We're in your macros, fixing your COM add-ins.
End Sub
While working on this, I found that there were some gaps in my understanding of the sequence of events that occur when Word 2007 disables a COM add-in. Please comment if you find that any of this is inaccurate or incomplete.

What happens when Word launches

A critical key to the whole business of Word add-ins is HKEY_CURRENT_USER\Software\Microsoft\Office\12.0\Word\Resiliency

When Word launches, it looks for data under the Resiliency key and a subkey: HKEY_CURRENT_USER\Software\Microsoft\Office\12.0\Word\Resiliency\StartupItems

If the StartupItems subkey contains a REG_BINARY value that corresponds to an add-in, Word throws the familiar warning:

Microsoft Office Word
Word experienced a serious problem with the ‘[addin name]’ add-in. If you have seen this message multiple times, you should disable this add-in and check to see if an update is available. Do you want to disable this add-in?
[Yes] [No]

Choosing No at the prompt removes the Resiliency key and allows Word to continue to launch, leaving the LoadBehavior for that add-in unchanged.

Choosing No also writes an Error event to the Application Event Viewer log:

Event Type:	Error
Event Source:	Microsoft Office 12
Event Category:	None
Event ID:	2000
Date:		5/23/2011
Time:		3:15:29 PM
User:		N/A
Computer:	[WORKSTATION_NAME]
Description:
Accepted Safe Mode action : Microsoft Office Word.

For more information, see Help and Support Center at http://go.microsoft.com/fwlink/events.asp.

Choosing Yes at the prompt removes the StartupItems subkey and creates a new DisabledItems subkey. This DisabledItems subkey will contain a different REG_BINARY value, the data of which contains information about the disabled add-in.

Choosing Yes also writes an Error event to the Application Event Viewer log:

Event Type:	Error
Event Source:	Microsoft Office 12
Event Category:	None
Event ID:	2001
Date:		5/23/2011
Time:		3:12:36 PM
User:		N/A
Computer:	[WORKSTATION_NAME]
Description:
Rejected Safe Mode action : Microsoft Office Word.

For more information, see Help and Support Center at http://go.microsoft.com/fwlink/events.asp.

At this point, the add-in is ‘hard-disabled’, but not ‘soft-disabled’.

Word then continues to launch, but without loading the add-in.

To see which add-ins have been hard-disabled, click on the Office Button | Word Options | Add-Ins, and scroll down to “Disabled Application Add-ins”.

To see which add-ins have been soft-disabled, click on the Office Button | Word Options | Add-Ins. Select “COM Add-Ins” in the Manage menu and click Go.

Word is somewhat tricky in this regard, as the add-in will not have a checkmark, but the LoadBehavior registry value will be unchanged. At any other time, the presence of a checkmark is an indication of the LoadBehavior, but when an add-in has been hard-disabled, the box will always be unchecked.

What users can do at this point

Going through Word Options and enabling the hard-disabled COM add-in will remove the Resiliency key. This may not make the add-in immediately available in Word, however.

To immediately load the add-in and gain its functionality, you can check the box. Otherwise, close and reopen Word, which will cause Word to launch with the add-in’s specified LoadBehavior.

In case you were curious about the keyboard shortcuts used to enable the first disabled add-in in the list of disabled add-ins (maybe you wanted to do something with SendKeys, for example), they are:
Alt+F, I, A, A, Tab, Tab, Tab, D, Enter, G, Space, Alt+E, C, Alt+F4.

In summary, deleting the Resiliency key after the “serious problem” prompt, then closing and reopening Word, returns Word to a normal operating state.

What I intend to accomplish with the macro is to re-enable the hard-disabled add-in, return any LoadBehavior values back to the desired settings, then prompt the user to save their work and close and reopen Word.

This should return Word to a working state.

Word 2010 on 64-bit Windows 7

As a bonus, here’s the same macro, with some minor adjustments to run in Word 2010 on Windows 7 64-bit, with Adobe Acrobat 9 Pro’s COM add-in acting as one of the required add-ins. The OneNote add-in is not enabled in Word by default, and the macro below does not attempt to enable it, but does consider it a required add-in. This is done to demonstrate the pop-up window. Note that a file named addinslog.txt must exist in the %TEMP% directory in order for the macro to write the log file.

Option Explicit

' Set up a function to search for a key and return true or false
Public Function KeyExists(key)
    Dim objShell
    On Error Resume Next
    Set objShell = CreateObject("WScript.Shell")
        objShell.RegRead (key)
    Set objShell = Nothing
    If Err = 0 Then KeyExists = True
End Function

Sub AutoExec()
'
' FixMissingAddins Macro
' Display a message box with any critical but not 'Connected' COM add-ins, then fix them programatically
'
' Oliver Baty
' June, 2010 - April, 2011
'
' Information on the Application.COMAddIns array
' http://msdn.microsoft.com/en-us/library/aa831759(v=office.10).aspx
'
' Running macros automatically
' http://support.microsoft.com/kb/286310
'
' Using Windows Scripting Shell (WshShell) to read from and write to the local registry
' http://technet.microsoft.com/en-us/library/ee156602.aspx

' Declare the WshShell variable (this is used to edit the registry)
    Dim WshShell

' Declare the fso and logFile variables (these are used to write to a txt file)
    Dim fso
    Dim logfile

' Create an instance of the WScript Shell object
    Set WshShell = CreateObject("WScript.Shell")

' Declare some other variables
   Dim MyAddin As COMAddIn
   Dim stringOfAddins As String
   Dim listOfDisconnectedAddins As String
   Dim requiredAddIn As Variant
   Dim msg As String

' Notes on deleting registry keys and values in VB
' http://www.vbforums.com/showthread.php?t=425483
' http://www.tek-tips.com/viewthread.cfm?qid=674375
' http://www.robvanderwoude.com/vbstech_registry_wshshell.php

' Create a string containing the names of all 'Connected' COM add-ins named "stringOfAddins"
   For Each MyAddin In Application.COMAddIns
      If MyAddin.Connect = True Then
          stringOfAddins = stringOfAddins & MyAddin.ProgID & " - "
      End If
   Next

' Create an array to hold the names of the critical (required) add-ins named "requiredAddIns"
' Example: change to "Dim requiredAddIns(0 To 4)" if the macro is checking 5 total add-ins)
   Dim requiredAddIns(0 To 1) As String

' Add each required AddIn to the array
   requiredAddIns(0) = "PDFMaker.OfficeAddin"
   requiredAddIns(1) = "OneNote.WordAddinTakeNotesService"
'   requiredAddIns(2) = ""
'   requiredAddIns(3) = ""
'   requiredAddIns(4) = ""

' Cycle through the array of required add-ins, and see if they exist in the connected add-ins list
   For Each requiredAddIn In requiredAddIns
      If InStr(stringOfAddins, requiredAddIn) Then
        ' The required add-in is in the string of connected add-ins
         msg = msg
      Else
        ' The required add-in is not in the string of connected add-ins, so add the add-in name to a string named "listOfDisconnectedAddins"
         msg = msg & requiredAddIn & vbCrLf
         listOfDisconnectedAddins = requiredAddIn & " " & listOfDisconnectedAddins
         listOfDisconnectedAddins = Trim(listOfDisconnectedAddins)
      End If
   Next

' If the msg variable is not blank (it contains at least one add-in's name) handle it, otherwise, do nothing
   If msg = "" Then
        ' There are no critical, unconnected add-ins (yay!)
        ' The script can now exit
   Else
        ' There are critical add-ins that are not connected, so handle this
        MsgBox "The following critical Word Add-In(s) are disabled: " & vbCrLf & vbCrLf & msg & vbCrLf & vbCrLf & "To correct this problem, please save any documents you are working on, then close Word and reopen Word."

            ' I find it extremely hackish to check for each possible key and delete it if found... need to research how to delete the tree
            ' One potential obstacle to this method is that I've seen a DocumentRecovery subkey under Resiliency (only once, while editing this macro), that I haven't researched yet

            ' Note: Since the WSH Shell has no Enumeration functionality, you cannot
            '       use the WSH Shell object to delete an entire "tree" unless you
            '       know the exact name of every subkey.
            '       If you don't, use the WMI StdRegProv instead.
            ' http://www.robvanderwoude.com/vbstech_registry_wshshell.php

            ' More info on WMI StdRegProv at:
            ' http://msdn.microsoft.com/en-us/library/aa393664(v=vs.85).aspx

        ' This is hackish, but it effectively deletes a registry key, if it exists
        If KeyExists("HKEY_CURRENT_USER\Software\Microsoft\Office\14.0\Word\Resiliency\DisabledItems\") Then
            WshShell.RegDelete "HKCU\Software\Microsoft\Office\14.0\Word\Resiliency\DisabledItems\"
        ElseIf KeyExists("HKEY_CURRENT_USER\Software\Microsoft\Office\14.0\Word\Resiliency\StartupItems\") Then
            WshShell.RegDelete "HKCU\Software\Microsoft\Office\14.0\Word\Resiliency\StartupItems\"
        ElseIf KeyExists("HKEY_CURRENT_USER\Software\Microsoft\Office\14.0\Word\Resiliency\") Then
            WshShell.RegDelete "HKCU\Software\Microsoft\Office\14.0\Word\Resiliency\"
        End If

        ' To be completely thorough, we can also set the desired LoadBehavior for certain add-ins
        ' This can be done selectively, and only if the LoadBehavior was incorrect, but the quick and dirty way would be to just force the values

        WshShell.RegWrite "HKCU\Software\Microsoft\Office\Word\Addins\PDFMaker.OfficeAddin\LoadBehavior", 3, "REG_DWORD"

        ' Release the WshShell object
        Set WshShell = Nothing

        ' Declare a few variables for the log file
        Dim user, machine, temp, datetime, output

        Set WshShell = CreateObject("WScript.Shell")
        user = WshShell.ExpandEnvironmentStrings("%USERNAME%")
        machine = WshShell.ExpandEnvironmentStrings("%COMPUTERNAME%")
        temp = WshShell.ExpandEnvironmentStrings("%TEMP%")
        ' Convert the slashes in Now to hyphens to prevent a fatal error
        datetime = Replace(Now, "/", "-")
        ' Create the string that will be written to the log file
        output = datetime + ", " + user + ", " + machine + ", " + listOfDisconnectedAddins

        ' Write the event to a log file
        logfile = temp + "\addinslog.txt"
        ' http://msdn.microsoft.com/en-us/library/2z9ffy99(v=vs.85).aspx
        ' http://www.devguru.com/technologies/vbscript/quickref/filesystemobject_opentextfile.html
        Set fso = CreateObject("Scripting.FileSystemObject")
        Set logfile = fso.OpenTextFile(logfile, 8, True)
        logfile.WriteLine (output)
        logfile.Close
        Set logfile = Nothing
        Set fso = Nothing
        
        ' Should we clear the variables?

        ' Release the WshShell object
        Set WshShell = Nothing
   End If

   ' Ardamis.com - We're in your macros, fixing your COM add-ins.
End Sub
Actually, my method of toggling the read-only attribute of Word.qat requires two macros. One switches on the read-only attribute of Word.qat to prevent it from being changed. The other clears the read-only attribute so buttons can be added or removed.

Just add these macros as buttons to the QAT to quickly protect and unprotect it. I prefer two buttons to a single button because I don’t know of a way of telling, visually, the current state of the read-only attribute of a file. I’d love to change the appearance of the button to indicate the state, but I haven’t found a way to do this. So for now, two buttons allow the user to take exactly the action desired.

Why would you ever need to do this?

Buttons disappearing from the QAT is a pretty common occurrence.

If your Quick Access Toolbar contains buttons from templates or COM add-ins, these custom buttons can be lost when Word is closed and reopened. To demonstrate this, add such a button to the QAT, then close Word and reopen it from the command line with winword.exe /a (the /n switch may also demonstrate this). Word will open, but without any add-ins. Instead of creating a temporary Word.qat with the default buttons, the working Word.qat file is edited to remove all the non-native Word buttons. The appearance to the user is that Word loses the custom buttons. Once the buttons disappear, they do not return when Word is opened normally.

From what I can tell, the QAT buttons disappearing isn’t a random event or a bug, but an intentional consequence of initiating a Word instance without any add-ins or a result of a badly written function in a template or add-in.

The LockQAT Macro

Sub LockQAT()
'
' LockQAT Macro
'
'

    Dim appdata, thepath, objFSO, objFile

    Set oShell = CreateObject("WScript.Shell")
    appdata = oShell.ExpandEnvironmentStrings("%APPDATA%")
    thepath = appdata & "\Microsoft\Office\Word.qat"

    Set objFSO = CreateObject("Scripting.FileSystemObject")
    Set objFile = objFSO.GetFile(thepath)
    
    'Determine if the file is ALREADY Read-Only
    If objFile.Attributes And 1 Then
        MsgBox "The Word.QAT file is already Read-only."
    Else
        MsgBox "Locking the QAT from further editing."
        objFile.Attributes = objFile.Attributes + 1
    End If
    
' Resources
' http://www.4guysfromrolla.com/webtech/112600-1.shtml

End Sub

The UnlockQAT Macro

Sub UnlockQAT()
'
' UnlockQAT Macro
'
'

    Dim appdata, thepath, objFSO, objFile
    
    Set oShell = CreateObject("WScript.Shell")
    appdata = oShell.ExpandEnvironmentStrings("%APPDATA%")
    thepath = appdata & "\Microsoft\Office\Word.qat"

    Set objFSO = CreateObject("Scripting.FileSystemObject")
    Set objFile = objFSO.GetFile(thepath)

    'Determine if the file is ALREADY Read-Only
    If objFile.Attributes And 1 Then
        MsgBox "Unlocking the QAT for editing."
        objFile.Attributes = objFile.Attributes - 1
    Else
        MsgBox "The Word.QAT file is already writeable."
    End If

' Resources
' http://www.4guysfromrolla.com/webtech/112600-1.shtml
    
End Sub

A user pointed out that while an attachment to an email had the icon of an installed application (in this case, Word) and the correct extention (.DOC), it would not open in Word with a double-click. The Open With dialog box opened instead. When the attachment was dragged to the desktop, it opened in Word with a double-click, as expected.

Because the filename of this attachment was pretty long, I suspected that it had something to do with the length of the filename, and so I started investigating.

Test files

I created text files with the following filenames:

119-CAsEvpz1R29z7sdrgs4-apJFmpissj-xxdfgh-dfght66x1aseg-7tSs5lF7lLyd3T-HJf42YiMYwguijgrsywh-wgh3q45y4tys64ysy45-119.txt

120-CAsEvpz1R29z7sdrgs4-apJFmpiRssj-xxdfgh-dfght66x1aseg-7tSs5lF7lLyd3T-HJf42YiMYwguijgrsywh-wgh3q45y4tys64ysy45-120.txt

123-CAsEvpz1R29z7sdrgs437-apJFmpiRssj-xxdfgh-dfght66x1aseg-7tSs5lF7lLyd3T-HJ6f42YiMYwguijgrsywh-wgh3q45y4tys64ysy45-123.txt

129-vpz1R296z7apJFmpiRss6x1IA7eu9utSs5lF7lLyd3THJf42YiMYwgVZ4FJ-CAsEvpz1R296z7apJFmpiRss6x1IA7eu9utSs5lF7lLyd3THJf42YiMYa-129.txt

131-vpz1R296z7apJFmpiRss6x23451IA7e9utSs5lF7lLyd3THJf42YiMYwgVZ4FJ-CAsEvpz1R296z7apJFmpiRss6x451I7eu9utSlF7lLyd3THJf42YiMYa-131.txt

133-vpz1R296z7apJFmpiRss6x1IA7eu9utSs5lF7lLyd3THJf42YiMYwgVZ4FJ-CAsEvpz1R296z7apJFmpiRss6x1IA7eu9utSs5lF7lLyd3THJf42YiMYwgVZa-133.txt

Including the extensions, these filenames are 119, 120, 123, 129, 131, and 133 characters, respectively.

Outgoing emails

I added the files as attachments to a new mail message.

For attachments with less than 130 characters in the filename, the filename is displayed in full.

The “129-” attachment’s name is 129 characters and the full name was displayed. The icon was the correct Text Document file icon.
The “131-” attachment’s name is 131 characters and the name was truncated at the 129th character (…-131.t). This caused the icon to be the Windows unrecognized file type icon (presumably because my computer has no application associated with a “.t” extension).
The “133-” attachment’s name is 133 characters and was truncated at the 129th character, before the . character (…-133). The icon was a Notepad icon, but not the typical Text Document file icon.

It would appear that attachment filenames are truncated at the 129th character when displayed in the attachment pane in the Mail To: window.

Incoming emails

Send the email.

Open the received email or view it with the Quickviewer and note that the filenames in the attachment window are again truncated at the 129th character.

Try to open each attachment with a double-click. The “119-” attachment should open in Notepad, but all attachments with longer filenames will not open, and instead cause an Open With prompt to open.

Why was this happening?

The locally stored attachment filename is differently truncated

Even when the full filename with the extension is visible, the filename of the local copy of the attachment is truncated at X characters, where X = (130 – PATH/TO/XPgrpwise).

In my case, the path to the XPgrpwise folder that contains the attachments is 63 characters long:
C:\Documents and Settings\F_LAST\Local Settings\Temp\XPgrpwise\
This means the maximum filename length for emails opened under my account is 67 characters (130 – 63 = 67).

A longer or shorter path to this folder will cause the maximum filename length to change accordingly, so if you repeat these tests, your experience may vary.

This matters less than one would think, though, because of the way GroupWise 7 shortens the filenames.

An unexpected discovery

Instead of simply chopping off any characters after the character limit has been reached, however, GroupWise will truncate the name portion of the filename and leave the extention portion intact, up to 119 characters. Filenames 120 characters or longer are truncated to the 119-character limit but the extention begins to be cut off. Once the extention begins to be cut off, double-clicking the attachment will cause the Open With dialog box to open if the shortened extention doesn’t have an application associated with it or is missing entirely (as one would expect). Filenames of 123 characters or longer are truncated such that the dot+extension is completely removed. This 119-character limit seems to be independent of the number of characters in the path to XPgrpwise.

In summary

To sum up, just because GroupWise 7 displays the full filename of an attachment and the correct icon doesn’t mean that the attachment can be opened in its associated application from the message window. When GroupWise saves the file to the hard drive, it truncates long filenames, potentially removing the extension. Opening attachments with filenames greater than 119 characters in length requires a little more effort because of the way the local copy of the file is saved without an extension.

I’ve written a simple batch file for backing up files and folder onto a different drive letter.

In my case, the destination drive will be a USB drive. Even though I’ve configured Windows to always assign the same drive letter to that device, the possibility remains that I’ll connect a different drive that will be assigned the same drive letter. In order to be sure that I’m backing up to the correct drive, the batch file performs a few checks before copying files.

The first check confirms that a disk exists at that drive letter. The second check confirms that the path is valid. The third check looks for the presence of a file in the destination directory.

To use, simply paste the following code into a text file, change the variables to match your environment, add additional xcopy lines for other folders, then save it as a .bat file. Fire the batch file manually, or place it in your startup folder to automatically back up your files each time you log in to Windows.

:: Back up select files and folders to a location that may be an external drive
@echo off

:: Set some variables
set destinationDrive=D:
set destinationPath=backup
Set destination=%destinationDrive%\%destinationPath%
set validationFile=asdf.txt

:: Check to see if the drive is available
if not exist %destinationDrive%\. goto :nodestinationDrive
:: Move to destination drive
%destinationDrive%

:: Check to see if the path is available
if not exist "\%destinationPath%\." goto :nodestinationPath
:: Move to destination path
cd %destinationPath%

:: Check to see if the validation file exists
if not exist %validationFile% goto :novalidationFile

:: Backup location is valid
@echo The backup location "%destination%" is valid.

:: Copy files and folders if source is newer than destination

:: Desktop
@xcopy "%USERPROFILE%\Desktop" "%destination%\Desktop" /d /e /c /i /q /h /r /k /y

@echo.
@echo Files copied.  Please review output for errors.
@pause
goto eof

:nodestinationDrive
@echo The destination drive "%destinationDrive%" does not exist.
goto :nocopy

:nodestinationPath
@echo The destination path "%destinationPath%" does not exist on drive %destinationDrive%.
goto :nocopy

:novalidationFile
@echo The validation file does not exist.
goto :nocopy

:: No files have been copied
:nocopy
::@echo A valid backup location cannot be confirmed.
@echo No files have been copied.

@echo.
@pause

This file works with Windows XP through Windows 7.

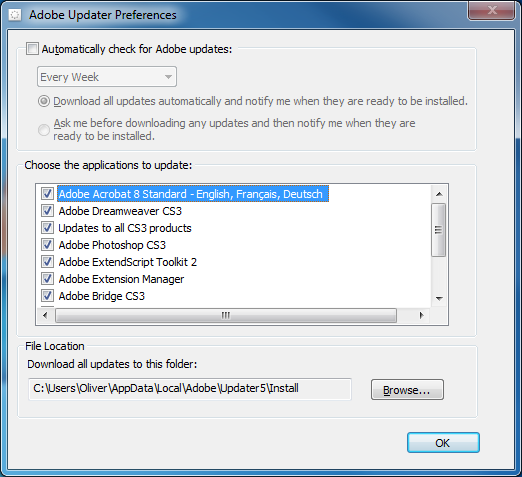
By default, the Adobe Updater application that is installed along side various Adobe products like Acrobat and Photoshop is set to check for updates automatically. Specifically, it’s set to check for updates to all installed Adobe products every week, and to download all updates and then notify you when they are ready to be installed. In this post, I’ll explain how to disable this feature by editing a settings file while avoiding the GUI.

Adobe Updater Preferences

Adobe Updater Preferences

In a managed environment, an administrator may not want any software to update itself for any number of reasons. The automatic check can be switched off in the Adobe Updater preferences, but it can be a nuisance to find and requires as many as 9 clicks.

Adobe Updater can be launched from within Adobe products by clicking Help | Check for Updates (note that in some products, the path is Help | Updates, but in either case, you can use the keystroke Alt+H, U). Click Preferences, then uncheck the box next to Automatically check for Adobe updates and click OK, then close the Adobe Updater window. You may have to click Quit in a subsequent window before the application closes.

For a more direct route, the Adobe Updater executable installed with Reader 9 resides at
C:\Program Files (x86)\Common Files\Adobe\Updater6\AdobeUpdater.exe on a 64-bit Windows 7 machine, and at
C:\Program Files\Common Files\Adobe\Updater6\AdobeUpdater.exe on a 32-bit Windows XP machine.

All of the configurable settings are saved to a file named AdobeUpdaterPrefs.dat in the user profile, rather than as registry keys. The .dat file extension suggests a binary file, but it’s actually just an XML document that can be opened in any text editor.

The preferences file resides at
C:\Users\[USERNAME]\AppData\Local\Adobe\Updater6\AdobeUpdaterPrefs.dat on a 64-bit Windows 7 machine, and at
C:\Documents and Settings\[USERNAME]\Local Settings\Application Data\Adobe\Updater6\AdobeUpdaterPrefs.dat on a 32-bit Windows XP machine.

The minimum lines that need to exist for the file to be valid and for “Automatically check for Adobe updates” to be disabled are:

<?xml version="1.0" encoding="UTF-8" ?>
<AdobeUpdater>
<AutoCheck>0</AutoCheck>
</AdobeUpdater>

To disable the auto update check programmatically, this file can be saved as AdobeUpdaterPrefs.dat and a script used to later overwrite the file in the user profile. A rather geekier approach would be to use a batch file to rename AdobeUpdaterPrefs.dat and then write a new file. I prefer the latter method because it requires only a single file and because it could be easily modified to insert lines that would change other settings, such as the location of the aum.log log file or the download directory, which are located in the user profile by default.

A batch file to back-up and then remake the file might look like this:

:: A batch file for writing a new Adobe Updater settings file "AdobeUpdaterPrefs.dat"
:: If an AdobeUpdaterPrefs.dat exists, it is edited and then the next next location is checked, until the script has iterated through all locations
@echo off

%SystemDrive%
cd\
SETLOCAL EnableDelayedExpansion

:: Check each location and if the file is found, pass the directory and a label (to the next path to be searched or to an EXIT command) to the function

:XPUpdater6
@echo.
echo Checking for "%USERPROFILE%\Local Settings\Application Data\Adobe\Updater6\AdobeUpdaterPrefs.dat"
if exist "%USERPROFILE%\Local Settings\Application Data\Adobe\Updater6\AdobeUpdaterPrefs.dat" (call:REWRITE "%USERPROFILE%\Local Settings\Application Data\Adobe\Updater6",XPUpdater5) else (@echo The AdobeUpdaterPrefs.dat file was not found.)

:XPUpdater5
@echo.
echo Checking for "%USERPROFILE%\Local Settings\Application Data\Adobe\Updater5\AdobeUpdaterPrefs.dat"
if exist "%USERPROFILE%\Local Settings\Application Data\Adobe\Updater5\AdobeUpdaterPrefs.dat" (call:REWRITE "%USERPROFILE%\Local Settings\Application Data\Adobe\Updater5",OUT) else (@echo The AdobeUpdaterPrefs.dat file was not found.)

:OUT
@pause
exit

:REWRITE
:: Configure Adobe Update to not check for updates
:: Move to the correct directory
cd %~1
:: Delete any temp file that this script may have created in the past
if exist AdobeUpdaterPrefs.dat.temp del AdobeUpdaterPrefs.dat.temp
:: Backup the old file
rename AdobeUpdaterPrefs.dat AdobeUpdaterPrefs.dat.temp
:: Write a new minimum settings file (the other data will be filled in when Auto Updater runs)
echo ^<?xml version="1.0" encoding="UTF-8" ?^> >> AdobeUpdaterPrefs.txt
echo ^<AdobeUpdater^> >> AdobeUpdaterPrefs.txt
echo ^<AutoCheck^>0^</AutoCheck^> >> AdobeUpdaterPrefs.txt
echo ^</AdobeUpdater^> >> AdobeUpdaterPrefs.txt
:: Rename the new file
rename AdobeUpdaterPrefs.txt AdobeUpdaterPrefs.dat
@echo The AdobeUpdaterPrefs.dat file was found and modified.
:: Go to the next location in the list
goto :%~2
goto :EOF

File locations in Windows 7

Note that in Windows 7, “%USERPROFILE%\AppData\Local\” and “%USERPROFILE%\Local Settings\Application Data\” contain the same data. A file added to a subdirectory in one location will appear in the corresponding subdirectory in the other location. So this script will work on Windows 7 because of 7’s backwards compatibility.

If you wanted to the script to run using Windows 7’s native C:\Users\… directory structure and did not care about the loss of compatibility with XP, you could use the following script instead.

:: A batch file for writing a new Adobe Updater settings file "AdobeUpdaterPrefs.dat"
:: If an AdobeUpdaterPrefs.dat exists, it is edited and then the next next location is checked, until the script has iterated through all locations
@echo off

%SystemDrive%
cd\
SETLOCAL EnableDelayedExpansion

:: Check each location and if the file is found, pass the directory and a label (to the next path to be searched or to an EXIT command) to the function

:WIN7Updater6
@echo.
echo Checking for "%USERPROFILE%\AppData\Local\Adobe\Updater6\AdobeUpdaterPrefs.dat"
if exist "%USERPROFILE%\AppData\Local\Adobe\Updater6\AdobeUpdaterPrefs.dat" (call:REWRITE "%USERPROFILE%\AppData\Local\Adobe\Updater6",WIN7Updater5) else (@echo The AdobeUpdaterPrefs.dat file was not found.)

:WIN7Updater5
@echo.
echo Checking for "%USERPROFILE%\AppData\Local\Adobe\Updater5\AdobeUpdaterPrefs.dat"
if exist "%USERPROFILE%\AppData\Local\Adobe\Updater5\AdobeUpdaterPrefs.dat" (call:REWRITE "%USERPROFILE%\AppData\Local\Adobe\Updater5",OUT) else (@echo The AdobeUpdaterPrefs.dat file was not found.)

:OUT
@pause
exit

:REWRITE
:: Configure Adobe Update to not check for updates
:: Move to the correct directory
cd %~1
:: Delete any temp file that this script may have created in the past
if exist AdobeUpdaterPrefs.dat.temp del AdobeUpdaterPrefs.dat.temp
:: Backup the old file
rename AdobeUpdaterPrefs.dat AdobeUpdaterPrefs.dat.temp
:: Write a new minimum settings file (the other data will be filled in when Auto Updater runs)
echo ^<?xml version="1.0" encoding="UTF-8" ?^> >> AdobeUpdaterPrefs.txt
echo ^<AdobeUpdater^> >> AdobeUpdaterPrefs.txt
echo ^<AutoCheck^>0^</AutoCheck^> >> AdobeUpdaterPrefs.txt
echo ^</AdobeUpdater^> >> AdobeUpdaterPrefs.txt
:: Rename the new file
rename AdobeUpdaterPrefs.txt AdobeUpdaterPrefs.dat
@echo The AdobeUpdaterPrefs.dat file was found and modified.
:: Go to the next location in the list
goto :%~2
goto :EOF

Additional benefits

Modifying the preferences file could have other benefits as well. Imagine the time and disk space that could saved by having all of those incremental Adobe updates saved to a network location, rather than downloading them to each workstation.

I like using the Import Pictures and Videos wizard in Windows 7 when transferring pictures from my digital camera because it can create a separate folder for each date. But it lacks the ability to rename the individual files based on date. I want my image filenames to be YYYY.MM.DD_001.jpg, where the trailing number increments for that date.

To get the filename just right, I use Advanced Renamer, a free program for renaming multiple files or folders at once. Advanced Renamer can read information from the image file (like the date the picture was taken).

Importing the images

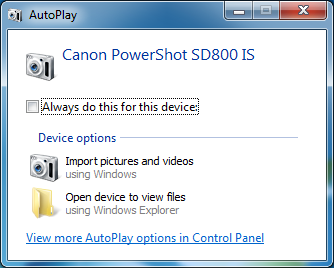
Connect the device or memory card to your computer. In the AutoPlay dialog box that appears, click Import pictures and videos using Windows.

Windows 7 AutoPlay dialog box

Windows 7 AutoPlay dialog box

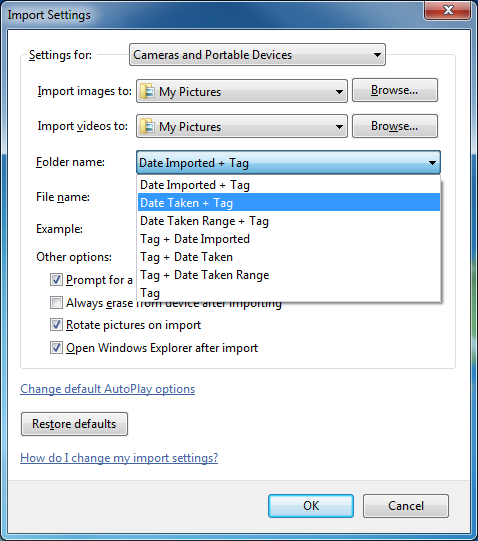
The default settings will create a single folder with today’s date, which is not what we want. To change the settings that are used when importing pictures and videos, click Import settings in the Import Pictures and Videos dialog box.

Windows 7 Import Settings dialog box

Windows 7 Import Settings dialog box

Under the Folder name menu, choose Date Taken + Tag and click OK. The import process will restart and you’ll be prompted to enter a tag. The tag isn’t important, so just click Import.

Configuring Advanced Renamer

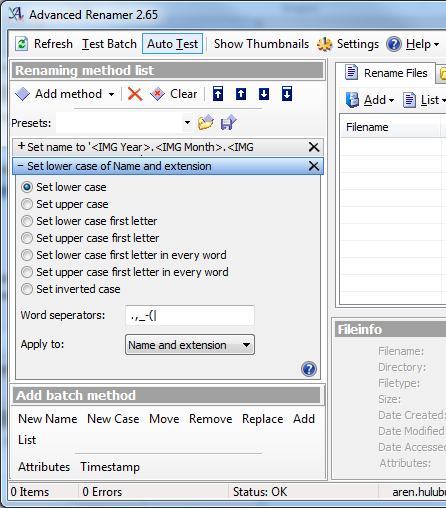
It takes two methods to get the names the way I want them. The first method changes the filename to use the year, month, and day information, and increment a trailing number. The second method changes the new filename to lowercase. If you prefer your file extensions to be in uppercase, you can skip the second method.

Advanced Renamer - Renaming method list

Advanced Renamer - Renaming method list

Under Add batch method, click New Name, and either select the desired date conventions from the options, adding any separator characters you wish, or copy the code below to use YYYY.MM.DD_001.EXT.

<IMG Year>.<IMG Month>.<IMG Day>_<Inc NrDir:001>.<Ext>

Under Add batch method, click New Case and then choose Set lower case. In the Apply to menu, choose Name and extension.

Click the Add button and browse to the parent folder. The files should appear in the list, and the new filename will be displayed. Check for any errors or problems with the filename, then click Start Batch.

Move the files into a single directory

Now that the pictures are all correctly named, I no longer need them to be in date-based folders. It’s more convenient to have them in a single folder from which I can organize them.

To do this, I use a batch file that moves any files in a sub-folder into the parent folder.

Set sOriginFolder="PATH\TO\PARENT\DIRECTORY"

For /f "Tokens=*" %%a in ('Dir %sOriginFolder% /a-d /s /b') do (
	move "%%a" %sOriginFolder%
)

Replace PATH\TO\PARENT\DIRECTORY with the full path to the parent folder, then run the batch file.

That’s it. Now I have a single folder of images that are uniquely named according to date taken.

Adobe Flash Player is frequently updated, which makes it difficult to keep a large user-base on the current version. This post is a collection of useful links for managing Flash Player.

Adobe Flash Player Version Information

This page reports the version of Flash Player currently running on the browser, along with the latest available version.
http://www.adobe.com/software/flash/about/

Install the latest version of Flash Player

To install the latest version of Flash Player, visit http://get.adobe.com/flashplayer/.

How to download the offline Flash Player installer

To download the offline Flash Player installer (*.exe) for Internet Explorer or Chrome, Firefox, Safari and Opera:

  1. Go to the download page at
    http://get.adobe.com/flashplayer/.
  2. Click on the link:
    Different operating system or browser?
  3. Select an operating system from the menu and click Continue.
  4. Select your browser.
  5. Click on the “Agree and install now” button to initiate the download.
  6. Run the installer file.
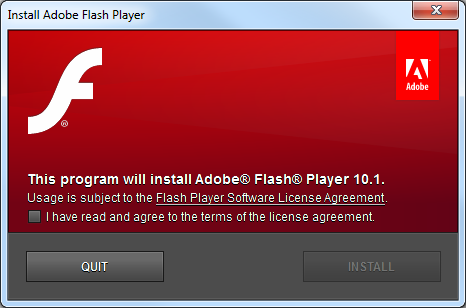
Install Adobe Flash Player

Install Adobe Flash Player

The direct link to the current version of the Flash Player installer (for Windows) for Chrome, Firefox, Safari and Opera:
http://fpdownload.adobe.com/get/flashplayer/current/install_flash_player.exe

The direct link to the current version of the Flash Player installer (for Windows) for Internet Explorer:
http://fpdownload.adobe.com/get/flashplayer/current/install_flash_player_ax.exe

Flash RSS Feeds

Recent documents: http://www.adobe.com/support/flashplayer/rss/recent.documents.xml
Top issues: http://www.adobe.com/support/flashplayer/rss/top.issues.static.xml
Developer Center: http://rss.adobe.com/developer_center_flashplayer_tutorials.rss?locale=en_US
Flash Player news: http://rss.adobe.com/resources_flashplayer.rss?locale=en_US

Distribute Adobe Flash Player

You may post Adobe Flash Player on company intranet sites or local networks.
The Adobe Flash Player is available for for distribution and use beyond single-user installations. This includes, for example, distributing to workstations within your department or organization, or on fixed media with your software product or multimedia experience.

http://www.adobe.com/products/players/fpsh_distribution1.html

Adobe Flash Player Settings Manager

The Settings Manager is a special control panel that runs on your local computer but is displayed within and accessed from the Adobe website. Adobe does not have access to the settings that you see in the Settings Manager or to personal information on your computer.

To change your settings, click the tabs to see different panels, then click the options in the Settings Manager panels that you see on the web page.

http://www.macromedia.com/support/documentation/en/flashplayer/help/settings_manager.html

How to disable notification of Flash Player updates

Flash Player is notoriously insecure, so I’d recommend keeping it up-to-date.

Right-click on any Flash content, select Global Settings, and click the Global Notifications Settings panel link in the Flash Player Settings Manager.

Note: The Settings Manager is a Flash application that displays Flash Player settings which are stored on your computer only. Adobe does not store or track this information on its servers nor does it pass this information to third parties.

Deselect the “Notify me When an Update to Adobe Flash Player is available.” option to stop receiving notifications.

Close the Settings Manager browser window. Flash Player automatically remembers the new settings.

Error messages in Internet Explorer

“Internet Explorer has encountered a problem with an add-on and needs to close. The following add-on was running when this problem occurred: Flash10a.ocx”

http://kb2.adobe.com/cps/408/kb408620.html

Update 5.5.11: I’ve written a better macro that doesn’t require a separate batch file and registry merge file. Please check out the new post at:

Programmatically re-enabling Word COM add-ins

A few months ago, I wrote a post on fixing Word 2007 add-in issues with a registry merge. In this post, I’ll take that idea a little further and explain how to automatically detect and fix add-ins through the use of a macro that runs each time Word is opened and a batch file that runs the registry merge file. All the end-user needs to do to repair the missing functionality is close and reopen Word.

The idea is that, in a corporate environment, there are certain important add-ins that must be running in order for Word to work normally. A good example would be an add-in that integrates Word with a document management system. Should that integration be lost because the add-in failed to load, data may be lost. Because there is no way to force Word to load certain add-ins, and there is no built-in function in Word for warning users when critically important don’t load, I decided to come up with a method for alerting the user to the problem and then fixing it with as little inconvenience as possible.

The example code in this post assumes the workstation is running Office 2007 on Windows XP (32-bit). I would think that the method could be adapted to other environments (Windows 7, Office 2010) without too much trouble. I’ve tried to note where differences come up on Windows 7 and 64-bit operating systems.

The process has four components:

  • an autoexec Word 2007 macro that runs each time Word is opened
  • a batch file that runs the registry merge file and writes an entry to a log file
  • the registry merge file that contains the correct LoadBehavior settings for the add-ins
  • a text file that acts as a log

The macro can be added to Normal.dotm or saved to a new .dotm file placed in the startup directory. The .bat batch file, .reg registry file, and .txt log file can be put anywhere, but in this example, they will be saved to a new folder C:\Word Add-ins fix\.

In the code examples below, I’ll be using the Acrobat PDFMaker Office COM Addin as the add-in that must always be loaded. This plugin is installed with Acrobat versions 8.1 and above and adds an Acrobat tab to the ribbon.

The macro

The first thing to do is to collect some information on the COM add-ins that are currently installed. Microsoft Support provides a simple macro for listing all of the COM add-ins at Some COM add-ins are not listed in the COM Add-Ins dialog box in Word. I recommend using this macro to identify the ProgID of your add-ins. The text to the left of the hyphen is the add-in’s Description and the text to the right of the hyphen is the ProgID.

Running the macro from the Microsoft site shows us that the ProgID for the Acrobat PDFMaker Office COM Addin is PDFMaker.OfficeAddin.

In Microsoft jargon, an add-in with a LoadBehavior of 3 is ‘Connected’. The COMAddIn object has a property called Connect that will be True if the add-in is Connected and False if it is not. The macro first checks the Connect property of each add-in and writes the ProgID of each Connected add-in to a string. It then checks to see if the string contains a match for each of the required add-ins. If the required add-in does not exist in the string, the macro will display a message to the user and fire the batch file to reset the LoadBehavior. It also passes the names of any not connected add-ins to the batch file as a parameter, so that information can be logged.

I found this article from MSDN on the COMAddIn object very helpful.

Sub AutoExec()
'
' FindMissingAddins Macro
' Display a message box with any critical but not 'Connected' COM add-ins
'

   Dim msg As String
   
   Dim MyAddin As COMAddIn
   Dim i As Integer, stringOfAddins As String
   
   For Each MyAddin In Application.COMAddIns
      If MyAddin.Connect = True Then
          stringOfAddins = stringOfAddins & MyAddin.ProgID & " - "
      End If
   Next
   
' Update the number of elements in the array
' Example: change to "requiredAddIns(0 To 4)" if you were checking 5 total add-ins)
   Dim requiredAddIns(0 To 0) As String
   
' Add each required AddIn to the array
   requiredAddIns(0) = "PDFMaker.OfficeAddin"
'   requiredAddIns(1) = ""
'   requiredAddIns(2) = ""
'   requiredAddIns(3) = ""
'   requiredAddIns(4) = ""
   
   For Each requiredAddIn In requiredAddIns
      If InStr(stringOfAddins, requiredAddIn) Then
         msg = msg
      Else
         msg = msg & requiredAddIn & vbCrLf
         listOfDisconnectedAddins = requiredAddIn & " " & listOfDisconnectedAddins
         listOfDisconnectedAddins = Trim(listOfDisconnectedAddins)
      End If
   Next
   
   If msg = "" Then
   Else
        MsgBox "The following important add-ins are not running: " & vbCrLf & vbCrLf & msg & vbCrLf & vbCrLf & "Please save your work, then close and reopen Word."
' Run a batch file that corrects the add-in problems in the registry and pass the list of unconnected add-ins as an argument
        Shell """C:\Word Add-ins fix\fixWordAddins.bat"" """ & listOfDisconnectedAddins & """"
   End If
   
End Sub

Edit the macro to fit your environment. You will need to specify each required add-in’s ProgID in the requiredAddIns array and update the number of add-ins in the array’s definition. The macro needs to be named AutoExec in order to run when Word starts.

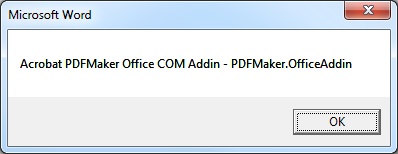
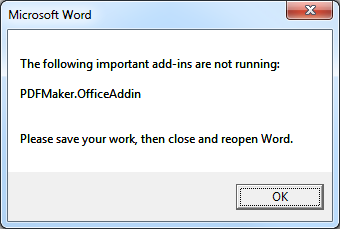
This is the message that the user will receive if the macro finds that a required add-in is not Connected.

Clicking OK runs the batch file and closes the window.

The batch file

The batch file is called by the macro when any of the add-ins are not registered and currently connected. The batch file references the .reg file that contains the correct LoadBehavior settings and writes an event to the log with information on the username, the machine name, the datetime that the problem was discovered and which add-in(s) were not connected.

Copy the code and save it as fixWordAddins.bat to the C:\Word Add-ins fix\ directory or wherever you want.

:: A batch file for running a registry merge to set the LoadBehavior for Word add-ins
::
@echo off

REGEDIT /S "C:\Word Add-ins fix\fixWordAddins.reg"

:: Let's create a little log file and output which user ran the script and at what date and time
:: Set some variables for the date. US format - not localized!
@For /F "tokens=2,3,4 delims=/ " %%A in ('Date /t') do @( 
	Set Month=%%A
	Set Day=%%B
	Set Year=%%C
)

:: Set some variables for the time.
@For /F "tokens=1,2,3 delims=/: " %%A in ('Time /t') do @( 
	Set Hours=%%A
	Set Minutes=%%B
	Set Meridiem=%%C
)

:: Output to a log file
@echo %username% at %computername% on %Month%/%Day%/%Year% at %Hours%:%Minutes% %Meridiem% (%1) >> "C:\Word Add-ins fix\log.txt"

The registry merge

Add-ins can be ‘hard-disabled’ or ‘soft-disabled’ by Word 2007. Please see my post at fixing Word 2007 add-in issues with a registry merge for more information about what this means. The following registry merge will address both issues.

The registry merge will have to be edited for your environment, too. First, find the LoadBehavior value in the the registry for each of your add-ins in either of two locations:
HKEY_LOCAL_MACHINE\SOFTWARE\Microsoft\Office\Word\Addins\
HKEY_CURRENT_USER\Software\Microsoft\Office\Word\Addins\

If you don’t find your add-in in either of those locations, search the registry for the ProgID.

A LoadBehavior of 3 = loaded (this corresponds to a checked box in Word Options/Add-Ins)
A LoadBehavior of 2 = not loaded (this corresponds to an unchecked box in Word Options/Add-Ins)

The only add-ins that you need to worry about here are those that you want to always run (those that normally have a LoadBehavior of 3). Export those keys and add them to the .reg file.

Copy the code and save it as fixWordAddins.reg to the C:\Word Add-ins fix\ directory or wherever you want. Edit it for the add-ins you wish to load.

Windows Registry Editor Version 5.00

[-HKEY_CURRENT_USER\Software\Microsoft\Office\12.0\Word\Resiliency]

[-HKEY_LOCAL_MACHINE\SOFTWARE\Microsoft\Office\12.0\Word\Resiliency]

[HKEY_LOCAL_MACHINE\SOFTWARE\Microsoft\Office\Word\Addins\PDFMaker.OfficeAddin]
"LoadBehavior"=dword:00000003

On 64-bit versions of Windows, the add-ins can be found in:
HKEY_LOCAL_MACHINE\SOFTWARE\Wow6432Node\Microsoft\Office\Word\Addins\

The log file

If the log file doesn’t already exist, the batch file will create it. Each time the batch file runs, it adds a line to the end of the log file.

An entry will look something like this:

USERNAME at MACHINENAME on 06/17/2010 at 01:02 PM ("PDFMaker.OfficeAddin")

Caveats

The macros in a *.dotm can’t be edited if that template was opened from the startup location. Open a copy in another location, make your changes and save, and then overwrite the version in the startup location.

Windows 7

Note that in Windows 7, the UAC needs your permission to run a .bat file.

The Word startup location in Windows 7 (put any custom *.dotm files here):
\AppData\Roaming\Microsoft\Word\STARTUP

The default location of Normal.dotm in Windows 7:
\AppData\Roaming\Microsoft\Templates

Generally

In nearly all cases, using the Native client is recommended over the Java client. See the section Changing the client for instructions.

To check/change the current client, click on the Advanced Options link on the login screen. Under “Remote client type”, the Native client should be currently selected.

Many issues are resolved by confirming that the local computer’s system clock is correct, deleting temporary internet files, and/or uninstalling then reinstalling the Citrix client. The Beyond site should be added to the Trusted Sites list in IE (see below).

Note that connecting to a user’s computer via a Webex support session installs a WebEx Document Loader virtual printer on that computer and sets it as the default printer.

Client installation issues

The latest Citrix client software can be downloaded from http://www.citrix.com/site/SS/downloads/index.asp.

Some older versions can be downloaded with fewer clicks from //ardamis.com/2009/11/26/citrix-xenapp-web-plugins/.

The wrong client software has been installed

Opening Citrix causes a window to open asking “What is the address of the server hosting your published resources.” There is a space to fill in the server name. The sample answer is https://servername

Uninstall and reinstall the Citrix client. Only the web plugin component should be installed.

Issues at the Citrix login page

Error messages to do with ‘invalid credentials’

This error is typically caused by an incorrectly typed password, PIN, or keyfob number; a domain password out of sync with the Novell password; or a keyfob in next tokencode mode.

Client software not detected

Before the user authenticates at the Citrix login page, the following warning is displayed in the Message Center:

We are unable to detect the appropriate client software on your computer to allow you to launch your applications.
Click here to obtain the client software

If the IE yellow warning bar is visible, click on it to install the Citrix Helper Control (an Active X control). Otherwise, if the software has been installed, click on the “Click here to obtain the client software” link, then click on either the Allow button or yellow bar to install the Citrix Helper Control, or click on the “Already Installed” link.

Adding the Beyond site to the Trusted Sites list in IE should allow the Active X control to run without prompting (see below).

Issues after successfully authenticating at the Citrix login web page

IE Trusted Sites

The user is able to authenticate at the Citrix login page and the applications are available, but the user sees the following warning in the Message Center:

Current browser security restrictions may prevent you from launching applications, or may require your explicit permission to proceed. To launch an application successfully, save the launch file if prompted and double-click the file to start the application.

This message appears only in Internet Explorer. Firefox and Chrome do not produce the warning. If the user is able to connect to the applications, the message can be ignored.

If the user is unable to connect, the resolution is to add the site to the Trusted Sites list in Internet Explorer:

In Internet Explorer, navigate to https://.com
Click Tools -> Internet Options -> Security tab.
Click the Trusted Sites checkmark icon, then click the Sites button.
Confirm that the URL https://.com appears in the top box, and click the Add button. Click Close and OK to return to the login screen.
Log in.

Client software not detected

The user is able to authenticate at the Citrix login page. Instead of a page displaying the available applications, the user sees a page displaying with the following warning:

Download Client Software
We are unable to detect the appropriate client software on your computer to allow you to launch your applications.
If you wish to download and deploy the client software to allow you to launch your applications, click Download.

If the IE yellow warning bar is visible, click on it to install the Citrix Helper Control (an Active X control). Otherwise, click on the ‘Already Installed’ link under Troubleshooting Options at the right-hand side of the page.

Temporary internet files

The user is prompted to save the launch.ica file. If the user saves the file and double-clicks it, Citrix opens but then displays an error:

The Citrix SSL server is not accepting connections.

Try clearing the browser’s temporary internet files. If this doesn’t resolve the issue, follow the instructions for adding the site to IE’s Trusted Sites, above. (Strangely, the resolution in a few tickets is to reboot the router.)

Client installation

The user is able to authenticate at the Citrix login page. After clicking on an application, the user receives the error:

Connecting through Citrix secured gateway. Error reading from proxy server.

Uninstall and reinstall the Citrix client. Only the web plugin component should be installed.

Session reconnection

The user is able to authenticate at the Citrix login page. After clicking on an application, the user receives the error:

There are no existing applications available for reconnection.

This is simply an informational message stating there are no pre-existing apps to reconnect to. It can be ignored if the user is not having an issue launching applications.

MSLicensing registry key

The user is able to authenticate at the Citrix login page. After clicking on an application, the user receives one of the following errors:

There is no route to the specified subnet address.
or
The Citrix MetaFrame server is not available. Please try again later.

To resolve, delete the MSLicensing registry key.

Click on the Start button, select Run and type in “regedit”.
Click OK.
The registry editor window will open.
Go to HKEY_LOCAL_MACHINE\SOFTWARE\Microsoft\MSLicensing.
Click once on MSLicensing so it is highlighted and then hit the Delete key.
Close the registry editor and attempt to login to Citrix.

Issues at the Novell Client window

Connecting to the wrong application

The user receives the following error message in Citrix after entering a username and password at the Novell Client window:

The system could not log you into the network.
Make sure your name and connection information are correct, then type your password again.

The user is likely trying to connect to the wrong application. For example, a Chicago user may have clicked on the DC Desktop application.

Issues after successfully authenticating at the Novell Client window

Reconnecting to a session

The user receives the following error message in Citrix after successfully authenticating at the Novell Client window:

Connection error: You have not been granted access to this published application

This issue can be resolved by a Citrix administrator. It may be due to an issue with a prior ‘disconnected’ session not connecting correctly. The administrator can reset the session.

Printer unavailable issues

The user cannot find the local printer in the list of available printers.

Disconnect from Citrix, set the local printer to be the default printer, confirm that the Native Client is the selected Citrix client under Advance Options, and reconnect to Citrix. If the printer is still missing, uninstall and reinstall the Citrix client.

Printer offline issues

While connected to Citrix, the user receives periodic messages having to do with ‘a network printer is offline’.

Check the physical printer. It is likely jammed or out of paper. It may also be that the printer is set to accept only certain paper types or sizes.

Confirm that the printer driver in Citrix is correct for that model printer.

Print jobs are not processed

In Citrix, a single print spooler is shared by all connections. A large print job can delay all other jobs, or a stuck job may prevent any other jobs from being processed. After ruling out other causes, contact the Citrix administrator to resolve.

MacPac

The user receives various errors when using MacPac.

If the user’s H: drive user folder is missing a \MacPac\Personal\ folder, copy yours to the user’s folder.

Lag

Latency is the primary cause of poor performance in Citrix. Latency can be roughly measured by pinging the URL of the login server. Latency greater than 100ms will result in lag and other problems. An example of lag is when the user types in a Word document but the text doesn’t appear on the screen for a few moments, then catches up all at once.

Citrix window not responding

Shortly (and sometimes immediately) after authenticating at the Novell Client window, the Citrix window will stop responding.

The fix is to give the user full rights to the MSLicensing key.

Open Regedit and navigate to:
HKEY_LOCAL_MACHINE\SOFTWARE\Microsoft\MSLicensing

Right-click on the MSLicensing key and select Permissions.
Under the Security tab, click on Users to highlight it.
Check the box in the Allow column next to Full Control.
Click OK and close Regedit.

Accessing the local machine’s hard drive

Once in Citrix, right-click on the Start button in the Citrix environment and select Explore.

Browse the list of drives in the left-hand pane and locate “C$ on ‘Client’ (C:)“. This is the local workstation’s C: drive. Click on the drive to open it.

How to allow Citrix access to the local machine’s hard drive and USB devices (including printers)

The first time you connect to Citrix, you’ll be shown a ICA Client File Security setting window where you can choose what access to your local machine you wish to grant to Citrix. You are also able to choose to “Never ask me again”.

If you need to later change these settings, follow the appropriate steps below (try the ‘newer clients’ step first).

Newer clients:

While connected to Citrix, double-click on the Citrix Connection Center icon in the system tray of the local machine. Click on the Security icon to configure the Session Security options for Files, Microphones/Webcams, PDA Devices, and USB/Other Devices.

Older clients:

Disconnect from Citrix. On the local machine, delete the webica.ini file under C:\Documents and Settings\[username]\Application Data\ICAClient. When you next reconnect to Citrix, you’ll be shown the ICA Client File Security setting window again.

Citrix Program Neighborhood

How to minimize the Citrix window to view the local machine’s desktop.

Shift+F2

SSL Errors

SSL error 61 (the server certificate received is not trusted)

Run Windows Updates and update the root certificates.

SSL error 68 (the SSL certificate is not yet valid)

Set the local system clock to the current date and time.

SSL error 70 (the SSL certificate is no longer valid)

Set the local system clock to the current date and time.

SSL/TLS error: The certificate validation failed.

Confirm that the Native client, not the Java client, is in use by clicking on the Advanced Options link on the login screen.

http://support.citrix.com/article/CTX125056

Changing the client

Changing the client from Java to Native resolves a good number of connection problems. The only time the Java client is preferable is when OS X 10.6.6 is used with a particular release of the Mac Citrix Client and the local default printer is not available in Citrix.

To change the client, at the Citrix web interface login screen, click on the Advanced Options link below the Passcode field. The area below the Advanced Options link will expand.

(Click any of the thumbnails below to see the full-sized image.)

The Advanced Options area

Click on the link Click here to change the selected client. You’ll be taken to the Client Selection page. If the Native Client shows a status of Not detected, click on Deploy to the right of Native Client.

The Client Selection page

If the Native client cannot be detected by the browser, but you’re certain it has been installed, click on the Already Installed link at the right of the Client Detection and Download page. If there’s any doubt that the latest client is installed, click on Download and install the Citrix Online Web plugin.

The Client Detection and Download page

You may be returned to the Client Selection page. Once the Native Client has been deployed, choose it from the Default Client menu and click OK.

Return to the web interface login page and confirm that the Native Client is listed as the currently selected client under Advanced Options, then log in normally.

As an IT guy in a good-sized law firm, I’m sometimes asked to make recommendations for anti-virus software.

For real-time protection that is always running on your computer, I like Microsoft Security Essentials.

Microsoft Security Essentials provides real-time protection for your home PC that helps guard against viruses, spyware, and other malicious software.
http://www.microsoft.com/security_essentials/default.aspx

If you don’t trust Microsoft, SUPERAntispyware has a terrible name but a good track record.

The SUPERAntiSpyware FREE Edition offers real-time blocking of threats.
http://www.superantispyware.com/

The SUPERAntiSpyware Portable Scanner can be run from a USB flash drive or CD without installlation.

The SUPERAntiSpyware Portable Scanner does not install anything on your Start Menu or Program Files and does not need to be uninstalled. Just download it and run it whenever you want.
http://www.superantispyware.com/portablescanner.html

Personally, I run Microsoft Security Essentials, and then do supplemental scans with the SUPERAntiSpyware Portable Scanner.