Category Archives: Nonsense

Repository for the uncategorizable.

It required only a few small changes to move from XHTML 1.0 Strict to HTML5, but as of today, ardamis.com is being served as valid HTML5. For some time, I’ve been waiting for HTML5 to get closer to becoming a W3C recommendation, and for better support from user agents, but I’ve gotten caught up with other improvements to the site and decided to make the transition now.

Over the next few weeks, I’ll be updating the HTML to incorporate some of the new tags. I’m pretty excited about replacing divs with new semantic elements like <header>, <article>, and <footer>.

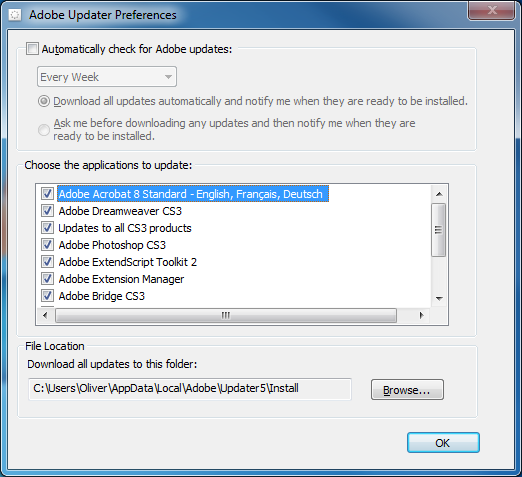
By default, the Adobe Updater application that is installed along side various Adobe products like Acrobat and Photoshop is set to check for updates automatically. Specifically, it’s set to check for updates to all installed Adobe products every week, and to download all updates and then notify you when they are ready to be installed. In this post, I’ll explain how to disable this feature by editing a settings file while avoiding the GUI.

Adobe Updater Preferences

Adobe Updater Preferences

In a managed environment, an administrator may not want any software to update itself for any number of reasons. The automatic check can be switched off in the Adobe Updater preferences, but it can be a nuisance to find and requires as many as 9 clicks.

Adobe Updater can be launched from within Adobe products by clicking Help | Check for Updates (note that in some products, the path is Help | Updates, but in either case, you can use the keystroke Alt+H, U). Click Preferences, then uncheck the box next to Automatically check for Adobe updates and click OK, then close the Adobe Updater window. You may have to click Quit in a subsequent window before the application closes.

For a more direct route, the Adobe Updater executable installed with Reader 9 resides at
C:\Program Files (x86)\Common Files\Adobe\Updater6\AdobeUpdater.exe on a 64-bit Windows 7 machine, and at
C:\Program Files\Common Files\Adobe\Updater6\AdobeUpdater.exe on a 32-bit Windows XP machine.

All of the configurable settings are saved to a file named AdobeUpdaterPrefs.dat in the user profile, rather than as registry keys. The .dat file extension suggests a binary file, but it’s actually just an XML document that can be opened in any text editor.

The preferences file resides at
C:\Users\[USERNAME]\AppData\Local\Adobe\Updater6\AdobeUpdaterPrefs.dat on a 64-bit Windows 7 machine, and at
C:\Documents and Settings\[USERNAME]\Local Settings\Application Data\Adobe\Updater6\AdobeUpdaterPrefs.dat on a 32-bit Windows XP machine.

The minimum lines that need to exist for the file to be valid and for “Automatically check for Adobe updates” to be disabled are:

<?xml version="1.0" encoding="UTF-8" ?>
<AdobeUpdater>
<AutoCheck>0</AutoCheck>
</AdobeUpdater>

To disable the auto update check programmatically, this file can be saved as AdobeUpdaterPrefs.dat and a script used to later overwrite the file in the user profile. A rather geekier approach would be to use a batch file to rename AdobeUpdaterPrefs.dat and then write a new file. I prefer the latter method because it requires only a single file and because it could be easily modified to insert lines that would change other settings, such as the location of the aum.log log file or the download directory, which are located in the user profile by default.

A batch file to back-up and then remake the file might look like this:

:: A batch file for writing a new Adobe Updater settings file "AdobeUpdaterPrefs.dat"
:: If an AdobeUpdaterPrefs.dat exists, it is edited and then the next next location is checked, until the script has iterated through all locations
@echo off

%SystemDrive%
cd\
SETLOCAL EnableDelayedExpansion

:: Check each location and if the file is found, pass the directory and a label (to the next path to be searched or to an EXIT command) to the function

:XPUpdater6
@echo.
echo Checking for "%USERPROFILE%\Local Settings\Application Data\Adobe\Updater6\AdobeUpdaterPrefs.dat"
if exist "%USERPROFILE%\Local Settings\Application Data\Adobe\Updater6\AdobeUpdaterPrefs.dat" (call:REWRITE "%USERPROFILE%\Local Settings\Application Data\Adobe\Updater6",XPUpdater5) else (@echo The AdobeUpdaterPrefs.dat file was not found.)

:XPUpdater5
@echo.
echo Checking for "%USERPROFILE%\Local Settings\Application Data\Adobe\Updater5\AdobeUpdaterPrefs.dat"
if exist "%USERPROFILE%\Local Settings\Application Data\Adobe\Updater5\AdobeUpdaterPrefs.dat" (call:REWRITE "%USERPROFILE%\Local Settings\Application Data\Adobe\Updater5",OUT) else (@echo The AdobeUpdaterPrefs.dat file was not found.)

:OUT
@pause
exit

:REWRITE
:: Configure Adobe Update to not check for updates
:: Move to the correct directory
cd %~1
:: Delete any temp file that this script may have created in the past
if exist AdobeUpdaterPrefs.dat.temp del AdobeUpdaterPrefs.dat.temp
:: Backup the old file
rename AdobeUpdaterPrefs.dat AdobeUpdaterPrefs.dat.temp
:: Write a new minimum settings file (the other data will be filled in when Auto Updater runs)
echo ^<?xml version="1.0" encoding="UTF-8" ?^> >> AdobeUpdaterPrefs.txt
echo ^<AdobeUpdater^> >> AdobeUpdaterPrefs.txt
echo ^<AutoCheck^>0^</AutoCheck^> >> AdobeUpdaterPrefs.txt
echo ^</AdobeUpdater^> >> AdobeUpdaterPrefs.txt
:: Rename the new file
rename AdobeUpdaterPrefs.txt AdobeUpdaterPrefs.dat
@echo The AdobeUpdaterPrefs.dat file was found and modified.
:: Go to the next location in the list
goto :%~2
goto :EOF

File locations in Windows 7

Note that in Windows 7, “%USERPROFILE%\AppData\Local\” and “%USERPROFILE%\Local Settings\Application Data\” contain the same data. A file added to a subdirectory in one location will appear in the corresponding subdirectory in the other location. So this script will work on Windows 7 because of 7’s backwards compatibility.

If you wanted to the script to run using Windows 7’s native C:\Users\… directory structure and did not care about the loss of compatibility with XP, you could use the following script instead.

:: A batch file for writing a new Adobe Updater settings file "AdobeUpdaterPrefs.dat"
:: If an AdobeUpdaterPrefs.dat exists, it is edited and then the next next location is checked, until the script has iterated through all locations
@echo off

%SystemDrive%
cd\
SETLOCAL EnableDelayedExpansion

:: Check each location and if the file is found, pass the directory and a label (to the next path to be searched or to an EXIT command) to the function

:WIN7Updater6
@echo.
echo Checking for "%USERPROFILE%\AppData\Local\Adobe\Updater6\AdobeUpdaterPrefs.dat"
if exist "%USERPROFILE%\AppData\Local\Adobe\Updater6\AdobeUpdaterPrefs.dat" (call:REWRITE "%USERPROFILE%\AppData\Local\Adobe\Updater6",WIN7Updater5) else (@echo The AdobeUpdaterPrefs.dat file was not found.)

:WIN7Updater5
@echo.
echo Checking for "%USERPROFILE%\AppData\Local\Adobe\Updater5\AdobeUpdaterPrefs.dat"
if exist "%USERPROFILE%\AppData\Local\Adobe\Updater5\AdobeUpdaterPrefs.dat" (call:REWRITE "%USERPROFILE%\AppData\Local\Adobe\Updater5",OUT) else (@echo The AdobeUpdaterPrefs.dat file was not found.)

:OUT
@pause
exit

:REWRITE
:: Configure Adobe Update to not check for updates
:: Move to the correct directory
cd %~1
:: Delete any temp file that this script may have created in the past
if exist AdobeUpdaterPrefs.dat.temp del AdobeUpdaterPrefs.dat.temp
:: Backup the old file
rename AdobeUpdaterPrefs.dat AdobeUpdaterPrefs.dat.temp
:: Write a new minimum settings file (the other data will be filled in when Auto Updater runs)
echo ^<?xml version="1.0" encoding="UTF-8" ?^> >> AdobeUpdaterPrefs.txt
echo ^<AdobeUpdater^> >> AdobeUpdaterPrefs.txt
echo ^<AutoCheck^>0^</AutoCheck^> >> AdobeUpdaterPrefs.txt
echo ^</AdobeUpdater^> >> AdobeUpdaterPrefs.txt
:: Rename the new file
rename AdobeUpdaterPrefs.txt AdobeUpdaterPrefs.dat
@echo The AdobeUpdaterPrefs.dat file was found and modified.
:: Go to the next location in the list
goto :%~2
goto :EOF

Additional benefits

Modifying the preferences file could have other benefits as well. Imagine the time and disk space that could saved by having all of those incremental Adobe updates saved to a network location, rather than downloading them to each workstation.

I had noticed mentions of analytic information provided by Compete.com often enough that I was curious about what it could do for me.

Compete already had some information about ardamis.com, but it was stunningly wrong. For example, it was telling me that the phrase “godaddy referral program” was responsible for 20.35% of the total traffic sent to my site by search engines. Until recently, I did have a page that mentioned godaddy referral programs, but according to Google Analytics, it was barely ever visited (7 page views in the last 30 days – it was the 78th most popular page on my site, which does get a few thousand visitors a month). Even more strange, it told me that I was getting traffic for the search phrase “myspace”. I have never written anything about myspace before.

I figured that once I installed their JavaScript tracking code, the analytics information would be much more accurate. So I installed the code, confirmed it appeared at the bottom of the home page, and attempted to verify my site at //ardamis.com/, but was unable to. I had read somewhere that the free account does not support tracking subdomains, and the verification process seemed to get hung up on the use of .htaccess to redirect non-www traffic to www.ardamis.com. I was mystified that Compete apparently could not recognize this was happening via a 301 redirect header and compensate.

Sorry,

It looks like the CompeteXL code has not been correctly placed on the homepage of your site.

This could be because either the code was not copied over correctly, or because it has been placed on the wrong page.

We think your homepage is

ardamis.com

I went so far as to email my amazement to their support staff, who promptly and politely wrote me back. (Thumbs up to the guys answering the emails.)

I had made a few other changes to my site at the same time, so I ran a Page Speed check on it. Page Speed told me that I was linking to a resource at trgc.opt.fimserve.com that was throwing a 404 error. I was pretty sure I didn’t intentionally link to anything at that domain, so I Googled it. Surprisingly, there’s not much out there on trgc.opt.fimserve.com other than this and this. As it turns out, fimserve.com is part of something called the FOX Audience Network, and FAN’s parent company is News Corporation, which also owns myspace.com.

Here’s the WHOIS on fimserve.com:

Domain Name: FIMSERVE.COM
Registrar: REGISTER.COM, INC.
Whois Server: whois.register.com
Referral URL: http://www.register.com
Name Server: NS1.MYSPACE.COM
Name Server: NS2.MYSPACE.COM
Status: clientTransferProhibited
Updated Date: 17-oct-2006
Creation Date: 17-oct-2006
Expiration Date: 17-oct-2011

And here’s the WHOIS on foxaudiencenetwork.com:

Domain Name: FOXAUDIENCENETWORK.COM
Registrar: MARKMONITOR INC.
Whois Server: whois.markmonitor.com
Referral URL: http://www.markmonitor.com
Name Server: NS1.MYSPACE.COM
Name Server: NS2.MYSPACE.COM
Status: clientDeleteProhibited
Status: clientTransferProhibited
Status: clientUpdateProhibited
Updated Date: 03-may-2010
Creation Date: 03-jun-2008
Expiration Date: 03-jun-2011

I didn’t like the idea that information about my visitors was being shared with anyone but the site I had signed up for, so I started looking through the Compete FAQs and found this:

Currently, the CompeteXL code tracks ONLY self-reported Audience Profile data through a partnership with the FOX Audience Network.

The CompeteXL code DOES NOT track traffic or user engagement metrics, that information continues to be provided through our multi-sourced panel and requires NO addition of code to your site.

http://www.compete.com/help/q225

What the hell? Why am I installing a tracking code if it’s not used to track traffic?

Oh, and this was a fun discovery, too:

The FOX Audience Network (FAN) is a unit of News Corporation that supports monetization efforts across the company’s online content portfolio, as well as third-party publisher sites.

FAN leverages proprietary advertising technology to create highly-targeted advertising campaigns for a wide range of marketers, while also delivering cutting-edge tools and services to third-party publisher partners. FAN works directly with hundreds of advertisers to develop customized marketing programs that optimize both branded and performance-based strategies.

http://www.foxaudiencenetwork.com/aboutus.php

I use a very popular HOSTS file to block a huge number of servers that are known to host advertisements, tracking scripts (including Google Analytics), parasites, hijackers and unwanted Adware/Spyware programs. The 404 error in Page Speed was caused by the inclusion of trgc.opt.fimserve.com in this custom HOSTS file, which then led me to finding all this out the next day. I’ve removed the tracking code because the information I wanted was on traffic – who’s coming to my site, why, and through what means – and not user demographics.

I like using the Import Pictures and Videos wizard in Windows 7 when transferring pictures from my digital camera because it can create a separate folder for each date. But it lacks the ability to rename the individual files based on date. I want my image filenames to be YYYY.MM.DD_001.jpg, where the trailing number increments for that date.

To get the filename just right, I use Advanced Renamer, a free program for renaming multiple files or folders at once. Advanced Renamer can read information from the image file (like the date the picture was taken).

Importing the images

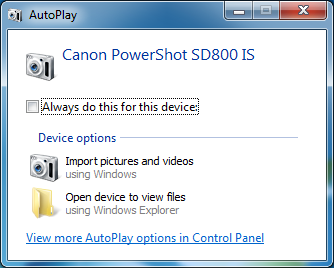
Connect the device or memory card to your computer. In the AutoPlay dialog box that appears, click Import pictures and videos using Windows.

Windows 7 AutoPlay dialog box

Windows 7 AutoPlay dialog box

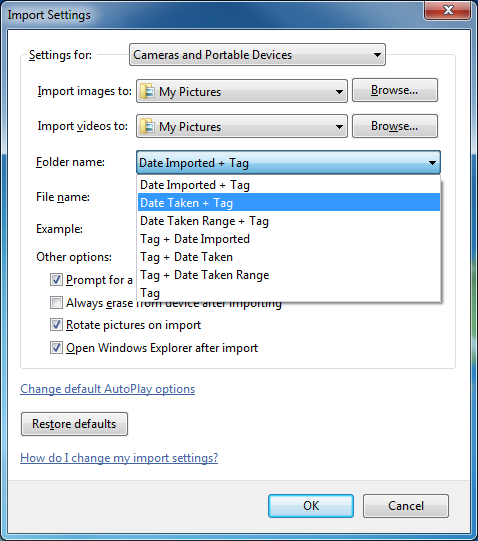
The default settings will create a single folder with today’s date, which is not what we want. To change the settings that are used when importing pictures and videos, click Import settings in the Import Pictures and Videos dialog box.

Windows 7 Import Settings dialog box

Windows 7 Import Settings dialog box

Under the Folder name menu, choose Date Taken + Tag and click OK. The import process will restart and you’ll be prompted to enter a tag. The tag isn’t important, so just click Import.

Configuring Advanced Renamer

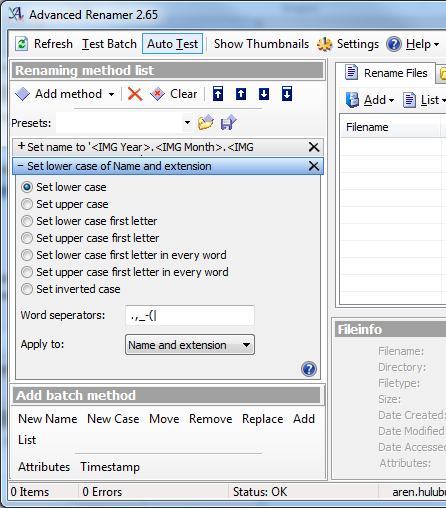
It takes two methods to get the names the way I want them. The first method changes the filename to use the year, month, and day information, and increment a trailing number. The second method changes the new filename to lowercase. If you prefer your file extensions to be in uppercase, you can skip the second method.

Advanced Renamer - Renaming method list

Advanced Renamer - Renaming method list

Under Add batch method, click New Name, and either select the desired date conventions from the options, adding any separator characters you wish, or copy the code below to use YYYY.MM.DD_001.EXT.

<IMG Year>.<IMG Month>.<IMG Day>_<Inc NrDir:001>.<Ext>

Under Add batch method, click New Case and then choose Set lower case. In the Apply to menu, choose Name and extension.

Click the Add button and browse to the parent folder. The files should appear in the list, and the new filename will be displayed. Check for any errors or problems with the filename, then click Start Batch.

Move the files into a single directory

Now that the pictures are all correctly named, I no longer need them to be in date-based folders. It’s more convenient to have them in a single folder from which I can organize them.

To do this, I use a batch file that moves any files in a sub-folder into the parent folder.

Set sOriginFolder="PATH\TO\PARENT\DIRECTORY"

For /f "Tokens=*" %%a in ('Dir %sOriginFolder% /a-d /s /b') do (
	move "%%a" %sOriginFolder%
)

Replace PATH\TO\PARENT\DIRECTORY with the full path to the parent folder, then run the batch file.

That’s it. Now I have a single folder of images that are uniquely named according to date taken.

Update 5.5.11: I’ve written a better macro that doesn’t require a separate batch file and registry merge file. Please check out the new post at:

Programmatically re-enabling Word COM add-ins

A few months ago, I wrote a post on fixing Word 2007 add-in issues with a registry merge. In this post, I’ll take that idea a little further and explain how to automatically detect and fix add-ins through the use of a macro that runs each time Word is opened and a batch file that runs the registry merge file. All the end-user needs to do to repair the missing functionality is close and reopen Word.

The idea is that, in a corporate environment, there are certain important add-ins that must be running in order for Word to work normally. A good example would be an add-in that integrates Word with a document management system. Should that integration be lost because the add-in failed to load, data may be lost. Because there is no way to force Word to load certain add-ins, and there is no built-in function in Word for warning users when critically important don’t load, I decided to come up with a method for alerting the user to the problem and then fixing it with as little inconvenience as possible.

The example code in this post assumes the workstation is running Office 2007 on Windows XP (32-bit). I would think that the method could be adapted to other environments (Windows 7, Office 2010) without too much trouble. I’ve tried to note where differences come up on Windows 7 and 64-bit operating systems.

The process has four components:

  • an autoexec Word 2007 macro that runs each time Word is opened
  • a batch file that runs the registry merge file and writes an entry to a log file
  • the registry merge file that contains the correct LoadBehavior settings for the add-ins
  • a text file that acts as a log

The macro can be added to Normal.dotm or saved to a new .dotm file placed in the startup directory. The .bat batch file, .reg registry file, and .txt log file can be put anywhere, but in this example, they will be saved to a new folder C:\Word Add-ins fix\.

In the code examples below, I’ll be using the Acrobat PDFMaker Office COM Addin as the add-in that must always be loaded. This plugin is installed with Acrobat versions 8.1 and above and adds an Acrobat tab to the ribbon.

The macro

The first thing to do is to collect some information on the COM add-ins that are currently installed. Microsoft Support provides a simple macro for listing all of the COM add-ins at Some COM add-ins are not listed in the COM Add-Ins dialog box in Word. I recommend using this macro to identify the ProgID of your add-ins. The text to the left of the hyphen is the add-in’s Description and the text to the right of the hyphen is the ProgID.

Running the macro from the Microsoft site shows us that the ProgID for the Acrobat PDFMaker Office COM Addin is PDFMaker.OfficeAddin.

In Microsoft jargon, an add-in with a LoadBehavior of 3 is ‘Connected’. The COMAddIn object has a property called Connect that will be True if the add-in is Connected and False if it is not. The macro first checks the Connect property of each add-in and writes the ProgID of each Connected add-in to a string. It then checks to see if the string contains a match for each of the required add-ins. If the required add-in does not exist in the string, the macro will display a message to the user and fire the batch file to reset the LoadBehavior. It also passes the names of any not connected add-ins to the batch file as a parameter, so that information can be logged.

I found this article from MSDN on the COMAddIn object very helpful.

Sub AutoExec()
'
' FindMissingAddins Macro
' Display a message box with any critical but not 'Connected' COM add-ins
'

   Dim msg As String
   
   Dim MyAddin As COMAddIn
   Dim i As Integer, stringOfAddins As String
   
   For Each MyAddin In Application.COMAddIns
      If MyAddin.Connect = True Then
          stringOfAddins = stringOfAddins & MyAddin.ProgID & " - "
      End If
   Next
   
' Update the number of elements in the array
' Example: change to "requiredAddIns(0 To 4)" if you were checking 5 total add-ins)
   Dim requiredAddIns(0 To 0) As String
   
' Add each required AddIn to the array
   requiredAddIns(0) = "PDFMaker.OfficeAddin"
'   requiredAddIns(1) = ""
'   requiredAddIns(2) = ""
'   requiredAddIns(3) = ""
'   requiredAddIns(4) = ""
   
   For Each requiredAddIn In requiredAddIns
      If InStr(stringOfAddins, requiredAddIn) Then
         msg = msg
      Else
         msg = msg & requiredAddIn & vbCrLf
         listOfDisconnectedAddins = requiredAddIn & " " & listOfDisconnectedAddins
         listOfDisconnectedAddins = Trim(listOfDisconnectedAddins)
      End If
   Next
   
   If msg = "" Then
   Else
        MsgBox "The following important add-ins are not running: " & vbCrLf & vbCrLf & msg & vbCrLf & vbCrLf & "Please save your work, then close and reopen Word."
' Run a batch file that corrects the add-in problems in the registry and pass the list of unconnected add-ins as an argument
        Shell """C:\Word Add-ins fix\fixWordAddins.bat"" """ & listOfDisconnectedAddins & """"
   End If
   
End Sub

Edit the macro to fit your environment. You will need to specify each required add-in’s ProgID in the requiredAddIns array and update the number of add-ins in the array’s definition. The macro needs to be named AutoExec in order to run when Word starts.

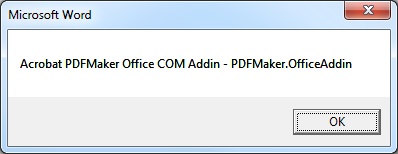
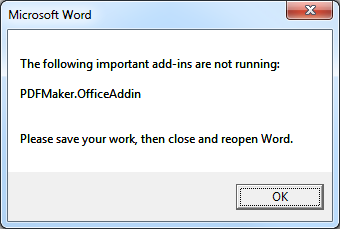
This is the message that the user will receive if the macro finds that a required add-in is not Connected.

Clicking OK runs the batch file and closes the window.

The batch file

The batch file is called by the macro when any of the add-ins are not registered and currently connected. The batch file references the .reg file that contains the correct LoadBehavior settings and writes an event to the log with information on the username, the machine name, the datetime that the problem was discovered and which add-in(s) were not connected.

Copy the code and save it as fixWordAddins.bat to the C:\Word Add-ins fix\ directory or wherever you want.

:: A batch file for running a registry merge to set the LoadBehavior for Word add-ins
::
@echo off

REGEDIT /S "C:\Word Add-ins fix\fixWordAddins.reg"

:: Let's create a little log file and output which user ran the script and at what date and time
:: Set some variables for the date. US format - not localized!
@For /F "tokens=2,3,4 delims=/ " %%A in ('Date /t') do @( 
	Set Month=%%A
	Set Day=%%B
	Set Year=%%C
)

:: Set some variables for the time.
@For /F "tokens=1,2,3 delims=/: " %%A in ('Time /t') do @( 
	Set Hours=%%A
	Set Minutes=%%B
	Set Meridiem=%%C
)

:: Output to a log file
@echo %username% at %computername% on %Month%/%Day%/%Year% at %Hours%:%Minutes% %Meridiem% (%1) >> "C:\Word Add-ins fix\log.txt"

The registry merge

Add-ins can be ‘hard-disabled’ or ‘soft-disabled’ by Word 2007. Please see my post at fixing Word 2007 add-in issues with a registry merge for more information about what this means. The following registry merge will address both issues.

The registry merge will have to be edited for your environment, too. First, find the LoadBehavior value in the the registry for each of your add-ins in either of two locations:
HKEY_LOCAL_MACHINE\SOFTWARE\Microsoft\Office\Word\Addins\
HKEY_CURRENT_USER\Software\Microsoft\Office\Word\Addins\

If you don’t find your add-in in either of those locations, search the registry for the ProgID.

A LoadBehavior of 3 = loaded (this corresponds to a checked box in Word Options/Add-Ins)
A LoadBehavior of 2 = not loaded (this corresponds to an unchecked box in Word Options/Add-Ins)

The only add-ins that you need to worry about here are those that you want to always run (those that normally have a LoadBehavior of 3). Export those keys and add them to the .reg file.

Copy the code and save it as fixWordAddins.reg to the C:\Word Add-ins fix\ directory or wherever you want. Edit it for the add-ins you wish to load.

Windows Registry Editor Version 5.00

[-HKEY_CURRENT_USER\Software\Microsoft\Office\12.0\Word\Resiliency]

[-HKEY_LOCAL_MACHINE\SOFTWARE\Microsoft\Office\12.0\Word\Resiliency]

[HKEY_LOCAL_MACHINE\SOFTWARE\Microsoft\Office\Word\Addins\PDFMaker.OfficeAddin]
"LoadBehavior"=dword:00000003

On 64-bit versions of Windows, the add-ins can be found in:
HKEY_LOCAL_MACHINE\SOFTWARE\Wow6432Node\Microsoft\Office\Word\Addins\

The log file

If the log file doesn’t already exist, the batch file will create it. Each time the batch file runs, it adds a line to the end of the log file.

An entry will look something like this:

USERNAME at MACHINENAME on 06/17/2010 at 01:02 PM ("PDFMaker.OfficeAddin")

Caveats

The macros in a *.dotm can’t be edited if that template was opened from the startup location. Open a copy in another location, make your changes and save, and then overwrite the version in the startup location.

Windows 7

Note that in Windows 7, the UAC needs your permission to run a .bat file.

The Word startup location in Windows 7 (put any custom *.dotm files here):
\AppData\Roaming\Microsoft\Word\STARTUP

The default location of Normal.dotm in Windows 7:
\AppData\Roaming\Microsoft\Templates

Generally

In nearly all cases, using the Native client is recommended over the Java client. See the section Changing the client for instructions.

To check/change the current client, click on the Advanced Options link on the login screen. Under “Remote client type”, the Native client should be currently selected.

Many issues are resolved by confirming that the local computer’s system clock is correct, deleting temporary internet files, and/or uninstalling then reinstalling the Citrix client. The Beyond site should be added to the Trusted Sites list in IE (see below).

Note that connecting to a user’s computer via a Webex support session installs a WebEx Document Loader virtual printer on that computer and sets it as the default printer.

Client installation issues

The latest Citrix client software can be downloaded from http://www.citrix.com/site/SS/downloads/index.asp.

Some older versions can be downloaded with fewer clicks from //ardamis.com/2009/11/26/citrix-xenapp-web-plugins/.

The wrong client software has been installed

Opening Citrix causes a window to open asking “What is the address of the server hosting your published resources.” There is a space to fill in the server name. The sample answer is https://servername

Uninstall and reinstall the Citrix client. Only the web plugin component should be installed.

Issues at the Citrix login page

Error messages to do with ‘invalid credentials’

This error is typically caused by an incorrectly typed password, PIN, or keyfob number; a domain password out of sync with the Novell password; or a keyfob in next tokencode mode.

Client software not detected

Before the user authenticates at the Citrix login page, the following warning is displayed in the Message Center:

We are unable to detect the appropriate client software on your computer to allow you to launch your applications.
Click here to obtain the client software

If the IE yellow warning bar is visible, click on it to install the Citrix Helper Control (an Active X control). Otherwise, if the software has been installed, click on the “Click here to obtain the client software” link, then click on either the Allow button or yellow bar to install the Citrix Helper Control, or click on the “Already Installed” link.

Adding the Beyond site to the Trusted Sites list in IE should allow the Active X control to run without prompting (see below).

Issues after successfully authenticating at the Citrix login web page

IE Trusted Sites

The user is able to authenticate at the Citrix login page and the applications are available, but the user sees the following warning in the Message Center:

Current browser security restrictions may prevent you from launching applications, or may require your explicit permission to proceed. To launch an application successfully, save the launch file if prompted and double-click the file to start the application.

This message appears only in Internet Explorer. Firefox and Chrome do not produce the warning. If the user is able to connect to the applications, the message can be ignored.

If the user is unable to connect, the resolution is to add the site to the Trusted Sites list in Internet Explorer:

In Internet Explorer, navigate to https://.com
Click Tools -> Internet Options -> Security tab.
Click the Trusted Sites checkmark icon, then click the Sites button.
Confirm that the URL https://.com appears in the top box, and click the Add button. Click Close and OK to return to the login screen.
Log in.

Client software not detected

The user is able to authenticate at the Citrix login page. Instead of a page displaying the available applications, the user sees a page displaying with the following warning:

Download Client Software
We are unable to detect the appropriate client software on your computer to allow you to launch your applications.
If you wish to download and deploy the client software to allow you to launch your applications, click Download.

If the IE yellow warning bar is visible, click on it to install the Citrix Helper Control (an Active X control). Otherwise, click on the ‘Already Installed’ link under Troubleshooting Options at the right-hand side of the page.

Temporary internet files

The user is prompted to save the launch.ica file. If the user saves the file and double-clicks it, Citrix opens but then displays an error:

The Citrix SSL server is not accepting connections.

Try clearing the browser’s temporary internet files. If this doesn’t resolve the issue, follow the instructions for adding the site to IE’s Trusted Sites, above. (Strangely, the resolution in a few tickets is to reboot the router.)

Client installation

The user is able to authenticate at the Citrix login page. After clicking on an application, the user receives the error:

Connecting through Citrix secured gateway. Error reading from proxy server.

Uninstall and reinstall the Citrix client. Only the web plugin component should be installed.

Session reconnection

The user is able to authenticate at the Citrix login page. After clicking on an application, the user receives the error:

There are no existing applications available for reconnection.

This is simply an informational message stating there are no pre-existing apps to reconnect to. It can be ignored if the user is not having an issue launching applications.

MSLicensing registry key

The user is able to authenticate at the Citrix login page. After clicking on an application, the user receives one of the following errors:

There is no route to the specified subnet address.
or
The Citrix MetaFrame server is not available. Please try again later.

To resolve, delete the MSLicensing registry key.

Click on the Start button, select Run and type in “regedit”.
Click OK.
The registry editor window will open.
Go to HKEY_LOCAL_MACHINE\SOFTWARE\Microsoft\MSLicensing.
Click once on MSLicensing so it is highlighted and then hit the Delete key.
Close the registry editor and attempt to login to Citrix.

Issues at the Novell Client window

Connecting to the wrong application

The user receives the following error message in Citrix after entering a username and password at the Novell Client window:

The system could not log you into the network.
Make sure your name and connection information are correct, then type your password again.

The user is likely trying to connect to the wrong application. For example, a Chicago user may have clicked on the DC Desktop application.

Issues after successfully authenticating at the Novell Client window

Reconnecting to a session

The user receives the following error message in Citrix after successfully authenticating at the Novell Client window:

Connection error: You have not been granted access to this published application

This issue can be resolved by a Citrix administrator. It may be due to an issue with a prior ‘disconnected’ session not connecting correctly. The administrator can reset the session.

Printer unavailable issues

The user cannot find the local printer in the list of available printers.

Disconnect from Citrix, set the local printer to be the default printer, confirm that the Native Client is the selected Citrix client under Advance Options, and reconnect to Citrix. If the printer is still missing, uninstall and reinstall the Citrix client.

Printer offline issues

While connected to Citrix, the user receives periodic messages having to do with ‘a network printer is offline’.

Check the physical printer. It is likely jammed or out of paper. It may also be that the printer is set to accept only certain paper types or sizes.

Confirm that the printer driver in Citrix is correct for that model printer.

Print jobs are not processed

In Citrix, a single print spooler is shared by all connections. A large print job can delay all other jobs, or a stuck job may prevent any other jobs from being processed. After ruling out other causes, contact the Citrix administrator to resolve.

MacPac

The user receives various errors when using MacPac.

If the user’s H: drive user folder is missing a \MacPac\Personal\ folder, copy yours to the user’s folder.

Lag

Latency is the primary cause of poor performance in Citrix. Latency can be roughly measured by pinging the URL of the login server. Latency greater than 100ms will result in lag and other problems. An example of lag is when the user types in a Word document but the text doesn’t appear on the screen for a few moments, then catches up all at once.

Citrix window not responding

Shortly (and sometimes immediately) after authenticating at the Novell Client window, the Citrix window will stop responding.

The fix is to give the user full rights to the MSLicensing key.

Open Regedit and navigate to:
HKEY_LOCAL_MACHINE\SOFTWARE\Microsoft\MSLicensing

Right-click on the MSLicensing key and select Permissions.
Under the Security tab, click on Users to highlight it.
Check the box in the Allow column next to Full Control.
Click OK and close Regedit.

Accessing the local machine’s hard drive

Once in Citrix, right-click on the Start button in the Citrix environment and select Explore.

Browse the list of drives in the left-hand pane and locate “C$ on ‘Client’ (C:)“. This is the local workstation’s C: drive. Click on the drive to open it.

How to allow Citrix access to the local machine’s hard drive and USB devices (including printers)

The first time you connect to Citrix, you’ll be shown a ICA Client File Security setting window where you can choose what access to your local machine you wish to grant to Citrix. You are also able to choose to “Never ask me again”.

If you need to later change these settings, follow the appropriate steps below (try the ‘newer clients’ step first).

Newer clients:

While connected to Citrix, double-click on the Citrix Connection Center icon in the system tray of the local machine. Click on the Security icon to configure the Session Security options for Files, Microphones/Webcams, PDA Devices, and USB/Other Devices.

Older clients:

Disconnect from Citrix. On the local machine, delete the webica.ini file under C:\Documents and Settings\[username]\Application Data\ICAClient. When you next reconnect to Citrix, you’ll be shown the ICA Client File Security setting window again.

Citrix Program Neighborhood

How to minimize the Citrix window to view the local machine’s desktop.

Shift+F2

SSL Errors

SSL error 61 (the server certificate received is not trusted)

Run Windows Updates and update the root certificates.

SSL error 68 (the SSL certificate is not yet valid)

Set the local system clock to the current date and time.

SSL error 70 (the SSL certificate is no longer valid)

Set the local system clock to the current date and time.

SSL/TLS error: The certificate validation failed.

Confirm that the Native client, not the Java client, is in use by clicking on the Advanced Options link on the login screen.

http://support.citrix.com/article/CTX125056

Changing the client

Changing the client from Java to Native resolves a good number of connection problems. The only time the Java client is preferable is when OS X 10.6.6 is used with a particular release of the Mac Citrix Client and the local default printer is not available in Citrix.

To change the client, at the Citrix web interface login screen, click on the Advanced Options link below the Passcode field. The area below the Advanced Options link will expand.

(Click any of the thumbnails below to see the full-sized image.)
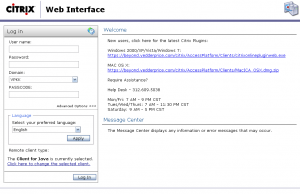
The Advanced Options area

Click on the link Click here to change the selected client. You’ll be taken to the Client Selection page. If the Native Client shows a status of Not detected, click on Deploy to the right of Native Client.
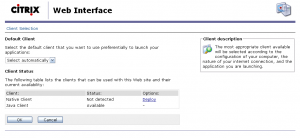
The Client Selection page

If the Native client cannot be detected by the browser, but you’re certain it has been installed, click on the Already Installed link at the right of the Client Detection and Download page. If there’s any doubt that the latest client is installed, click on Download and install the Citrix Online Web plugin.
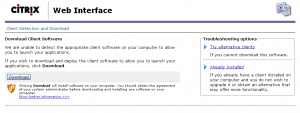
The Client Detection and Download page

You may be returned to the Client Selection page. Once the Native Client has been deployed, choose it from the Default Client menu and click OK.

Return to the web interface login page and confirm that the Native Client is listed as the currently selected client under Advanced Options, then log in normally.
These are from my notes that I took when setting up IIS 7.5 on Windows 7. It’s not supposed to be a how-to, exactly. It’s just what I need to do to get my dev server up and running classic .ASP pages.

Install IIS via Control Panel -> Programs and Features -> “Turn Windows features on or off”.

Click the box next to Internet Information Services. It will become blocked, not checked, indicating some but not all features are installed. Click OK.

Once Windows has installed IIS, browse to http://localhost/ to confirm the server has started.

If you browse to an .asp page, though, you’ll get a Server Error:

HTTP Error 404.3 – Not Found
The page you are requesting cannot be served because of the extension configuration. If the page is a script, add a handler. If the file should be downloaded, add a MIME map.

To enable the server to run classic .ASP pages, go back to Control Panel -> Programs and Features -> “Turn Windows features on or off”, then expand Internet Information Services -> World Wide Web Services -> Application Development Features. Check the box next to ASP, then click OK.

Parent Paths is disabled by default on IIS 7.5. To enable it, run the following command as administrator:

%systemroot%\system32\inetsrv\APPCMD set config "Default Web Site" -section:system.webServer/asp /enableParentPaths:"True" /commit:apphost

Credit: http://learn.iis.net/page.aspx/566/classic-asp-parent-paths-are-disabled-by-default/

Classic ASP script error messages are no longer shown in the web browser by default on IIS 7.5. Misconfigurations are hard to troubleshoot, because IIS returns only:

An error occurred on the server when processing the URL. Please contact the system administrator.
If you are the system administrator please click here to find out more about this error.

To enable sending detailed ASP script error messages to the Web browser (as was the case in IIS 6), run the following command as administrator:

%windir%\system32\inetsrv\appcmd set config -section:asp -scriptErrorSentToBrowser:true

Credit: http://blogs.iis.net/bills/archive/2007/05/21/tips-for-classic-asp-developers-on-iis7.aspx

To start the default web site from the command line, run the following command as administrator:

%systemroot%\system32\inetsrv\APPCMD start site "Default Web Site"

To stop the default web site from the command line, run the following command as administrator:

%systemroot%\system32\inetsrv\APPCMD stop site "Default Web Site"

Even better, you can make shortcuts to batch files that contain those commands, and then set the shortcuts to always run as administrator.

The c:\inetpub\wwwroot directory is UAC-protected. If you are going to leave UAC on (and it’s recommended that you do), you will probably want to change the NTFS permissions on the wwwroot folder so that you don’t have to click through a prompt each time you change a file.

The IIS Manager app is located at Control Panel -> Administrative Tools -> Internet Information Services (IIS) Manager.

I’m often given copy for web sites as Word documents. As one would expect, these documents contain all sorts of symbols that should be converted to entities before they can be used in a web page.

For example, ‘smart quotes’ (curly quotes), trademark and registered symbols, em-dashes, and other symbols look great, but can cause problems if you just drop them into a page and don’t use the corresponding character encoding.

Rather than do a global find-and-replace in my HTML editor, I’ve written a few Word macros that replace these symbols.

The first macro, CleanupHTML, replaces smart quotes with straight quotes. The second macro, PrettyHTML, replaces smart quotes with the correct pretty quote, ala .

At some point, I want to extend the macro to replace accented characters, such as è, and also to wrap bold and italics in strong and em tags. Ideally, I’d also find a way of converting lists in Word to straight text wrapped in unordered list items, as lists seem to require the most cleanup when copying and pasting.

Sub CleanupHTML()
'
' CleanupHTML Macro
' Cleanup document for HTML by replacing special characters with entities.
'
    Selection.Find.ClearFormatting
    Selection.Find.Replacement.ClearFormatting
    With Selection.Find
        .Text = "&"
        .Replacement.Text = "&amp;"
        .Forward = True
        .Wrap = wdFindContinue
        .Format = False
        .MatchCase = False
        .MatchWholeWord = False
        .MatchWildcards = False
        .MatchSoundsLike = False
        .MatchAllWordForms = False
    End With
    Selection.Find.Execute Replace:=wdReplaceAll
    Selection.Find.ClearFormatting
    Selection.Find.Replacement.ClearFormatting
    With Selection.Find
        .Text = "©"
        .Replacement.Text = "&copy;"
        .Forward = True
        .Wrap = wdFindContinue
        .Format = False
        .MatchCase = False
        .MatchWholeWord = False
        .MatchWildcards = False
        .MatchSoundsLike = False
        .MatchAllWordForms = False
    End With
    Selection.Find.Execute Replace:=wdReplaceAll
    Selection.Find.ClearFormatting
    Selection.Find.Replacement.ClearFormatting
    With Selection.Find
        .Text = "®"
        .Replacement.Text = "&reg;"
        .Forward = True
        .Wrap = wdFindContinue
        .Format = False
        .MatchCase = False
        .MatchWholeWord = False
        .MatchWildcards = False
        .MatchSoundsLike = False
        .MatchAllWordForms = False
    End With
    Selection.Find.Execute Replace:=wdReplaceAll
    Selection.Find.ClearFormatting
    Selection.Find.Replacement.ClearFormatting
    With Selection.Find
        .Text = "™"
        .Replacement.Text = "&#8482;"
        .Forward = True
        .Wrap = wdFindContinue
        .Format = False
        .MatchCase = False
        .MatchWholeWord = False
        .MatchWildcards = False
        .MatchSoundsLike = False
        .MatchAllWordForms = False
    End With
    Selection.Find.Execute Replace:=wdReplaceAll
    Selection.Find.ClearFormatting
    Selection.Find.Replacement.ClearFormatting
    With Selection.Find
        .Text = "--"
        .Replacement.Text = "&#8212;"
        .Forward = True
        .Wrap = wdFindContinue
        .Format = False
        .MatchCase = False
        .MatchWholeWord = False
        .MatchWildcards = False
        .MatchSoundsLike = False
        .MatchAllWordForms = False
    End With
    Selection.Find.Execute Replace:=wdReplaceAll
    Selection.Find.ClearFormatting
    Selection.Find.Replacement.ClearFormatting
    With Selection.Find
        .Text = "—"
        .Replacement.Text = "&#8212;"
        .Forward = True
        .Wrap = wdFindContinue
        .Format = False
        .MatchCase = False
        .MatchWholeWord = False
        .MatchWildcards = False
        .MatchSoundsLike = False
        .MatchAllWordForms = False
    End With
    Selection.Find.Execute Replace:=wdReplaceAll
    Selection.Find.ClearFormatting
    Selection.Find.Replacement.ClearFormatting
    With Selection.Find
        .Text = "–"
        .Replacement.Text = "&#8211;"
        .Forward = True
        .Wrap = wdFindContinue
        .Format = False
        .MatchCase = False
        .MatchWholeWord = False
        .MatchWildcards = False
        .MatchSoundsLike = False
        .MatchAllWordForms = False
    End With
    Selection.Find.Execute Replace:=wdReplaceAll
    Selection.Find.ClearFormatting
    Selection.Find.Replacement.ClearFormatting
    With Selection.Find
        .Text = "…"
        .Replacement.Text = "..."
        .Forward = True
        .Wrap = wdFindContinue
        .Format = False
        .MatchCase = False
        .MatchWholeWord = False
        .MatchWildcards = False
        .MatchSoundsLike = False
        .MatchAllWordForms = False
    End With
    Selection.Find.Execute Replace:=wdReplaceAll
    Selection.Find.ClearFormatting
    Selection.Find.Replacement.ClearFormatting
    With Selection.Find
        .Text = "'"
        .Replacement.Text = "'"
        .Forward = True
        .Wrap = wdFindContinue
        .Format = False
        .MatchCase = False
        .MatchWholeWord = False
        .MatchWildcards = False
        .MatchSoundsLike = False
        .MatchAllWordForms = False
    End With
    Selection.Find.Execute Replace:=wdReplaceAll
    With Selection.Find
        .Text = """"
        .Replacement.Text = """"
        .Forward = True
        .Wrap = wdFindContinue
        .Format = False
        .MatchCase = False
        .MatchWholeWord = False
        .MatchWildcards = False
        .MatchSoundsLike = False
        .MatchAllWordForms = False
    End With
    Selection.Find.Execute Replace:=wdReplaceAll
End Sub

Sub PrettyHTML()
'
' PrettyHTML Macro
'
'
    Selection.Find.ClearFormatting
    Selection.Find.Replacement.ClearFormatting
    With Selection.Find
        .Text = "&"
        .Replacement.Text = "&amp;"
        .Forward = True
        .Wrap = wdFindContinue
        .Format = False
        .MatchCase = False
        .MatchWholeWord = False
        .MatchWildcards = False
        .MatchSoundsLike = False
        .MatchAllWordForms = False
    End With
    Selection.Find.Execute Replace:=wdReplaceAll
    Selection.Find.ClearFormatting
    Selection.Find.Replacement.ClearFormatting
    With Selection.Find
        .Text = "©"
        .Replacement.Text = "&copy;"
        .Forward = True
        .Wrap = wdFindContinue
        .Format = False
        .MatchCase = False
        .MatchWholeWord = False
        .MatchWildcards = False
        .MatchSoundsLike = False
        .MatchAllWordForms = False
    End With
    Selection.Find.Execute Replace:=wdReplaceAll
    Selection.Find.ClearFormatting
    Selection.Find.Replacement.ClearFormatting
    With Selection.Find
        .Text = "®"
        .Replacement.Text = "&reg;"
        .Forward = True
        .Wrap = wdFindContinue
        .Format = False
        .MatchCase = False
        .MatchWholeWord = False
        .MatchWildcards = False
        .MatchSoundsLike = False
        .MatchAllWordForms = False
    End With
    Selection.Find.Execute Replace:=wdReplaceAll
    Selection.Find.ClearFormatting
    Selection.Find.Replacement.ClearFormatting
    With Selection.Find
        .Text = "™"
        .Replacement.Text = "&#8482;"
        .Forward = True
        .Wrap = wdFindContinue
        .Format = False
        .MatchCase = False
        .MatchWholeWord = False
        .MatchWildcards = False
        .MatchSoundsLike = False
        .MatchAllWordForms = False
    End With
    Selection.Find.Execute Replace:=wdReplaceAll
    Selection.Find.ClearFormatting
    Selection.Find.Replacement.ClearFormatting
    With Selection.Find
        .Text = "--"
        .Replacement.Text = "&#8212;"
        .Forward = True
        .Wrap = wdFindContinue
        .Format = False
        .MatchCase = False
        .MatchWholeWord = False
        .MatchWildcards = False
        .MatchSoundsLike = False
        .MatchAllWordForms = False
    End With
    Selection.Find.Execute Replace:=wdReplaceAll
    Selection.Find.ClearFormatting
    Selection.Find.Replacement.ClearFormatting
    With Selection.Find
        .Text = "—"
        .Replacement.Text = "&#8212;"
        .Forward = True
        .Wrap = wdFindContinue
        .Format = False
        .MatchCase = False
        .MatchWholeWord = False
        .MatchWildcards = False
        .MatchSoundsLike = False
        .MatchAllWordForms = False
    End With
    Selection.Find.Execute Replace:=wdReplaceAll
    Selection.Find.ClearFormatting
    Selection.Find.Replacement.ClearFormatting
    With Selection.Find
        .Text = "–"
        .Replacement.Text = "&#8211;"
        .Forward = True
        .Wrap = wdFindContinue
        .Format = False
        .MatchCase = False
        .MatchWholeWord = False
        .MatchWildcards = False
        .MatchSoundsLike = False
        .MatchAllWordForms = False
    End With
    Selection.Find.Execute Replace:=wdReplaceAll
    Selection.Find.ClearFormatting
    Selection.Find.Replacement.ClearFormatting
    With Selection.Find
        .Text = "…"
        .Replacement.Text = "..."
        .Forward = True
        .Wrap = wdFindContinue
        .Format = False
        .MatchCase = False
        .MatchWholeWord = False
        .MatchWildcards = False
        .MatchSoundsLike = False
        .MatchAllWordForms = False
    End With
    Selection.Find.ClearFormatting
    Selection.Find.Replacement.ClearFormatting
    With Selection.Find
        .Text = ChrW(8220)
        .Replacement.Text = "&ldquo;"
        .Forward = True
        .Wrap = wdFindContinue
        .Format = False
        .MatchCase = False
        .MatchWholeWord = False
        .MatchWildcards = False
        .MatchSoundsLike = False
        .MatchAllWordForms = False
    End With
    Selection.Find.Execute Replace:=wdReplaceAll
    Selection.Find.ClearFormatting
    Selection.Find.Replacement.ClearFormatting
    With Selection.Find
        .Text = ChrW(8221)
        .Replacement.Text = "&rdquo;"
        .Forward = True
        .Wrap = wdFindContinue
        .Format = False
        .MatchCase = False
        .MatchWholeWord = False
        .MatchWildcards = False
        .MatchSoundsLike = False
        .MatchAllWordForms = False
    End With
    Selection.Find.Execute Replace:=wdReplaceAll
    Selection.Find.ClearFormatting
    Selection.Find.Replacement.ClearFormatting
    With Selection.Find
        .Text = "'"
        .Replacement.Text = "&rsquo;"
        .Forward = True
        .Wrap = wdFindContinue
        .Format = False
        .MatchCase = False
        .MatchWholeWord = False
        .MatchWildcards = False
        .MatchSoundsLike = False
        .MatchAllWordForms = False
    End With
    Selection.Find.Execute Replace:=wdReplaceAll
    Selection.Find.ClearFormatting
    Selection.Find.Replacement.ClearFormatting
    With Selection.Find
        .Text = "è"
        .Replacement.Text = "&egrave;"
        .Forward = True
        .Wrap = wdFindContinue
        .Format = False
        .MatchCase = False
        .MatchWholeWord = False
        .MatchWildcards = False
        .MatchSoundsLike = False
        .MatchAllWordForms = False
    End With
    Selection.Find.Execute Replace:=wdReplaceAll
    Selection.Find.ClearFormatting
    Selection.Find.Replacement.ClearFormatting
End Sub

Many thanks to
http://celebritycola.blogspot.com/2004/09/preserving-formatting-when-posting.html for getting me started on this.

Update 5.5.11: I’ve since written two more posts on handling issues with Word add-ins, the better one being: Programmatically re-enabling Word COM add-ins I’d recommend checking it out, too, as I’ve learned quite a bit since writing this post.

Many of the problems with Word 2007’s stability are due to third-party add-ins that are often used to add functionality to Word and to add new tabs and groups to the ribbon. If something unexpected happens in Word (it crashes, for example) while an add-in is being used, Word will flag it as problematic and will alert you to this the next time Word is launched. Depending on the severity of the problem, the add-in can be either ‘soft-disabled’ or ‘hard-disabled’. More on this a bit later.

In this post, I’ll explain how to programmatically restore add-ins after Word has disabled them. Determining what caused the problem in the first place is outside the scope of this post. However, I’ve watched Word fail to properly start up and blame this on an add-in that has worked without issue for weeks on end. What’s more, after re-loading the add-in, Word and the add-in will work fine for weeks more. So, it may not be a particular add-in is malfunctioning, but that Word’s handling of add-ins generally is flaky.

Microsoft explains the differences between Hard Disabled vs Soft Disabled in a MSDN article at: http://msdn.microsoft.com/en-us/library/ms268871(VS.80).aspx, but I’ll paraphrase here.

Hard-Disabled Add-ins

Hard-disabling occurs when the add-in causes the application (Word) to close unexpectedly. The problem was so serious that Word crashed.

Once an add-in has been ‘hard-disabled’ by Word 2007, it will appear in the Disabled Application Add-ins list. To see which add-ins have been hard-disabled, click on the Office Button | Word Options | Add-Ins, and scroll down to “Disabled Application Add-ins”.

To manually restore a hard-disabled add-in, first enable the add-in by selecting “Disabled Items” in the Manage menu, clicking Go, selecting the add-in to re-enable, and clicking the Enable button. Then load it by selecting “COM Add-Ins” in the Manage menu, clicking Go, and placing a check in the box next to the Add-In.

Each hard-disable add-in will have an entry in the DisabledItems registry key at:

HKEY_CURRENT_USER\Software\Microsoft\Office\12.0\Word\Resiliency\DisabledItems

The entry name is some sort of hash/random binary value, rather than the name of the add-in. You can look at the hex of each and identify the specific add-in, but programatically re-enabling them is most easily done by deleting the entire Resiliency key. This makes it an ‘all or nothing’ situation.

Disabling adds a binary value for each addin with a name that’s randomly generated. The Resiliency key exists if there is at least one disabled item, but if you re-enable the addin then the Resiliency key and DisabledItems subkey are both deleted. So the presence of the Resiliency key serves as a general test for the existence of disabled items. You can re-enable the addin by deleting the specific binary reg value, or by removing the whole key.
http://help.lockergnome.com/office/Outlook-constantly-disabled–ftopict876175.html

Soft-Disabled Add-ins

Soft-disabling occurs when an add-in throws an unhandled exception, but the application (Word) does not unexpectedly close.

If an add-in has been ‘soft-disabled’ by Word 2007, it will NOT appear in the Disabled Application Add-ins list. It can be enabled by selecting “COM Add-Ins” in the Manage menu, clicking Go, and placing a check in the box next to the Add-In.

When you re-enable a soft-disabled add-in, Word immediately attempts to load the add-in. If the problem that initially caused Word to soft-disable the add-in has not been fixed, it will soft-disable the add-in again, and the box will not stay checked.

When an add-in has been soft-disabled, the LoadBehavior value in the registry will be changed. It seems that this value can exist in either of two locations:

HKEY_CURRENT_USER\Software\Microsoft\Office\Word\Addins\
HKEY_LOCAL_MACHINE\SOFTWARE\Microsoft\Office\Word\Addins\

A LoadBehavior of 2 = unloaded (this corresponds to an unchecked box)
A LoadBehavior of 3 = loaded (this corresponds to a checked box)

Here’s more information from Microsoft on the various LoadBehavior registry entries.

Restoring disabled add-ins programmatically

Hard-disabled add-ins can be promoted to a temporarily soft-disabled status by running the following registry merge file to delete the Resiliency key:

Windows Registry Editor Version 5.00

[-HKEY_CURRENT_USER\Software\Microsoft\Office\12.0\Word\Resiliency]

As an example, Word can be configured to attempt to load the Acrobat PDFMaker Office COM Addin installed with Acrobat 8 Standard by running the following registry merge file to force the data on the LoadBehavior value:

Windows Registry Editor Version 5.00

[HKEY_LOCAL_MACHINE\SOFTWARE\Microsoft\Office\Word\Addins\PDFMaker.OfficeAddin]
"LoadBehavior"=dword:00000003

By enabling the add-ins you wish to always load through the Word GUI, then exporting the Word\Addins registry keys to capture the correct LoadBehavior, and combining those keys with the instruction to delete the Resiliency key, you’ll be able to fix all of your add-in problems and restore Word to a working state with a single click.

A macro to display a message box with all currently loaded COM add-ins

You can use the following macro to display a message box with all currently loaded COM add-ins.

Sub ShowAddins()
'
' ShowAddins Macro
' Display a message box with all currently loaded COM add-ins
'
   Dim MyAddin As COMAddIn
   Dim i As Integer, msg As String

   For Each MyAddin In Application.COMAddIns
      msg = msg & MyAddin.Description & " - " & MyAddin.ProgID & vbCrLf
   Next

   MsgBox msg

End Sub

Source: Some COM add-ins are not listed in the COM Add-Ins dialog box in Word

Forcing add-ins to be disabled by Word

To test, you may be able to cause add-ins to be disabled by forcibly ending the winword.exe process while Word is loading, or after it has invoked a function from the add-in. It might require crashing Word a few times, but eventually you’ll get an error:

Microsoft Office Word
Word experienced a serious problem with the ‘[add-in name]’ add-in. If you have seen this message multiple times, you should disable this add-in and check to see if an update is available.
Do you want to disable this add-in?
[Yes] [No]

If you click Yes, the add-in will be hard-disabled and an entry will be created in

HKEY_CURRENT_USER\Software\Microsoft\Office\12.0\Word\Resiliency\DisabledItems

I’m using Windows 7, trying to transfer photos from my digital camera to my laptop for the second time, but the Import Pictures and Videos wizard won’t let me. After I connect my camera and choose ‘Import pictures and videos’ from the AutoPlay dialog box, I get a message from the Import Pictures and Videos wizard that ‘No new pictures or videos were found on this device’.

Although it would have been simple to just treat the camera as a mass storage device and browse the files in Explorer, I wanted to use the wizard to create a folder for each date. Why can’t we have a button to import the same images again and again, as many times as we want?

Disconnecting and reconnecting the device didn’t help, and deleting the picture files and the folders that contained them from my computer didn’t help, either. Obviously, something on the computer was keeping track of which images had been transferred. So, I started digging around and found this interesting hidden file in my user folder:

C:\Users\[username]\AppData\Local\Microsoft\Photo Acquisition\PreviouslyAcquired.db

I renamed PreviouslyAcquired.db to PreviouslyAcquired.db.old, then reconnected the camera and went through the wizard again, where I was able to import the pictures a second time.

As noted in the comments below, in order to see the PreviouslyAcquired.db file, you first need to turn on Show hidden files, folders, and drives in Windows’ Folder Options dialog box. To do this, open Windows Explorer, click on Organize and choose Folder and search options to open the Folder Options dialog box. Choose the View tab, then choose the Show hidden files, folders, and drives radio button under Hidden files and folders.