Monthly Archives: July 2010

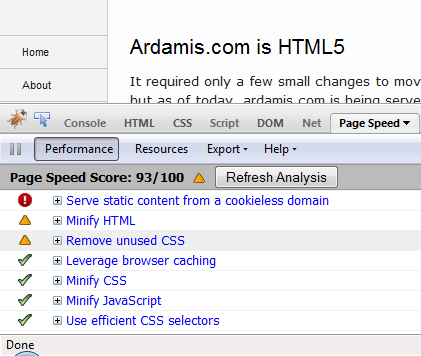
The results are in, and they’re good. After compressing .php, .css and .js files without mod_gzip or mod_deflate and sending the correct headers to leverage browser caching, Ardamis.com now has a Google Page Speed score of 93/100.

Ardamis.com PageSpeed score of 93/100

Ardamis.com Page Speed score of 93/100

Page Speed just keeps getting better, and it keeps getting tougher to score well. I’m happy, but not satisfied yet. The remaining hurdle is to serve static content from a cookieless domain. I’m looking into the CDN offered by Amazon.com, but it’s a paid service.

It required only a few small changes to move from XHTML 1.0 Strict to HTML5, but as of today, ardamis.com is being served as valid HTML5. For some time, I’ve been waiting for HTML5 to get closer to becoming a W3C recommendation, and for better support from user agents, but I’ve gotten caught up with other improvements to the site and decided to make the transition now.

Over the next few weeks, I’ll be updating the HTML to incorporate some of the new tags. I’m pretty excited about replacing divs with new semantic elements like <header>, <article>, and <footer>.

As a follow-up to my post on compressing .php, .css and .js files without mod_gzip or mod_deflate, I’m documenting the changes I made to the .htaccess file on ardamis.com in order to speed up page load times for returning visitors and satisfy the Leverage browser caching recommendation of Google’s Page Speed Firefox/Firebug Add-on.

A great explanation of why browser caching helps the web deliver a better user experience is at betterexplained.com.

Two authoritative articles on the subject are Google’s Performance Best Practices | Optimize caching and Yahoo’s Best Practices for Speeding Up Your Web Site | Add an Expires or a Cache-Control Header.

I’d like to point out that in researching browser cashing, I came across a lot of information that contradicted the rather clear instructions from Google:

It is important to specify one of Expires or Cache-Control max-age, and one of Last-Modified or ETag, for all cacheable resources. It is redundant to specify both Expires and Cache-Control: max-age, or to specify both Last-Modified and ETag.

I’m not sure that this recommendation is entirely correct, as the W3C states that Expires and Cache-Control max-age are used in different situations, with Cache-Control max-age overriding Expires in the event of conflicts.

If a response includes both an Expires header and a max-age directive, the max-age directive overrides the Expires header, even if the Expires header is more restrictive. This rule allows an origin server to provide, for a given response, a longer expiration time to an HTTP/1.1 (or later) cache than to an HTTP/1.0 cache.

http://www.w3.org/Protocols/rfc2616/rfc2616-sec14.html

It would seem that Cache-Control is the preferred method of controlling browser caching going forward.

HTTP 1.1 clients will honour “Cache-Control” (which is easier to use and much more flexible).
HTTP 1.0 clients will ignore “Cache-Control” but honour “Expires”. With “Expires” you get thus at least a bit control for these old clients.

http://www.peterbe.com/plog/cache-control_or_expires

In any event, Page Speed won’t protest if you do end up sending both Expires and Cache-Control max-age, or if you remove both Last-Modified and ETag, but I was able to get the best results with just setting Cache-Control max-age and removing the ETag.

Setting the headers in .htaccess

On Apache, configuring the proper headers can be done in the .htaccess file, using the Header directive. The Header directive requires the mod_headers module to be enabled.

I’m choosing to set a far future Expires header of one year on my images files, because I tweak the CSS and JavaScript pretty often, and don’t want those file types to be cached as long.

Add the following code to your .htaccess file to set your Cache-Control and Expires headers, adjusting the date to be one year from today.

# Set Cache-Control and Expires headers
<filesMatch "\\.(ico|pdf|flv|jpg|jpeg|png|gif|swf|mp3|mp4)$">
Header set Cache-Control "max-age=2592000, private"
Header set Expires "Sun, 17 July 2011 20:00:00 GMT"
</filesMatch>
<filesMatch "\\.(css|css.gz)$">
Header set Cache-Control "max-age=604800, private"
</filesMatch>
<filesMatch "\\.(js|js.gz)$">
Header set Cache-Control "max-age=604800, private"
</filesMatch>
<filesMatch "\\.(xml|txt)$">
Header set Cache-Control "max-age=216000, private, must-revalidate"
</filesMatch>
<filesMatch "\\.(html|htm)$">
Header set Cache-Control "max-age=7200, private, must-revalidate"
</filesMatch>

Removing ETags in .htaccess

Most sources recommend simply removing ETags if they are not required.

Entity tags (ETags) are a mechanism that web servers and browsers use to determine whether the component in the browser’s cache matches the one on the origin server.

If you’re not taking advantage of the flexible validation model that ETags provide, it’s better to just remove the ETag altogether.

http://developer.yahoo.com/performance/rules.html#etags

Add the following code to your .htaccess file to remove ETag headers.

# Turn off ETags
FileETag None
Header unset ETag

Set Expires headers with ExpiresByType (optional)

If your host has the mod_expires module enabled, you can specify Expires headers by file type. Godaddy does not have this module enabled.

# Set Expires headers
ExpiresActive On
ExpiresDefault "access plus 1 year"
ExpiresByType text/html "access plus 1 second"
ExpiresByType image/gif "access plus 2592000 seconds"
ExpiresByType image/jpeg "access plus 2592000 seconds"
ExpiresByType image/png "access plus 2592000 seconds"
ExpiresByType image/x-icon "access plus 2592000 seconds"
ExpiresByType text/css "access plus 604800 seconds"
ExpiresByType text/javascript "access plus 604800 seconds"
ExpiresByType application/x-javascript "access plus 604800 seconds"

Removing the Last-Modified header in .htaccess (optional)

I’m following Google’s instructions and not removing the Last-Modified header, but if you wanted to do so, you could use:

# Remove Last-Modified header
Header unset Last-Modified

Busting the cache when files change

What happens when you change files and need to force browsers to load the new files? Christian Johansen offers two methods in his post on Using a far future expires header.

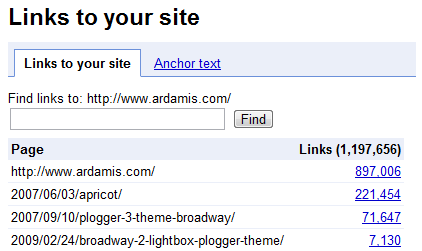
I’d like to note that, as of today, Google Webmaster Tools is reporting over one million inbound links to pages on ardamis.com.

one million inbound links

One million inbound links!

I’ve been spending quite a bit of time on ardamis.com lately, giving it a new look, working at improving the site’s navigation, cultivating some inbound links, and posting more regularly. It’s rewarding to see that the effort is paying off.

Over the last few days, I’ve been concentrating on reducing page load times by sending the proper headers and compressing files.

I’ll give it some time and see how performance improves.

According to Google’s Webmaster Tools’ performance overview, with Super Cache running, a single minified CSS, a single minified JavaScript, etc. but no compression or header tweaks:
On average, pages in your site take 2.8 seconds to load (updated on Jun 28, 2010). This is faster than 53% of sites.

The chart illustrating page load times is pretty much all over the place, but at no time has the site dipped into the 20th percentile, indicating a ‘fast’ site. I’m trying to change that.

File compression is possible on Apache web hosts that do not have mod_gzip or mod_deflate enabled, and it’s easier than you might think.

A great explanation of why compression helps the web deliver a better user experience is at betterexplained.com.

Two authoritative articles on the subject are Google’s Performance Best Practices documentation | Enable compression and Yahoo’s Best Practices for Speeding Up Your Web Site | Gzip Components.

Compressing PHP files

If your Apache server does not have mod_gzip or mod_deflate enabled (Godaddy and JustHost shared hosting, for example), you can use PHP to compress pages on-the-fly. This is still preferable to sending uncompressed files to the browser, so don’t worry about the additional work the server has to do to compress the files at each request.

Option 1: PHP.INI using zlib.output_compression

The zlib extension can be used to transparently compress PHP pages on-the-fly if the browser sends an “Accept-Encoding: gzip” or “deflate” header. Compression with zlib.output_compression seems to be disabled on most hosts by default, but can be enabled with a custom php.ini file:

[PHP]

zlib.output_compression = On

Credit: http://php.net/manual/en/zlib.configuration.php

Check with your host for instructions on how to implement this, and whether you need a php.ini file in each directory.

Option 2: PHP using ob_gzhandler

If your host does not allow custom php.ini files, you can add the following line of code to the top of your PHP pages, above the DOCTYPE declaration or first line of output:

<?php if (substr_count($_SERVER['HTTP_ACCEPT_ENCODING'], 'gzip')) ob_start("ob_gzhandler"); else ob_start(); ?>

Credit: GoDaddy.com

For WordPress sites, this code would be added to the top of the theme’s header.php file.

According to php.net, using zlib.output_compression is preferred over ob_gzhandler().

For WordPress or other CMS sites, an advantage of zlib.output_compression over the ob_gzhandler method is that all of the .php pages served will be compressed, not just those that contain the global include (eg.: header.php, etc.).

Running both ob_gzhandler and zlib.output_compression at the same time will throw a warning, similar to:

Warning: ob_start() [ref.outcontrol]: output handler ‘ob_gzhandler’ conflicts with ‘zlib output compression’ in /home/path/public_html/ardamis.com/wp-content/themes/mytheme/header.php on line 7

Compressing CSS and JavaScript files

Because the on-the-fly methods above only work for PHP pages, you’ll need something else to compress CSS and JavaScript files. Furthermore, these files typically don’t change, so there isn’t a need to compress them at each request. A better method is to serve pre-compressed versions of these files. I’ll describe a few different ways to do this, but in both cases, you’ll need to add some lines to your .htaccess file to send user agents the gzipped versions if they support the encoding. This requires that Apache’s mod_rewrite be enabled (and I think it’s almost universally enabled).

Option 1: Compress locally and upload

CSS and JavaScript files can be gzipped on the workstation, then uploaded along with the uncompressed files. Use a utility like 7-Zip (quite possibly the best compression software around, and it’s free) to compress the CSS and JavaScript files using the gzip format (with extension *.gz), then upload them to your server.

For Windows users, here is a handy command to compress all the .css and .js files in the current directory and all sub directories (adjust the path to the 7-Zip executable, 7z.exe, as necessary):

for /R %i in (*.css *.js) do "C:\Program Files (x86)\7-Zip\7z.exe" a -tgzip "%i.gz" "%i" -mx9

Note that the above command is to be run from the command line. The batch file equivalent would be:

for /R %%i in (*.css *.js) do "C:\Program Files (x86)\7-Zip\7z.exe" a -tgzip "%%i.gz" "%%i" -mx9

Option 2: Compress on the server

If you have shell access, you can run a command to create a gzip copy of each CSS and JavaScript file on your site (or, if you are developing on Linux, you can run it locally):

find . -regex ".*\(css\|js\)$" -exec bash -c 'echo Compressing "{}" && gzip -c --best "{}" > "{}.gz"' \;

This may be a bit too technical for many people, but is also much more convenient. It is particularly useful when you need to compress a large number of files (as in the case of a WordPress installation with multiple plugins). Remember to run it every time you automatically update WordPress, your theme, or any plugins, so as to replace the gzip’d versions of any updated CSS and JavaScript files.

The .htaccess (for both options)

Add the following lines to your .htaccess file to identify the user agents that can accept the gzip encoded versions of these files.

<files *.js.gz>
  AddType "text/javascript" .gz
  AddEncoding gzip .gz
</files>
<files *.css.gz>
  AddType "text/css" .gz
  AddEncoding gzip .gz
</files>
RewriteEngine on
#Check to see if browser can accept gzip files.
ReWriteCond %{HTTP:accept-encoding} gzip
RewriteCond %{HTTP_USER_AGENT} !Safari
#make sure there's no trailing .gz on the url
ReWriteCond %{REQUEST_FILENAME} !^.+\.gz$
#check to see if a .gz version of the file exists.
RewriteCond %{REQUEST_FILENAME}.gz -f
#All conditions met so add .gz to URL filename (invisibly)
RewriteRule ^(.+) $1.gz [QSA,L]

Credit: opensourcetutor.com

I’m not sure it’s still necessary to exclude Safari.

For added benefit, minify the CSS and JavaScript files before gzipping them. Google’s excellent Page Speed Firefox/Firebug Add-on makes this very easy. Yahoo’s YUI Compressor is also quite good.

Verify that your content is being compressed

Use the nifty Web Page Content Compression Verification tool at http://www.whatsmyip.org/http_compression/ to confirm that your server is sending the compressed files.

Speed up page load times for returning visitors

Compression is only part of the story. In order to further speed page load times for your returning visitors, you will want to send the correct headers to leverage browser caching.
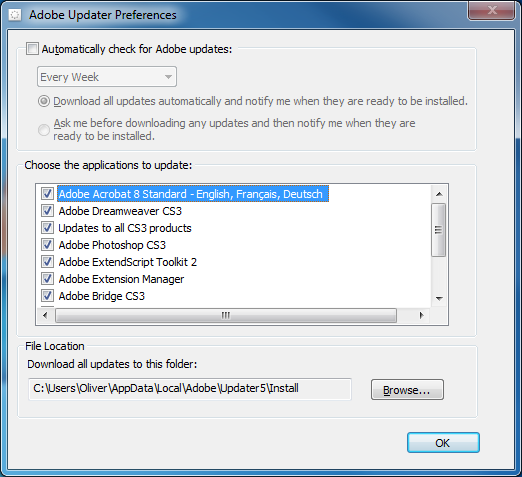
By default, the Adobe Updater application that is installed along side various Adobe products like Acrobat and Photoshop is set to check for updates automatically. Specifically, it’s set to check for updates to all installed Adobe products every week, and to download all updates and then notify you when they are ready to be installed. In this post, I’ll explain how to disable this feature by editing a settings file while avoiding the GUI.

Adobe Updater Preferences

Adobe Updater Preferences

In a managed environment, an administrator may not want any software to update itself for any number of reasons. The automatic check can be switched off in the Adobe Updater preferences, but it can be a nuisance to find and requires as many as 9 clicks.

Adobe Updater can be launched from within Adobe products by clicking Help | Check for Updates (note that in some products, the path is Help | Updates, but in either case, you can use the keystroke Alt+H, U). Click Preferences, then uncheck the box next to Automatically check for Adobe updates and click OK, then close the Adobe Updater window. You may have to click Quit in a subsequent window before the application closes.

For a more direct route, the Adobe Updater executable installed with Reader 9 resides at
C:\Program Files (x86)\Common Files\Adobe\Updater6\AdobeUpdater.exe on a 64-bit Windows 7 machine, and at
C:\Program Files\Common Files\Adobe\Updater6\AdobeUpdater.exe on a 32-bit Windows XP machine.

All of the configurable settings are saved to a file named AdobeUpdaterPrefs.dat in the user profile, rather than as registry keys. The .dat file extension suggests a binary file, but it’s actually just an XML document that can be opened in any text editor.

The preferences file resides at
C:\Users\[USERNAME]\AppData\Local\Adobe\Updater6\AdobeUpdaterPrefs.dat on a 64-bit Windows 7 machine, and at
C:\Documents and Settings\[USERNAME]\Local Settings\Application Data\Adobe\Updater6\AdobeUpdaterPrefs.dat on a 32-bit Windows XP machine.

The minimum lines that need to exist for the file to be valid and for “Automatically check for Adobe updates” to be disabled are:

<?xml version="1.0" encoding="UTF-8" ?>
<AdobeUpdater>
<AutoCheck>0</AutoCheck>
</AdobeUpdater>

To disable the auto update check programmatically, this file can be saved as AdobeUpdaterPrefs.dat and a script used to later overwrite the file in the user profile. A rather geekier approach would be to use a batch file to rename AdobeUpdaterPrefs.dat and then write a new file. I prefer the latter method because it requires only a single file and because it could be easily modified to insert lines that would change other settings, such as the location of the aum.log log file or the download directory, which are located in the user profile by default.

A batch file to back-up and then remake the file might look like this:

:: A batch file for writing a new Adobe Updater settings file "AdobeUpdaterPrefs.dat"
:: If an AdobeUpdaterPrefs.dat exists, it is edited and then the next next location is checked, until the script has iterated through all locations
@echo off

%SystemDrive%
cd\
SETLOCAL EnableDelayedExpansion

:: Check each location and if the file is found, pass the directory and a label (to the next path to be searched or to an EXIT command) to the function

:XPUpdater6
@echo.
echo Checking for "%USERPROFILE%\Local Settings\Application Data\Adobe\Updater6\AdobeUpdaterPrefs.dat"
if exist "%USERPROFILE%\Local Settings\Application Data\Adobe\Updater6\AdobeUpdaterPrefs.dat" (call:REWRITE "%USERPROFILE%\Local Settings\Application Data\Adobe\Updater6",XPUpdater5) else (@echo The AdobeUpdaterPrefs.dat file was not found.)

:XPUpdater5
@echo.
echo Checking for "%USERPROFILE%\Local Settings\Application Data\Adobe\Updater5\AdobeUpdaterPrefs.dat"
if exist "%USERPROFILE%\Local Settings\Application Data\Adobe\Updater5\AdobeUpdaterPrefs.dat" (call:REWRITE "%USERPROFILE%\Local Settings\Application Data\Adobe\Updater5",OUT) else (@echo The AdobeUpdaterPrefs.dat file was not found.)

:OUT
@pause
exit

:REWRITE
:: Configure Adobe Update to not check for updates
:: Move to the correct directory
cd %~1
:: Delete any temp file that this script may have created in the past
if exist AdobeUpdaterPrefs.dat.temp del AdobeUpdaterPrefs.dat.temp
:: Backup the old file
rename AdobeUpdaterPrefs.dat AdobeUpdaterPrefs.dat.temp
:: Write a new minimum settings file (the other data will be filled in when Auto Updater runs)
echo ^<?xml version="1.0" encoding="UTF-8" ?^> >> AdobeUpdaterPrefs.txt
echo ^<AdobeUpdater^> >> AdobeUpdaterPrefs.txt
echo ^<AutoCheck^>0^</AutoCheck^> >> AdobeUpdaterPrefs.txt
echo ^</AdobeUpdater^> >> AdobeUpdaterPrefs.txt
:: Rename the new file
rename AdobeUpdaterPrefs.txt AdobeUpdaterPrefs.dat
@echo The AdobeUpdaterPrefs.dat file was found and modified.
:: Go to the next location in the list
goto :%~2
goto :EOF

File locations in Windows 7

Note that in Windows 7, “%USERPROFILE%\AppData\Local\” and “%USERPROFILE%\Local Settings\Application Data\” contain the same data. A file added to a subdirectory in one location will appear in the corresponding subdirectory in the other location. So this script will work on Windows 7 because of 7’s backwards compatibility.

If you wanted to the script to run using Windows 7’s native C:\Users\… directory structure and did not care about the loss of compatibility with XP, you could use the following script instead.

:: A batch file for writing a new Adobe Updater settings file "AdobeUpdaterPrefs.dat"
:: If an AdobeUpdaterPrefs.dat exists, it is edited and then the next next location is checked, until the script has iterated through all locations
@echo off

%SystemDrive%
cd\
SETLOCAL EnableDelayedExpansion

:: Check each location and if the file is found, pass the directory and a label (to the next path to be searched or to an EXIT command) to the function

:WIN7Updater6
@echo.
echo Checking for "%USERPROFILE%\AppData\Local\Adobe\Updater6\AdobeUpdaterPrefs.dat"
if exist "%USERPROFILE%\AppData\Local\Adobe\Updater6\AdobeUpdaterPrefs.dat" (call:REWRITE "%USERPROFILE%\AppData\Local\Adobe\Updater6",WIN7Updater5) else (@echo The AdobeUpdaterPrefs.dat file was not found.)

:WIN7Updater5
@echo.
echo Checking for "%USERPROFILE%\AppData\Local\Adobe\Updater5\AdobeUpdaterPrefs.dat"
if exist "%USERPROFILE%\AppData\Local\Adobe\Updater5\AdobeUpdaterPrefs.dat" (call:REWRITE "%USERPROFILE%\AppData\Local\Adobe\Updater5",OUT) else (@echo The AdobeUpdaterPrefs.dat file was not found.)

:OUT
@pause
exit

:REWRITE
:: Configure Adobe Update to not check for updates
:: Move to the correct directory
cd %~1
:: Delete any temp file that this script may have created in the past
if exist AdobeUpdaterPrefs.dat.temp del AdobeUpdaterPrefs.dat.temp
:: Backup the old file
rename AdobeUpdaterPrefs.dat AdobeUpdaterPrefs.dat.temp
:: Write a new minimum settings file (the other data will be filled in when Auto Updater runs)
echo ^<?xml version="1.0" encoding="UTF-8" ?^> >> AdobeUpdaterPrefs.txt
echo ^<AdobeUpdater^> >> AdobeUpdaterPrefs.txt
echo ^<AutoCheck^>0^</AutoCheck^> >> AdobeUpdaterPrefs.txt
echo ^</AdobeUpdater^> >> AdobeUpdaterPrefs.txt
:: Rename the new file
rename AdobeUpdaterPrefs.txt AdobeUpdaterPrefs.dat
@echo The AdobeUpdaterPrefs.dat file was found and modified.
:: Go to the next location in the list
goto :%~2
goto :EOF

Additional benefits

Modifying the preferences file could have other benefits as well. Imagine the time and disk space that could saved by having all of those incremental Adobe updates saved to a network location, rather than downloading them to each workstation.

In this post, I’ll explain how to delete files known as Flash cookies from a Windows computer using a batch file.

Most people are familiar with the concept of cookies – small files saved to your computer by the web sites you visit – and how to delete them. But there is a wide-spread misconception that simply deleting your cookies erases your tracks. Even when you’ve instructed your browser to delete cookies and browsing history, a potentially large collection of files remains, and the paths to these files contain the domain names of the sites that have placed them on your computer.

Local Shared Objects (LSO), commonly called Flash cookies, are collections of cookie-like data stored as a file on a user’s computer. LSOs are used by all versions of Adobe Flash Player…

With the default settings, Adobe Flash Player does not seek the user’s permission to store LSO files on the hard disk.

There is relatively little public awareness of LSOs, and they can usually not be deleted by the cookie privacy controls in a web browser.

http://en.wikipedia.org/wiki/Local_Shared_Object

The files are saved to two locations in the roaming profile:
%APPDATA%\Macromedia\Flash Player\#SharedObjects
and
%APPDATA%\Macromedia\Flash Player\macromedia.com\support\flashplayer\sys

As an example, a visit to YouTube will result in the following folders being created:
C:\Users\Oliver\AppData\Roaming\Macromedia\Flash Player\#SharedObjects\KV9EDJYY\s.ytimg.com
C:\Users\Oliver\AppData\Roaming\Macromedia\Flash Player\macromedia.com\support\flashplayer\sys\#s.ytimg.com

Create a text file with the following lines, then save it as deleteLSOs.bat. Run the batch file to delete and remake these folders, thereby clearing all of the subfolders and files.

@echo off
copy "%APPDATA%\Macromedia\Flash Player\macromedia.com\support\flashplayer\sys\settings.sol" "%USERPROFILE%\Local Settings\Temp\settings.sol"
rmdir /s /q "%APPDATA%\Macromedia\Flash Player\#SharedObjects"
md "%APPDATA%\Macromedia\Flash Player\#SharedObjects"
rmdir /s /q "%APPDATA%\Macromedia\Flash Player\macromedia.com\support\flashplayer\sys"
md "%APPDATA%\Macromedia\Flash Player\macromedia.com\support\flashplayer\sys"
copy "%USERPROFILE%\Local Settings\Temp\settings.sol" "%APPDATA%\Macromedia\Flash Player\macromedia.com\support\flashplayer\sys\settings.sol"

Note that the script backs up and then restores a settings.sol file that contains the Flash Player global settings, which can be managed from the Flash Player Settings Manager.

I had noticed mentions of analytic information provided by Compete.com often enough that I was curious about what it could do for me.

Compete already had some information about ardamis.com, but it was stunningly wrong. For example, it was telling me that the phrase “godaddy referral program” was responsible for 20.35% of the total traffic sent to my site by search engines. Until recently, I did have a page that mentioned godaddy referral programs, but according to Google Analytics, it was barely ever visited (7 page views in the last 30 days – it was the 78th most popular page on my site, which does get a few thousand visitors a month). Even more strange, it told me that I was getting traffic for the search phrase “myspace”. I have never written anything about myspace before.

I figured that once I installed their JavaScript tracking code, the analytics information would be much more accurate. So I installed the code, confirmed it appeared at the bottom of the home page, and attempted to verify my site at //ardamis.com/, but was unable to. I had read somewhere that the free account does not support tracking subdomains, and the verification process seemed to get hung up on the use of .htaccess to redirect non-www traffic to www.ardamis.com. I was mystified that Compete apparently could not recognize this was happening via a 301 redirect header and compensate.

Sorry,

It looks like the CompeteXL code has not been correctly placed on the homepage of your site.

This could be because either the code was not copied over correctly, or because it has been placed on the wrong page.

We think your homepage is

ardamis.com

I went so far as to email my amazement to their support staff, who promptly and politely wrote me back. (Thumbs up to the guys answering the emails.)

I had made a few other changes to my site at the same time, so I ran a Page Speed check on it. Page Speed told me that I was linking to a resource at trgc.opt.fimserve.com that was throwing a 404 error. I was pretty sure I didn’t intentionally link to anything at that domain, so I Googled it. Surprisingly, there’s not much out there on trgc.opt.fimserve.com other than this and this. As it turns out, fimserve.com is part of something called the FOX Audience Network, and FAN’s parent company is News Corporation, which also owns myspace.com.

Here’s the WHOIS on fimserve.com:

Domain Name: FIMSERVE.COM
Registrar: REGISTER.COM, INC.
Whois Server: whois.register.com
Referral URL: http://www.register.com
Name Server: NS1.MYSPACE.COM
Name Server: NS2.MYSPACE.COM
Status: clientTransferProhibited
Updated Date: 17-oct-2006
Creation Date: 17-oct-2006
Expiration Date: 17-oct-2011

And here’s the WHOIS on foxaudiencenetwork.com:

Domain Name: FOXAUDIENCENETWORK.COM
Registrar: MARKMONITOR INC.
Whois Server: whois.markmonitor.com
Referral URL: http://www.markmonitor.com
Name Server: NS1.MYSPACE.COM
Name Server: NS2.MYSPACE.COM
Status: clientDeleteProhibited
Status: clientTransferProhibited
Status: clientUpdateProhibited
Updated Date: 03-may-2010
Creation Date: 03-jun-2008
Expiration Date: 03-jun-2011

I didn’t like the idea that information about my visitors was being shared with anyone but the site I had signed up for, so I started looking through the Compete FAQs and found this:

Currently, the CompeteXL code tracks ONLY self-reported Audience Profile data through a partnership with the FOX Audience Network.

The CompeteXL code DOES NOT track traffic or user engagement metrics, that information continues to be provided through our multi-sourced panel and requires NO addition of code to your site.

http://www.compete.com/help/q225

What the hell? Why am I installing a tracking code if it’s not used to track traffic?

Oh, and this was a fun discovery, too:

The FOX Audience Network (FAN) is a unit of News Corporation that supports monetization efforts across the company’s online content portfolio, as well as third-party publisher sites.

FAN leverages proprietary advertising technology to create highly-targeted advertising campaigns for a wide range of marketers, while also delivering cutting-edge tools and services to third-party publisher partners. FAN works directly with hundreds of advertisers to develop customized marketing programs that optimize both branded and performance-based strategies.

http://www.foxaudiencenetwork.com/aboutus.php

I use a very popular HOSTS file to block a huge number of servers that are known to host advertisements, tracking scripts (including Google Analytics), parasites, hijackers and unwanted Adware/Spyware programs. The 404 error in Page Speed was caused by the inclusion of trgc.opt.fimserve.com in this custom HOSTS file, which then led me to finding all this out the next day. I’ve removed the tracking code because the information I wanted was on traffic – who’s coming to my site, why, and through what means – and not user demographics.