Tag Archives: Microsoft

I have to look up how to implement a 301 redirect in ASP every few months, so I’m putting this up as a personal reference.

<%@ Language="VBScript" %>
<% 
Response.Status = "301 Moved Permanently" 
Response.AddHeader "Location", "http://domain.com/page.asp" 
Response.End 
%> 

It seems that the value of Location can be a relative path and the redirect will still function.

Actually, my method of toggling the read-only attribute of Word.qat requires two macros. One switches on the read-only attribute of Word.qat to prevent it from being changed. The other clears the read-only attribute so buttons can be added or removed.

Just add these macros as buttons to the QAT to quickly protect and unprotect it. I prefer two buttons to a single button because I don’t know of a way of telling, visually, the current state of the read-only attribute of a file. I’d love to change the appearance of the button to indicate the state, but I haven’t found a way to do this. So for now, two buttons allow the user to take exactly the action desired.

Why would you ever need to do this?

Buttons disappearing from the QAT is a pretty common occurrence.

If your Quick Access Toolbar contains buttons from templates or COM add-ins, these custom buttons can be lost when Word is closed and reopened. To demonstrate this, add such a button to the QAT, then close Word and reopen it from the command line with winword.exe /a (the /n switch may also demonstrate this). Word will open, but without any add-ins. Instead of creating a temporary Word.qat with the default buttons, the working Word.qat file is edited to remove all the non-native Word buttons. The appearance to the user is that Word loses the custom buttons. Once the buttons disappear, they do not return when Word is opened normally.

From what I can tell, the QAT buttons disappearing isn’t a random event or a bug, but an intentional consequence of initiating a Word instance without any add-ins or a result of a badly written function in a template or add-in.

The LockQAT Macro

Sub LockQAT()
'
' LockQAT Macro
'
'

    Dim appdata, thepath, objFSO, objFile

    Set oShell = CreateObject("WScript.Shell")
    appdata = oShell.ExpandEnvironmentStrings("%APPDATA%")
    thepath = appdata & "\Microsoft\Office\Word.qat"

    Set objFSO = CreateObject("Scripting.FileSystemObject")
    Set objFile = objFSO.GetFile(thepath)
    
    'Determine if the file is ALREADY Read-Only
    If objFile.Attributes And 1 Then
        MsgBox "The Word.QAT file is already Read-only."
    Else
        MsgBox "Locking the QAT from further editing."
        objFile.Attributes = objFile.Attributes + 1
    End If
    
' Resources
' http://www.4guysfromrolla.com/webtech/112600-1.shtml

End Sub

The UnlockQAT Macro

Sub UnlockQAT()
'
' UnlockQAT Macro
'
'

    Dim appdata, thepath, objFSO, objFile
    
    Set oShell = CreateObject("WScript.Shell")
    appdata = oShell.ExpandEnvironmentStrings("%APPDATA%")
    thepath = appdata & "\Microsoft\Office\Word.qat"

    Set objFSO = CreateObject("Scripting.FileSystemObject")
    Set objFile = objFSO.GetFile(thepath)

    'Determine if the file is ALREADY Read-Only
    If objFile.Attributes And 1 Then
        MsgBox "Unlocking the QAT for editing."
        objFile.Attributes = objFile.Attributes - 1
    Else
        MsgBox "The Word.QAT file is already writeable."
    End If

' Resources
' http://www.4guysfromrolla.com/webtech/112600-1.shtml
    
End Sub

A user pointed out that while an attachment to an email had the icon of an installed application (in this case, Word) and the correct extention (.DOC), it would not open in Word with a double-click. The Open With dialog box opened instead. When the attachment was dragged to the desktop, it opened in Word with a double-click, as expected.

Because the filename of this attachment was pretty long, I suspected that it had something to do with the length of the filename, and so I started investigating.

Test files

I created text files with the following filenames:

119-CAsEvpz1R29z7sdrgs4-apJFmpissj-xxdfgh-dfght66x1aseg-7tSs5lF7lLyd3T-HJf42YiMYwguijgrsywh-wgh3q45y4tys64ysy45-119.txt

120-CAsEvpz1R29z7sdrgs4-apJFmpiRssj-xxdfgh-dfght66x1aseg-7tSs5lF7lLyd3T-HJf42YiMYwguijgrsywh-wgh3q45y4tys64ysy45-120.txt

123-CAsEvpz1R29z7sdrgs437-apJFmpiRssj-xxdfgh-dfght66x1aseg-7tSs5lF7lLyd3T-HJ6f42YiMYwguijgrsywh-wgh3q45y4tys64ysy45-123.txt

129-vpz1R296z7apJFmpiRss6x1IA7eu9utSs5lF7lLyd3THJf42YiMYwgVZ4FJ-CAsEvpz1R296z7apJFmpiRss6x1IA7eu9utSs5lF7lLyd3THJf42YiMYa-129.txt

131-vpz1R296z7apJFmpiRss6x23451IA7e9utSs5lF7lLyd3THJf42YiMYwgVZ4FJ-CAsEvpz1R296z7apJFmpiRss6x451I7eu9utSlF7lLyd3THJf42YiMYa-131.txt

133-vpz1R296z7apJFmpiRss6x1IA7eu9utSs5lF7lLyd3THJf42YiMYwgVZ4FJ-CAsEvpz1R296z7apJFmpiRss6x1IA7eu9utSs5lF7lLyd3THJf42YiMYwgVZa-133.txt

Including the extensions, these filenames are 119, 120, 123, 129, 131, and 133 characters, respectively.

Outgoing emails

I added the files as attachments to a new mail message.

For attachments with less than 130 characters in the filename, the filename is displayed in full.

The “129-” attachment’s name is 129 characters and the full name was displayed. The icon was the correct Text Document file icon.
The “131-” attachment’s name is 131 characters and the name was truncated at the 129th character (…-131.t). This caused the icon to be the Windows unrecognized file type icon (presumably because my computer has no application associated with a “.t” extension).
The “133-” attachment’s name is 133 characters and was truncated at the 129th character, before the . character (…-133). The icon was a Notepad icon, but not the typical Text Document file icon.

It would appear that attachment filenames are truncated at the 129th character when displayed in the attachment pane in the Mail To: window.

Incoming emails

Send the email.

Open the received email or view it with the Quickviewer and note that the filenames in the attachment window are again truncated at the 129th character.

Try to open each attachment with a double-click. The “119-” attachment should open in Notepad, but all attachments with longer filenames will not open, and instead cause an Open With prompt to open.

Why was this happening?

The locally stored attachment filename is differently truncated

Even when the full filename with the extension is visible, the filename of the local copy of the attachment is truncated at X characters, where X = (130 – PATH/TO/XPgrpwise).

In my case, the path to the XPgrpwise folder that contains the attachments is 63 characters long:
C:\Documents and Settings\F_LAST\Local Settings\Temp\XPgrpwise\
This means the maximum filename length for emails opened under my account is 67 characters (130 – 63 = 67).

A longer or shorter path to this folder will cause the maximum filename length to change accordingly, so if you repeat these tests, your experience may vary.

This matters less than one would think, though, because of the way GroupWise 7 shortens the filenames.

An unexpected discovery

Instead of simply chopping off any characters after the character limit has been reached, however, GroupWise will truncate the name portion of the filename and leave the extention portion intact, up to 119 characters. Filenames 120 characters or longer are truncated to the 119-character limit but the extention begins to be cut off. Once the extention begins to be cut off, double-clicking the attachment will cause the Open With dialog box to open if the shortened extention doesn’t have an application associated with it or is missing entirely (as one would expect). Filenames of 123 characters or longer are truncated such that the dot+extension is completely removed. This 119-character limit seems to be independent of the number of characters in the path to XPgrpwise.

In summary

To sum up, just because GroupWise 7 displays the full filename of an attachment and the correct icon doesn’t mean that the attachment can be opened in its associated application from the message window. When GroupWise saves the file to the hard drive, it truncates long filenames, potentially removing the extension. Opening attachments with filenames greater than 119 characters in length requires a little more effort because of the way the local copy of the file is saved without an extension.
A collection of web development tools for building better sites more easily.

Frameworks and scripts

HTML5 Boilerplate is the professional badass’s base HTML/CSS/JS template for a fast, robust and future-proof site.

scriptsrc.net is a collection of script tags of the latest versions of a range of JavaScript libraries.

Modernizr adds classes to the <html> element which allow you to target specific browser functionality in your stylesheet. You don’t actually need to write any Javascript to use it.

Images

placehold.it is a quick and simple image placeholder service.

Text manipulation

TextFixer is a collection of online text tools. Remove line breaks from text, alphabetize text, capitalize the first letter of sentences, remove whitespaces, and uppercase text or lowercase text.

XHTML

HTML Minifier will minify HTML (or XHTML), and any CSS or JS included in your markup.

CSS

CSS3 Generator is an awesome code generator for CSS3 snippets, and shows the minimum browser versions required to display the effects.

proCSSor is an advanced CSS prettifier with tons of formatting options.

JavaScript

Online javascript beautifier will reformat and reindent bookmarklets, ugly javascript, unpack scripts packed by the popular Dean Edward’s packer, as well as deobfuscate scripts processed by javascriptobfuscator.com. The source code for the latest version is always available on github, and you can download the beautifier for local use (zip, tar.gz) as well.

Fonts and Typography

Fontshop.com has written A Field Guide to Typography to get you excited about fonts and typography.

Typetester is an online app for comparing different fonts for the screen, you can test up to three fonts at a time and choose the one you like. Its primary role is to make web designer’s life easier.

A quick chart of the fonts common to all versions of Windows and the Mac equivalents, or a more extensive matrix of fonts bundled with Mac and Windows operating systems, Microsoft Office and Adobe Creative Suite.

<html>ipsum has Lorem ipsum already wrapped in HTML tags. Pre-made paragraphs, lists, etc…

More resources at: 50 Useful Design Tools For Beautiful Web Typography and 21 Typography and Font Web Apps You Can’t Live Without.

Colors

Color Scheme Designer.

Markup

Google Webmaster Tools’ Rich Snippets Testing Tool.

Use the Rich Snippets Testing Tool to check that Google can correctly parse your structured data markup and display it in search results.

I’ve written a simple batch file to remove those hidden files that Mac OSX leaves all over shared drives to annoy us Windows users.

del /s /a:h ._*
:: http://en.wikipedia.org/wiki/Resource_fork

del /s /a:h .DS_Store
:: http://en.wikipedia.org/wiki/.DS_Store

del /s /a:h .Trashes
:: http://en.wikipedia.org/wiki/Recycle_bin_(computing)

@pause

How to use

Copy the code into a text file, rename it cleanOSX.bat and run it from the root of the drive you wish to clean. The script will look through all subfolders, deleting any hidden file or folder with a name that begins with ._, or that matches .DS_Store or .Trashes. Depending on the number of these files on your drive, the process of deleting them could take some time.

Where do these files come from?

The resource fork

The resource fork is a construct of the Mac OS operating system used to store structured data in a file, alongside unstructured data stored within the data fork. A resource fork stores information in a specific form, such as icons, the shapes of windows, definitions of menus and their contents, and application code (machine code). For example, a word processing file might store its text in the data fork, while storing any embedded images in the same file’s resource fork. The resource fork is used mostly by executables, but every file is able to have a resource fork.

Currently, Mac OS X does support resource forks on Windows SMB shares by creating a hidden file in the same directory with the data fork file, with the characters “._” at the beginning of the file name. However, this may be annoying for some users, especially because some Windows power users always keep hidden files visible. Besides, Windows does not treat those files correctly as the file itself is moved or removed.

http://en.wikipedia.org/wiki/Resource_fork

The Desktop Services Store

.DS_Store (Desktop Services Store) is a hidden file created by Apple Inc.’s Mac OS X operating system to store custom attributes of a folder such as the position of icons or the choice of a background image.

http://en.wikipedia.org/wiki/.DS_Store

The Trash folder

Under Mac OS X, when a file is deleted in Finder, it is moved to a .Trashes folder, and when viewing the device’s available space the space occupied by the deleted files is shown as occupied.

http://en.wikipedia.org/wiki/Recycle_bin_(computing)

I’ve written a simple batch file for backing up files and folder onto a different drive letter.

In my case, the destination drive will be a USB drive. Even though I’ve configured Windows to always assign the same drive letter to that device, the possibility remains that I’ll connect a different drive that will be assigned the same drive letter. In order to be sure that I’m backing up to the correct drive, the batch file performs a few checks before copying files.

The first check confirms that a disk exists at that drive letter. The second check confirms that the path is valid. The third check looks for the presence of a file in the destination directory.

To use, simply paste the following code into a text file, change the variables to match your environment, add additional xcopy lines for other folders, then save it as a .bat file. Fire the batch file manually, or place it in your startup folder to automatically back up your files each time you log in to Windows.

:: Back up select files and folders to a location that may be an external drive
@echo off

:: Set some variables
set destinationDrive=D:
set destinationPath=backup
Set destination=%destinationDrive%\%destinationPath%
set validationFile=asdf.txt

:: Check to see if the drive is available
if not exist %destinationDrive%\. goto :nodestinationDrive
:: Move to destination drive
%destinationDrive%

:: Check to see if the path is available
if not exist "\%destinationPath%\." goto :nodestinationPath
:: Move to destination path
cd %destinationPath%

:: Check to see if the validation file exists
if not exist %validationFile% goto :novalidationFile

:: Backup location is valid
@echo The backup location "%destination%" is valid.

:: Copy files and folders if source is newer than destination

:: Desktop
@xcopy "%USERPROFILE%\Desktop" "%destination%\Desktop" /d /e /c /i /q /h /r /k /y

@echo.
@echo Files copied.  Please review output for errors.
@pause
goto eof

:nodestinationDrive
@echo The destination drive "%destinationDrive%" does not exist.
goto :nocopy

:nodestinationPath
@echo The destination path "%destinationPath%" does not exist on drive %destinationDrive%.
goto :nocopy

:novalidationFile
@echo The validation file does not exist.
goto :nocopy

:: No files have been copied
:nocopy
::@echo A valid backup location cannot be confirmed.
@echo No files have been copied.

@echo.
@pause

This file works with Windows XP through Windows 7.

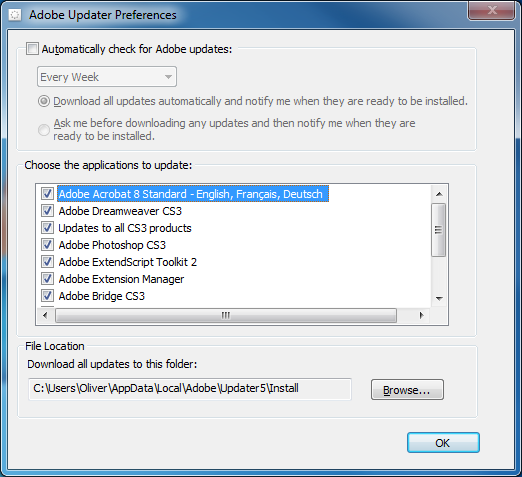
By default, the Adobe Updater application that is installed along side various Adobe products like Acrobat and Photoshop is set to check for updates automatically. Specifically, it’s set to check for updates to all installed Adobe products every week, and to download all updates and then notify you when they are ready to be installed. In this post, I’ll explain how to disable this feature by editing a settings file while avoiding the GUI.

Adobe Updater Preferences

Adobe Updater Preferences

In a managed environment, an administrator may not want any software to update itself for any number of reasons. The automatic check can be switched off in the Adobe Updater preferences, but it can be a nuisance to find and requires as many as 9 clicks.

Adobe Updater can be launched from within Adobe products by clicking Help | Check for Updates (note that in some products, the path is Help | Updates, but in either case, you can use the keystroke Alt+H, U). Click Preferences, then uncheck the box next to Automatically check for Adobe updates and click OK, then close the Adobe Updater window. You may have to click Quit in a subsequent window before the application closes.

For a more direct route, the Adobe Updater executable installed with Reader 9 resides at
C:\Program Files (x86)\Common Files\Adobe\Updater6\AdobeUpdater.exe on a 64-bit Windows 7 machine, and at
C:\Program Files\Common Files\Adobe\Updater6\AdobeUpdater.exe on a 32-bit Windows XP machine.

All of the configurable settings are saved to a file named AdobeUpdaterPrefs.dat in the user profile, rather than as registry keys. The .dat file extension suggests a binary file, but it’s actually just an XML document that can be opened in any text editor.

The preferences file resides at
C:\Users\[USERNAME]\AppData\Local\Adobe\Updater6\AdobeUpdaterPrefs.dat on a 64-bit Windows 7 machine, and at
C:\Documents and Settings\[USERNAME]\Local Settings\Application Data\Adobe\Updater6\AdobeUpdaterPrefs.dat on a 32-bit Windows XP machine.

The minimum lines that need to exist for the file to be valid and for “Automatically check for Adobe updates” to be disabled are:

<?xml version="1.0" encoding="UTF-8" ?>
<AdobeUpdater>
<AutoCheck>0</AutoCheck>
</AdobeUpdater>

To disable the auto update check programmatically, this file can be saved as AdobeUpdaterPrefs.dat and a script used to later overwrite the file in the user profile. A rather geekier approach would be to use a batch file to rename AdobeUpdaterPrefs.dat and then write a new file. I prefer the latter method because it requires only a single file and because it could be easily modified to insert lines that would change other settings, such as the location of the aum.log log file or the download directory, which are located in the user profile by default.

A batch file to back-up and then remake the file might look like this:

:: A batch file for writing a new Adobe Updater settings file "AdobeUpdaterPrefs.dat"
:: If an AdobeUpdaterPrefs.dat exists, it is edited and then the next next location is checked, until the script has iterated through all locations
@echo off

%SystemDrive%
cd\
SETLOCAL EnableDelayedExpansion

:: Check each location and if the file is found, pass the directory and a label (to the next path to be searched or to an EXIT command) to the function

:XPUpdater6
@echo.
echo Checking for "%USERPROFILE%\Local Settings\Application Data\Adobe\Updater6\AdobeUpdaterPrefs.dat"
if exist "%USERPROFILE%\Local Settings\Application Data\Adobe\Updater6\AdobeUpdaterPrefs.dat" (call:REWRITE "%USERPROFILE%\Local Settings\Application Data\Adobe\Updater6",XPUpdater5) else (@echo The AdobeUpdaterPrefs.dat file was not found.)

:XPUpdater5
@echo.
echo Checking for "%USERPROFILE%\Local Settings\Application Data\Adobe\Updater5\AdobeUpdaterPrefs.dat"
if exist "%USERPROFILE%\Local Settings\Application Data\Adobe\Updater5\AdobeUpdaterPrefs.dat" (call:REWRITE "%USERPROFILE%\Local Settings\Application Data\Adobe\Updater5",OUT) else (@echo The AdobeUpdaterPrefs.dat file was not found.)

:OUT
@pause
exit

:REWRITE
:: Configure Adobe Update to not check for updates
:: Move to the correct directory
cd %~1
:: Delete any temp file that this script may have created in the past
if exist AdobeUpdaterPrefs.dat.temp del AdobeUpdaterPrefs.dat.temp
:: Backup the old file
rename AdobeUpdaterPrefs.dat AdobeUpdaterPrefs.dat.temp
:: Write a new minimum settings file (the other data will be filled in when Auto Updater runs)
echo ^<?xml version="1.0" encoding="UTF-8" ?^> >> AdobeUpdaterPrefs.txt
echo ^<AdobeUpdater^> >> AdobeUpdaterPrefs.txt
echo ^<AutoCheck^>0^</AutoCheck^> >> AdobeUpdaterPrefs.txt
echo ^</AdobeUpdater^> >> AdobeUpdaterPrefs.txt
:: Rename the new file
rename AdobeUpdaterPrefs.txt AdobeUpdaterPrefs.dat
@echo The AdobeUpdaterPrefs.dat file was found and modified.
:: Go to the next location in the list
goto :%~2
goto :EOF

File locations in Windows 7

Note that in Windows 7, “%USERPROFILE%\AppData\Local\” and “%USERPROFILE%\Local Settings\Application Data\” contain the same data. A file added to a subdirectory in one location will appear in the corresponding subdirectory in the other location. So this script will work on Windows 7 because of 7’s backwards compatibility.

If you wanted to the script to run using Windows 7’s native C:\Users\… directory structure and did not care about the loss of compatibility with XP, you could use the following script instead.

:: A batch file for writing a new Adobe Updater settings file "AdobeUpdaterPrefs.dat"
:: If an AdobeUpdaterPrefs.dat exists, it is edited and then the next next location is checked, until the script has iterated through all locations
@echo off

%SystemDrive%
cd\
SETLOCAL EnableDelayedExpansion

:: Check each location and if the file is found, pass the directory and a label (to the next path to be searched or to an EXIT command) to the function

:WIN7Updater6
@echo.
echo Checking for "%USERPROFILE%\AppData\Local\Adobe\Updater6\AdobeUpdaterPrefs.dat"
if exist "%USERPROFILE%\AppData\Local\Adobe\Updater6\AdobeUpdaterPrefs.dat" (call:REWRITE "%USERPROFILE%\AppData\Local\Adobe\Updater6",WIN7Updater5) else (@echo The AdobeUpdaterPrefs.dat file was not found.)

:WIN7Updater5
@echo.
echo Checking for "%USERPROFILE%\AppData\Local\Adobe\Updater5\AdobeUpdaterPrefs.dat"
if exist "%USERPROFILE%\AppData\Local\Adobe\Updater5\AdobeUpdaterPrefs.dat" (call:REWRITE "%USERPROFILE%\AppData\Local\Adobe\Updater5",OUT) else (@echo The AdobeUpdaterPrefs.dat file was not found.)

:OUT
@pause
exit

:REWRITE
:: Configure Adobe Update to not check for updates
:: Move to the correct directory
cd %~1
:: Delete any temp file that this script may have created in the past
if exist AdobeUpdaterPrefs.dat.temp del AdobeUpdaterPrefs.dat.temp
:: Backup the old file
rename AdobeUpdaterPrefs.dat AdobeUpdaterPrefs.dat.temp
:: Write a new minimum settings file (the other data will be filled in when Auto Updater runs)
echo ^<?xml version="1.0" encoding="UTF-8" ?^> >> AdobeUpdaterPrefs.txt
echo ^<AdobeUpdater^> >> AdobeUpdaterPrefs.txt
echo ^<AutoCheck^>0^</AutoCheck^> >> AdobeUpdaterPrefs.txt
echo ^</AdobeUpdater^> >> AdobeUpdaterPrefs.txt
:: Rename the new file
rename AdobeUpdaterPrefs.txt AdobeUpdaterPrefs.dat
@echo The AdobeUpdaterPrefs.dat file was found and modified.
:: Go to the next location in the list
goto :%~2
goto :EOF

Additional benefits

Modifying the preferences file could have other benefits as well. Imagine the time and disk space that could saved by having all of those incremental Adobe updates saved to a network location, rather than downloading them to each workstation.

In this post, I’ll explain how to delete files known as Flash cookies from a Windows computer using a batch file.

Most people are familiar with the concept of cookies – small files saved to your computer by the web sites you visit – and how to delete them. But there is a wide-spread misconception that simply deleting your cookies erases your tracks. Even when you’ve instructed your browser to delete cookies and browsing history, a potentially large collection of files remains, and the paths to these files contain the domain names of the sites that have placed them on your computer.

Local Shared Objects (LSO), commonly called Flash cookies, are collections of cookie-like data stored as a file on a user’s computer. LSOs are used by all versions of Adobe Flash Player…

With the default settings, Adobe Flash Player does not seek the user’s permission to store LSO files on the hard disk.

There is relatively little public awareness of LSOs, and they can usually not be deleted by the cookie privacy controls in a web browser.

http://en.wikipedia.org/wiki/Local_Shared_Object

The files are saved to two locations in the roaming profile:
%APPDATA%\Macromedia\Flash Player\#SharedObjects
and
%APPDATA%\Macromedia\Flash Player\macromedia.com\support\flashplayer\sys

As an example, a visit to YouTube will result in the following folders being created:
C:\Users\Oliver\AppData\Roaming\Macromedia\Flash Player\#SharedObjects\KV9EDJYY\s.ytimg.com
C:\Users\Oliver\AppData\Roaming\Macromedia\Flash Player\macromedia.com\support\flashplayer\sys\#s.ytimg.com

Create a text file with the following lines, then save it as deleteLSOs.bat. Run the batch file to delete and remake these folders, thereby clearing all of the subfolders and files.

@echo off
copy "%APPDATA%\Macromedia\Flash Player\macromedia.com\support\flashplayer\sys\settings.sol" "%USERPROFILE%\Local Settings\Temp\settings.sol"
rmdir /s /q "%APPDATA%\Macromedia\Flash Player\#SharedObjects"
md "%APPDATA%\Macromedia\Flash Player\#SharedObjects"
rmdir /s /q "%APPDATA%\Macromedia\Flash Player\macromedia.com\support\flashplayer\sys"
md "%APPDATA%\Macromedia\Flash Player\macromedia.com\support\flashplayer\sys"
copy "%USERPROFILE%\Local Settings\Temp\settings.sol" "%APPDATA%\Macromedia\Flash Player\macromedia.com\support\flashplayer\sys\settings.sol"

Note that the script backs up and then restores a settings.sol file that contains the Flash Player global settings, which can be managed from the Flash Player Settings Manager.

I like using the Import Pictures and Videos wizard in Windows 7 when transferring pictures from my digital camera because it can create a separate folder for each date. But it lacks the ability to rename the individual files based on date. I want my image filenames to be YYYY.MM.DD_001.jpg, where the trailing number increments for that date.

To get the filename just right, I use Advanced Renamer, a free program for renaming multiple files or folders at once. Advanced Renamer can read information from the image file (like the date the picture was taken).

Importing the images

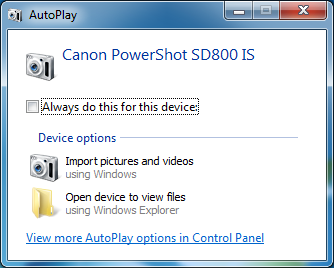
Connect the device or memory card to your computer. In the AutoPlay dialog box that appears, click Import pictures and videos using Windows.

Windows 7 AutoPlay dialog box

Windows 7 AutoPlay dialog box

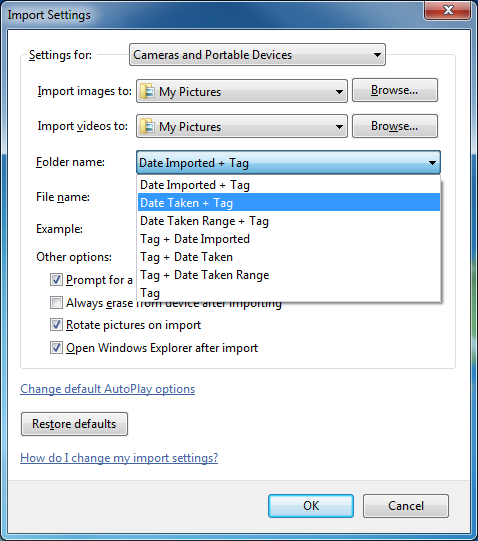
The default settings will create a single folder with today’s date, which is not what we want. To change the settings that are used when importing pictures and videos, click Import settings in the Import Pictures and Videos dialog box.

Windows 7 Import Settings dialog box

Windows 7 Import Settings dialog box

Under the Folder name menu, choose Date Taken + Tag and click OK. The import process will restart and you’ll be prompted to enter a tag. The tag isn’t important, so just click Import.

Configuring Advanced Renamer

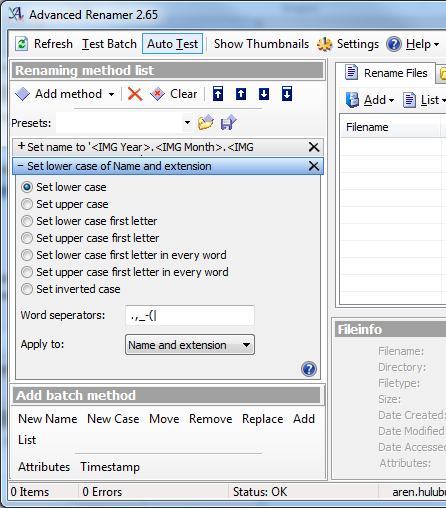
It takes two methods to get the names the way I want them. The first method changes the filename to use the year, month, and day information, and increment a trailing number. The second method changes the new filename to lowercase. If you prefer your file extensions to be in uppercase, you can skip the second method.

Advanced Renamer - Renaming method list

Advanced Renamer - Renaming method list

Under Add batch method, click New Name, and either select the desired date conventions from the options, adding any separator characters you wish, or copy the code below to use YYYY.MM.DD_001.EXT.

<IMG Year>.<IMG Month>.<IMG Day>_<Inc NrDir:001>.<Ext>

Under Add batch method, click New Case and then choose Set lower case. In the Apply to menu, choose Name and extension.

Click the Add button and browse to the parent folder. The files should appear in the list, and the new filename will be displayed. Check for any errors or problems with the filename, then click Start Batch.

Move the files into a single directory

Now that the pictures are all correctly named, I no longer need them to be in date-based folders. It’s more convenient to have them in a single folder from which I can organize them.

To do this, I use a batch file that moves any files in a sub-folder into the parent folder.

Set sOriginFolder="PATH\TO\PARENT\DIRECTORY"

For /f "Tokens=*" %%a in ('Dir %sOriginFolder% /a-d /s /b') do (
	move "%%a" %sOriginFolder%
)

Replace PATH\TO\PARENT\DIRECTORY with the full path to the parent folder, then run the batch file.

That’s it. Now I have a single folder of images that are uniquely named according to date taken.