Category Archives: Tutorials

Tutorials and how-to’s, and answers to common computer questions.

I replaced the shattered color wheel on my 61″ Samsung HLN617W DLP television using the excellent instructions at http://www.jangro.com/items/samsung-dlp-replace-color-wheel/.

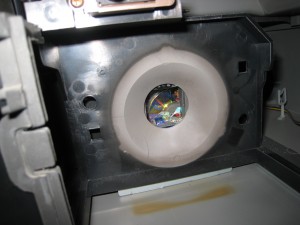
A shattered Samsung HLN617W DLP color wheel

A shattered Samsung HLN617W DLP color wheel

A color wheel is six separate pieces of glass attached to a hub through which the light from the lamp is cast. The wheel spins insanely fast, and over time the bearings wore and it developed a wobble. Once the wobble became pronounced enough, the wheel tore itself apart. I should have known something was up, because the TV had been making a sound like a vacuum cleaner for a few months.

A shattered Samsung HLN617W DLP color wheel (closeup)

A shattered Samsung HLN617W DLP color wheel (closeup)

While the lamps on DLP sets are easily accessed, replacing the color wheel requires tearing the guts out of the thing. Still, if you’re comfortable with electronics, you shouldn’t have too much trouble with it.

I like DLP, even though the components are subject to wear and replacement, because you don’t get much more analog than using a high-pressure mercury-vapor metal halide arc lamp to generate a pretty intense beam of light, sending that beam of light through a mechanical spinning color wheel and then scattering it with a reflective micromirror chip against a surface.

Actually, my method of toggling the read-only attribute of Word.qat requires two macros. One switches on the read-only attribute of Word.qat to prevent it from being changed. The other clears the read-only attribute so buttons can be added or removed.

Just add these macros as buttons to the QAT to quickly protect and unprotect it. I prefer two buttons to a single button because I don’t know of a way of telling, visually, the current state of the read-only attribute of a file. I’d love to change the appearance of the button to indicate the state, but I haven’t found a way to do this. So for now, two buttons allow the user to take exactly the action desired.

Why would you ever need to do this?

Buttons disappearing from the QAT is a pretty common occurrence.

If your Quick Access Toolbar contains buttons from templates or COM add-ins, these custom buttons can be lost when Word is closed and reopened. To demonstrate this, add such a button to the QAT, then close Word and reopen it from the command line with winword.exe /a (the /n switch may also demonstrate this). Word will open, but without any add-ins. Instead of creating a temporary Word.qat with the default buttons, the working Word.qat file is edited to remove all the non-native Word buttons. The appearance to the user is that Word loses the custom buttons. Once the buttons disappear, they do not return when Word is opened normally.

From what I can tell, the QAT buttons disappearing isn’t a random event or a bug, but an intentional consequence of initiating a Word instance without any add-ins or a result of a badly written function in a template or add-in.

The LockQAT Macro

Sub LockQAT()
'
' LockQAT Macro
'
'

    Dim appdata, thepath, objFSO, objFile

    Set oShell = CreateObject("WScript.Shell")
    appdata = oShell.ExpandEnvironmentStrings("%APPDATA%")
    thepath = appdata & "\Microsoft\Office\Word.qat"

    Set objFSO = CreateObject("Scripting.FileSystemObject")
    Set objFile = objFSO.GetFile(thepath)
    
    'Determine if the file is ALREADY Read-Only
    If objFile.Attributes And 1 Then
        MsgBox "The Word.QAT file is already Read-only."
    Else
        MsgBox "Locking the QAT from further editing."
        objFile.Attributes = objFile.Attributes + 1
    End If
    
' Resources
' http://www.4guysfromrolla.com/webtech/112600-1.shtml

End Sub

The UnlockQAT Macro

Sub UnlockQAT()
'
' UnlockQAT Macro
'
'

    Dim appdata, thepath, objFSO, objFile
    
    Set oShell = CreateObject("WScript.Shell")
    appdata = oShell.ExpandEnvironmentStrings("%APPDATA%")
    thepath = appdata & "\Microsoft\Office\Word.qat"

    Set objFSO = CreateObject("Scripting.FileSystemObject")
    Set objFile = objFSO.GetFile(thepath)

    'Determine if the file is ALREADY Read-Only
    If objFile.Attributes And 1 Then
        MsgBox "Unlocking the QAT for editing."
        objFile.Attributes = objFile.Attributes - 1
    Else
        MsgBox "The Word.QAT file is already writeable."
    End If

' Resources
' http://www.4guysfromrolla.com/webtech/112600-1.shtml
    
End Sub

I’ve written a simple batch file to remove those hidden files that Mac OSX leaves all over shared drives to annoy us Windows users.

del /s /a:h ._*
:: http://en.wikipedia.org/wiki/Resource_fork

del /s /a:h .DS_Store
:: http://en.wikipedia.org/wiki/.DS_Store

del /s /a:h .Trashes
:: http://en.wikipedia.org/wiki/Recycle_bin_(computing)

@pause

How to use

Copy the code into a text file, rename it cleanOSX.bat and run it from the root of the drive you wish to clean. The script will look through all subfolders, deleting any hidden file or folder with a name that begins with ._, or that matches .DS_Store or .Trashes. Depending on the number of these files on your drive, the process of deleting them could take some time.

Where do these files come from?

The resource fork

The resource fork is a construct of the Mac OS operating system used to store structured data in a file, alongside unstructured data stored within the data fork. A resource fork stores information in a specific form, such as icons, the shapes of windows, definitions of menus and their contents, and application code (machine code). For example, a word processing file might store its text in the data fork, while storing any embedded images in the same file’s resource fork. The resource fork is used mostly by executables, but every file is able to have a resource fork.

Currently, Mac OS X does support resource forks on Windows SMB shares by creating a hidden file in the same directory with the data fork file, with the characters “._” at the beginning of the file name. However, this may be annoying for some users, especially because some Windows power users always keep hidden files visible. Besides, Windows does not treat those files correctly as the file itself is moved or removed.

http://en.wikipedia.org/wiki/Resource_fork

The Desktop Services Store

.DS_Store (Desktop Services Store) is a hidden file created by Apple Inc.’s Mac OS X operating system to store custom attributes of a folder such as the position of icons or the choice of a background image.

http://en.wikipedia.org/wiki/.DS_Store

The Trash folder

Under Mac OS X, when a file is deleted in Finder, it is moved to a .Trashes folder, and when viewing the device’s available space the space occupied by the deleted files is shown as occupied.

http://en.wikipedia.org/wiki/Recycle_bin_(computing)

I’ve written a simple batch file for backing up files and folder onto a different drive letter.

In my case, the destination drive will be a USB drive. Even though I’ve configured Windows to always assign the same drive letter to that device, the possibility remains that I’ll connect a different drive that will be assigned the same drive letter. In order to be sure that I’m backing up to the correct drive, the batch file performs a few checks before copying files.

The first check confirms that a disk exists at that drive letter. The second check confirms that the path is valid. The third check looks for the presence of a file in the destination directory.

To use, simply paste the following code into a text file, change the variables to match your environment, add additional xcopy lines for other folders, then save it as a .bat file. Fire the batch file manually, or place it in your startup folder to automatically back up your files each time you log in to Windows.

:: Back up select files and folders to a location that may be an external drive
@echo off

:: Set some variables
set destinationDrive=D:
set destinationPath=backup
Set destination=%destinationDrive%\%destinationPath%
set validationFile=asdf.txt

:: Check to see if the drive is available
if not exist %destinationDrive%\. goto :nodestinationDrive
:: Move to destination drive
%destinationDrive%

:: Check to see if the path is available
if not exist "\%destinationPath%\." goto :nodestinationPath
:: Move to destination path
cd %destinationPath%

:: Check to see if the validation file exists
if not exist %validationFile% goto :novalidationFile

:: Backup location is valid
@echo The backup location "%destination%" is valid.

:: Copy files and folders if source is newer than destination

:: Desktop
@xcopy "%USERPROFILE%\Desktop" "%destination%\Desktop" /d /e /c /i /q /h /r /k /y

@echo.
@echo Files copied.  Please review output for errors.
@pause
goto eof

:nodestinationDrive
@echo The destination drive "%destinationDrive%" does not exist.
goto :nocopy

:nodestinationPath
@echo The destination path "%destinationPath%" does not exist on drive %destinationDrive%.
goto :nocopy

:novalidationFile
@echo The validation file does not exist.
goto :nocopy

:: No files have been copied
:nocopy
::@echo A valid backup location cannot be confirmed.
@echo No files have been copied.

@echo.
@pause

This file works with Windows XP through Windows 7.

As a follow-up to my post on compressing .php, .css and .js files without mod_gzip or mod_deflate, I’m documenting the changes I made to the .htaccess file on ardamis.com in order to speed up page load times for returning visitors and satisfy the Leverage browser caching recommendation of Google’s Page Speed Firefox/Firebug Add-on.

A great explanation of why browser caching helps the web deliver a better user experience is at betterexplained.com.

Two authoritative articles on the subject are Google’s Performance Best Practices | Optimize caching and Yahoo’s Best Practices for Speeding Up Your Web Site | Add an Expires or a Cache-Control Header.

I’d like to point out that in researching browser cashing, I came across a lot of information that contradicted the rather clear instructions from Google:

It is important to specify one of Expires or Cache-Control max-age, and one of Last-Modified or ETag, for all cacheable resources. It is redundant to specify both Expires and Cache-Control: max-age, or to specify both Last-Modified and ETag.

I’m not sure that this recommendation is entirely correct, as the W3C states that Expires and Cache-Control max-age are used in different situations, with Cache-Control max-age overriding Expires in the event of conflicts.

If a response includes both an Expires header and a max-age directive, the max-age directive overrides the Expires header, even if the Expires header is more restrictive. This rule allows an origin server to provide, for a given response, a longer expiration time to an HTTP/1.1 (or later) cache than to an HTTP/1.0 cache.

http://www.w3.org/Protocols/rfc2616/rfc2616-sec14.html

It would seem that Cache-Control is the preferred method of controlling browser caching going forward.

HTTP 1.1 clients will honour “Cache-Control” (which is easier to use and much more flexible).
HTTP 1.0 clients will ignore “Cache-Control” but honour “Expires”. With “Expires” you get thus at least a bit control for these old clients.

http://www.peterbe.com/plog/cache-control_or_expires

In any event, Page Speed won’t protest if you do end up sending both Expires and Cache-Control max-age, or if you remove both Last-Modified and ETag, but I was able to get the best results with just setting Cache-Control max-age and removing the ETag.

Setting the headers in .htaccess

On Apache, configuring the proper headers can be done in the .htaccess file, using the Header directive. The Header directive requires the mod_headers module to be enabled.

I’m choosing to set a far future Expires header of one year on my images files, because I tweak the CSS and JavaScript pretty often, and don’t want those file types to be cached as long.

Add the following code to your .htaccess file to set your Cache-Control and Expires headers, adjusting the date to be one year from today.

# Set Cache-Control and Expires headers
<filesMatch "\\.(ico|pdf|flv|jpg|jpeg|png|gif|swf|mp3|mp4)$">
Header set Cache-Control "max-age=2592000, private"
Header set Expires "Sun, 17 July 2011 20:00:00 GMT"
</filesMatch>
<filesMatch "\\.(css|css.gz)$">
Header set Cache-Control "max-age=604800, private"
</filesMatch>
<filesMatch "\\.(js|js.gz)$">
Header set Cache-Control "max-age=604800, private"
</filesMatch>
<filesMatch "\\.(xml|txt)$">
Header set Cache-Control "max-age=216000, private, must-revalidate"
</filesMatch>
<filesMatch "\\.(html|htm)$">
Header set Cache-Control "max-age=7200, private, must-revalidate"
</filesMatch>

Removing ETags in .htaccess

Most sources recommend simply removing ETags if they are not required.

Entity tags (ETags) are a mechanism that web servers and browsers use to determine whether the component in the browser’s cache matches the one on the origin server.

If you’re not taking advantage of the flexible validation model that ETags provide, it’s better to just remove the ETag altogether.

http://developer.yahoo.com/performance/rules.html#etags

Add the following code to your .htaccess file to remove ETag headers.

# Turn off ETags
FileETag None
Header unset ETag

Set Expires headers with ExpiresByType (optional)

If your host has the mod_expires module enabled, you can specify Expires headers by file type. Godaddy does not have this module enabled.

# Set Expires headers
ExpiresActive On
ExpiresDefault "access plus 1 year"
ExpiresByType text/html "access plus 1 second"
ExpiresByType image/gif "access plus 2592000 seconds"
ExpiresByType image/jpeg "access plus 2592000 seconds"
ExpiresByType image/png "access plus 2592000 seconds"
ExpiresByType image/x-icon "access plus 2592000 seconds"
ExpiresByType text/css "access plus 604800 seconds"
ExpiresByType text/javascript "access plus 604800 seconds"
ExpiresByType application/x-javascript "access plus 604800 seconds"

Removing the Last-Modified header in .htaccess (optional)

I’m following Google’s instructions and not removing the Last-Modified header, but if you wanted to do so, you could use:

# Remove Last-Modified header
Header unset Last-Modified

Busting the cache when files change

What happens when you change files and need to force browsers to load the new files? Christian Johansen offers two methods in his post on Using a far future expires header.

File compression is possible on Apache web hosts that do not have mod_gzip or mod_deflate enabled, and it’s easier than you might think.

A great explanation of why compression helps the web deliver a better user experience is at betterexplained.com.

Two authoritative articles on the subject are Google’s Performance Best Practices documentation | Enable compression and Yahoo’s Best Practices for Speeding Up Your Web Site | Gzip Components.

Compressing PHP files

If your Apache server does not have mod_gzip or mod_deflate enabled (Godaddy and JustHost shared hosting, for example), you can use PHP to compress pages on-the-fly. This is still preferable to sending uncompressed files to the browser, so don’t worry about the additional work the server has to do to compress the files at each request.

Option 1: PHP.INI using zlib.output_compression

The zlib extension can be used to transparently compress PHP pages on-the-fly if the browser sends an “Accept-Encoding: gzip” or “deflate” header. Compression with zlib.output_compression seems to be disabled on most hosts by default, but can be enabled with a custom php.ini file:

[PHP]

zlib.output_compression = On

Credit: http://php.net/manual/en/zlib.configuration.php

Check with your host for instructions on how to implement this, and whether you need a php.ini file in each directory.

Option 2: PHP using ob_gzhandler

If your host does not allow custom php.ini files, you can add the following line of code to the top of your PHP pages, above the DOCTYPE declaration or first line of output:

<?php if (substr_count($_SERVER['HTTP_ACCEPT_ENCODING'], 'gzip')) ob_start("ob_gzhandler"); else ob_start(); ?>

Credit: GoDaddy.com

For WordPress sites, this code would be added to the top of the theme’s header.php file.

According to php.net, using zlib.output_compression is preferred over ob_gzhandler().

For WordPress or other CMS sites, an advantage of zlib.output_compression over the ob_gzhandler method is that all of the .php pages served will be compressed, not just those that contain the global include (eg.: header.php, etc.).

Running both ob_gzhandler and zlib.output_compression at the same time will throw a warning, similar to:

Warning: ob_start() [ref.outcontrol]: output handler ‘ob_gzhandler’ conflicts with ‘zlib output compression’ in /home/path/public_html/ardamis.com/wp-content/themes/mytheme/header.php on line 7

Compressing CSS and JavaScript files

Because the on-the-fly methods above only work for PHP pages, you’ll need something else to compress CSS and JavaScript files. Furthermore, these files typically don’t change, so there isn’t a need to compress them at each request. A better method is to serve pre-compressed versions of these files. I’ll describe a few different ways to do this, but in both cases, you’ll need to add some lines to your .htaccess file to send user agents the gzipped versions if they support the encoding. This requires that Apache’s mod_rewrite be enabled (and I think it’s almost universally enabled).

Option 1: Compress locally and upload

CSS and JavaScript files can be gzipped on the workstation, then uploaded along with the uncompressed files. Use a utility like 7-Zip (quite possibly the best compression software around, and it’s free) to compress the CSS and JavaScript files using the gzip format (with extension *.gz), then upload them to your server.

For Windows users, here is a handy command to compress all the .css and .js files in the current directory and all sub directories (adjust the path to the 7-Zip executable, 7z.exe, as necessary):

for /R %i in (*.css *.js) do "C:\Program Files (x86)\7-Zip\7z.exe" a -tgzip "%i.gz" "%i" -mx9

Note that the above command is to be run from the command line. The batch file equivalent would be:

for /R %%i in (*.css *.js) do "C:\Program Files (x86)\7-Zip\7z.exe" a -tgzip "%%i.gz" "%%i" -mx9

Option 2: Compress on the server

If you have shell access, you can run a command to create a gzip copy of each CSS and JavaScript file on your site (or, if you are developing on Linux, you can run it locally):

find . -regex ".*\(css\|js\)$" -exec bash -c 'echo Compressing "{}" && gzip -c --best "{}" > "{}.gz"' \;

This may be a bit too technical for many people, but is also much more convenient. It is particularly useful when you need to compress a large number of files (as in the case of a WordPress installation with multiple plugins). Remember to run it every time you automatically update WordPress, your theme, or any plugins, so as to replace the gzip’d versions of any updated CSS and JavaScript files.

The .htaccess (for both options)

Add the following lines to your .htaccess file to identify the user agents that can accept the gzip encoded versions of these files.

<files *.js.gz>
  AddType "text/javascript" .gz
  AddEncoding gzip .gz
</files>
<files *.css.gz>
  AddType "text/css" .gz
  AddEncoding gzip .gz
</files>
RewriteEngine on
#Check to see if browser can accept gzip files.
ReWriteCond %{HTTP:accept-encoding} gzip
RewriteCond %{HTTP_USER_AGENT} !Safari
#make sure there's no trailing .gz on the url
ReWriteCond %{REQUEST_FILENAME} !^.+\.gz$
#check to see if a .gz version of the file exists.
RewriteCond %{REQUEST_FILENAME}.gz -f
#All conditions met so add .gz to URL filename (invisibly)
RewriteRule ^(.+) $1.gz [QSA,L]

Credit: opensourcetutor.com

I’m not sure it’s still necessary to exclude Safari.

For added benefit, minify the CSS and JavaScript files before gzipping them. Google’s excellent Page Speed Firefox/Firebug Add-on makes this very easy. Yahoo’s YUI Compressor is also quite good.

Verify that your content is being compressed

Use the nifty Web Page Content Compression Verification tool at http://www.whatsmyip.org/http_compression/ to confirm that your server is sending the compressed files.

Speed up page load times for returning visitors

Compression is only part of the story. In order to further speed page load times for your returning visitors, you will want to send the correct headers to leverage browser caching.

By default, the Adobe Updater application that is installed along side various Adobe products like Acrobat and Photoshop is set to check for updates automatically. Specifically, it’s set to check for updates to all installed Adobe products every week, and to download all updates and then notify you when they are ready to be installed. In this post, I’ll explain how to disable this feature by editing a settings file while avoiding the GUI.

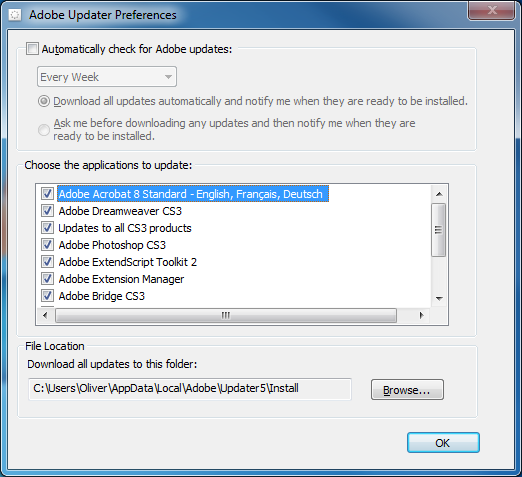
Adobe Updater Preferences

Adobe Updater Preferences

In a managed environment, an administrator may not want any software to update itself for any number of reasons. The automatic check can be switched off in the Adobe Updater preferences, but it can be a nuisance to find and requires as many as 9 clicks.

Adobe Updater can be launched from within Adobe products by clicking Help | Check for Updates (note that in some products, the path is Help | Updates, but in either case, you can use the keystroke Alt+H, U). Click Preferences, then uncheck the box next to Automatically check for Adobe updates and click OK, then close the Adobe Updater window. You may have to click Quit in a subsequent window before the application closes.

For a more direct route, the Adobe Updater executable installed with Reader 9 resides at
C:\Program Files (x86)\Common Files\Adobe\Updater6\AdobeUpdater.exe on a 64-bit Windows 7 machine, and at
C:\Program Files\Common Files\Adobe\Updater6\AdobeUpdater.exe on a 32-bit Windows XP machine.

All of the configurable settings are saved to a file named AdobeUpdaterPrefs.dat in the user profile, rather than as registry keys. The .dat file extension suggests a binary file, but it’s actually just an XML document that can be opened in any text editor.

The preferences file resides at
C:\Users\[USERNAME]\AppData\Local\Adobe\Updater6\AdobeUpdaterPrefs.dat on a 64-bit Windows 7 machine, and at
C:\Documents and Settings\[USERNAME]\Local Settings\Application Data\Adobe\Updater6\AdobeUpdaterPrefs.dat on a 32-bit Windows XP machine.

The minimum lines that need to exist for the file to be valid and for “Automatically check for Adobe updates” to be disabled are:

<?xml version="1.0" encoding="UTF-8" ?>
<AdobeUpdater>
<AutoCheck>0</AutoCheck>
</AdobeUpdater>

To disable the auto update check programmatically, this file can be saved as AdobeUpdaterPrefs.dat and a script used to later overwrite the file in the user profile. A rather geekier approach would be to use a batch file to rename AdobeUpdaterPrefs.dat and then write a new file. I prefer the latter method because it requires only a single file and because it could be easily modified to insert lines that would change other settings, such as the location of the aum.log log file or the download directory, which are located in the user profile by default.

A batch file to back-up and then remake the file might look like this:

:: A batch file for writing a new Adobe Updater settings file "AdobeUpdaterPrefs.dat"
:: If an AdobeUpdaterPrefs.dat exists, it is edited and then the next next location is checked, until the script has iterated through all locations
@echo off

%SystemDrive%
cd\
SETLOCAL EnableDelayedExpansion

:: Check each location and if the file is found, pass the directory and a label (to the next path to be searched or to an EXIT command) to the function

:XPUpdater6
@echo.
echo Checking for "%USERPROFILE%\Local Settings\Application Data\Adobe\Updater6\AdobeUpdaterPrefs.dat"
if exist "%USERPROFILE%\Local Settings\Application Data\Adobe\Updater6\AdobeUpdaterPrefs.dat" (call:REWRITE "%USERPROFILE%\Local Settings\Application Data\Adobe\Updater6",XPUpdater5) else (@echo The AdobeUpdaterPrefs.dat file was not found.)

:XPUpdater5
@echo.
echo Checking for "%USERPROFILE%\Local Settings\Application Data\Adobe\Updater5\AdobeUpdaterPrefs.dat"
if exist "%USERPROFILE%\Local Settings\Application Data\Adobe\Updater5\AdobeUpdaterPrefs.dat" (call:REWRITE "%USERPROFILE%\Local Settings\Application Data\Adobe\Updater5",OUT) else (@echo The AdobeUpdaterPrefs.dat file was not found.)

:OUT
@pause
exit

:REWRITE
:: Configure Adobe Update to not check for updates
:: Move to the correct directory
cd %~1
:: Delete any temp file that this script may have created in the past
if exist AdobeUpdaterPrefs.dat.temp del AdobeUpdaterPrefs.dat.temp
:: Backup the old file
rename AdobeUpdaterPrefs.dat AdobeUpdaterPrefs.dat.temp
:: Write a new minimum settings file (the other data will be filled in when Auto Updater runs)
echo ^<?xml version="1.0" encoding="UTF-8" ?^> >> AdobeUpdaterPrefs.txt
echo ^<AdobeUpdater^> >> AdobeUpdaterPrefs.txt
echo ^<AutoCheck^>0^</AutoCheck^> >> AdobeUpdaterPrefs.txt
echo ^</AdobeUpdater^> >> AdobeUpdaterPrefs.txt
:: Rename the new file
rename AdobeUpdaterPrefs.txt AdobeUpdaterPrefs.dat
@echo The AdobeUpdaterPrefs.dat file was found and modified.
:: Go to the next location in the list
goto :%~2
goto :EOF

File locations in Windows 7

Note that in Windows 7, “%USERPROFILE%\AppData\Local\” and “%USERPROFILE%\Local Settings\Application Data\” contain the same data. A file added to a subdirectory in one location will appear in the corresponding subdirectory in the other location. So this script will work on Windows 7 because of 7’s backwards compatibility.

If you wanted to the script to run using Windows 7’s native C:\Users\… directory structure and did not care about the loss of compatibility with XP, you could use the following script instead.

:: A batch file for writing a new Adobe Updater settings file "AdobeUpdaterPrefs.dat"
:: If an AdobeUpdaterPrefs.dat exists, it is edited and then the next next location is checked, until the script has iterated through all locations
@echo off

%SystemDrive%
cd\
SETLOCAL EnableDelayedExpansion

:: Check each location and if the file is found, pass the directory and a label (to the next path to be searched or to an EXIT command) to the function

:WIN7Updater6
@echo.
echo Checking for "%USERPROFILE%\AppData\Local\Adobe\Updater6\AdobeUpdaterPrefs.dat"
if exist "%USERPROFILE%\AppData\Local\Adobe\Updater6\AdobeUpdaterPrefs.dat" (call:REWRITE "%USERPROFILE%\AppData\Local\Adobe\Updater6",WIN7Updater5) else (@echo The AdobeUpdaterPrefs.dat file was not found.)

:WIN7Updater5
@echo.
echo Checking for "%USERPROFILE%\AppData\Local\Adobe\Updater5\AdobeUpdaterPrefs.dat"
if exist "%USERPROFILE%\AppData\Local\Adobe\Updater5\AdobeUpdaterPrefs.dat" (call:REWRITE "%USERPROFILE%\AppData\Local\Adobe\Updater5",OUT) else (@echo The AdobeUpdaterPrefs.dat file was not found.)

:OUT
@pause
exit

:REWRITE
:: Configure Adobe Update to not check for updates
:: Move to the correct directory
cd %~1
:: Delete any temp file that this script may have created in the past
if exist AdobeUpdaterPrefs.dat.temp del AdobeUpdaterPrefs.dat.temp
:: Backup the old file
rename AdobeUpdaterPrefs.dat AdobeUpdaterPrefs.dat.temp
:: Write a new minimum settings file (the other data will be filled in when Auto Updater runs)
echo ^<?xml version="1.0" encoding="UTF-8" ?^> >> AdobeUpdaterPrefs.txt
echo ^<AdobeUpdater^> >> AdobeUpdaterPrefs.txt
echo ^<AutoCheck^>0^</AutoCheck^> >> AdobeUpdaterPrefs.txt
echo ^</AdobeUpdater^> >> AdobeUpdaterPrefs.txt
:: Rename the new file
rename AdobeUpdaterPrefs.txt AdobeUpdaterPrefs.dat
@echo The AdobeUpdaterPrefs.dat file was found and modified.
:: Go to the next location in the list
goto :%~2
goto :EOF

Additional benefits

Modifying the preferences file could have other benefits as well. Imagine the time and disk space that could saved by having all of those incremental Adobe updates saved to a network location, rather than downloading them to each workstation.

In this post, I’ll explain how to delete files known as Flash cookies from a Windows computer using a batch file.

Most people are familiar with the concept of cookies – small files saved to your computer by the web sites you visit – and how to delete them. But there is a wide-spread misconception that simply deleting your cookies erases your tracks. Even when you’ve instructed your browser to delete cookies and browsing history, a potentially large collection of files remains, and the paths to these files contain the domain names of the sites that have placed them on your computer.

Local Shared Objects (LSO), commonly called Flash cookies, are collections of cookie-like data stored as a file on a user’s computer. LSOs are used by all versions of Adobe Flash Player…

With the default settings, Adobe Flash Player does not seek the user’s permission to store LSO files on the hard disk.

There is relatively little public awareness of LSOs, and they can usually not be deleted by the cookie privacy controls in a web browser.

http://en.wikipedia.org/wiki/Local_Shared_Object

The files are saved to two locations in the roaming profile:
%APPDATA%\Macromedia\Flash Player\#SharedObjects
and
%APPDATA%\Macromedia\Flash Player\macromedia.com\support\flashplayer\sys

As an example, a visit to YouTube will result in the following folders being created:
C:\Users\Oliver\AppData\Roaming\Macromedia\Flash Player\#SharedObjects\KV9EDJYY\s.ytimg.com
C:\Users\Oliver\AppData\Roaming\Macromedia\Flash Player\macromedia.com\support\flashplayer\sys\#s.ytimg.com

Create a text file with the following lines, then save it as deleteLSOs.bat. Run the batch file to delete and remake these folders, thereby clearing all of the subfolders and files.

@echo off
copy "%APPDATA%\Macromedia\Flash Player\macromedia.com\support\flashplayer\sys\settings.sol" "%USERPROFILE%\Local Settings\Temp\settings.sol"
rmdir /s /q "%APPDATA%\Macromedia\Flash Player\#SharedObjects"
md "%APPDATA%\Macromedia\Flash Player\#SharedObjects"
rmdir /s /q "%APPDATA%\Macromedia\Flash Player\macromedia.com\support\flashplayer\sys"
md "%APPDATA%\Macromedia\Flash Player\macromedia.com\support\flashplayer\sys"
copy "%USERPROFILE%\Local Settings\Temp\settings.sol" "%APPDATA%\Macromedia\Flash Player\macromedia.com\support\flashplayer\sys\settings.sol"

Note that the script backs up and then restores a settings.sol file that contains the Flash Player global settings, which can be managed from the Flash Player Settings Manager.

Adobe Flash Player is frequently updated, which makes it difficult to keep a large user-base on the current version. This post is a collection of useful links for managing Flash Player.

Adobe Flash Player Version Information

This page reports the version of Flash Player currently running on the browser, along with the latest available version.
http://www.adobe.com/software/flash/about/

Install the latest version of Flash Player

To install the latest version of Flash Player, visit http://get.adobe.com/flashplayer/.

How to download the offline Flash Player installer

To download the offline Flash Player installer (*.exe) for Internet Explorer or Chrome, Firefox, Safari and Opera:

  1. Go to the download page at
    http://get.adobe.com/flashplayer/.
  2. Click on the link:
    Different operating system or browser?
  3. Select an operating system from the menu and click Continue.
  4. Select your browser.
  5. Click on the “Agree and install now” button to initiate the download.
  6. Run the installer file.
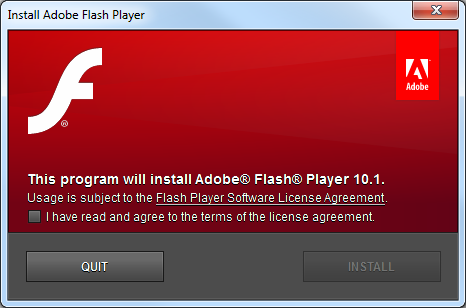
Install Adobe Flash Player

Install Adobe Flash Player

The direct link to the current version of the Flash Player installer (for Windows) for Chrome, Firefox, Safari and Opera:
http://fpdownload.adobe.com/get/flashplayer/current/install_flash_player.exe

The direct link to the current version of the Flash Player installer (for Windows) for Internet Explorer:
http://fpdownload.adobe.com/get/flashplayer/current/install_flash_player_ax.exe

Flash RSS Feeds

Recent documents: http://www.adobe.com/support/flashplayer/rss/recent.documents.xml
Top issues: http://www.adobe.com/support/flashplayer/rss/top.issues.static.xml
Developer Center: http://rss.adobe.com/developer_center_flashplayer_tutorials.rss?locale=en_US
Flash Player news: http://rss.adobe.com/resources_flashplayer.rss?locale=en_US

Distribute Adobe Flash Player

You may post Adobe Flash Player on company intranet sites or local networks.
The Adobe Flash Player is available for for distribution and use beyond single-user installations. This includes, for example, distributing to workstations within your department or organization, or on fixed media with your software product or multimedia experience.

http://www.adobe.com/products/players/fpsh_distribution1.html

Adobe Flash Player Settings Manager

The Settings Manager is a special control panel that runs on your local computer but is displayed within and accessed from the Adobe website. Adobe does not have access to the settings that you see in the Settings Manager or to personal information on your computer.

To change your settings, click the tabs to see different panels, then click the options in the Settings Manager panels that you see on the web page.

http://www.macromedia.com/support/documentation/en/flashplayer/help/settings_manager.html

How to disable notification of Flash Player updates

Flash Player is notoriously insecure, so I’d recommend keeping it up-to-date.

Right-click on any Flash content, select Global Settings, and click the Global Notifications Settings panel link in the Flash Player Settings Manager.

Note: The Settings Manager is a Flash application that displays Flash Player settings which are stored on your computer only. Adobe does not store or track this information on its servers nor does it pass this information to third parties.

Deselect the “Notify me When an Update to Adobe Flash Player is available.” option to stop receiving notifications.

Close the Settings Manager browser window. Flash Player automatically remembers the new settings.

Error messages in Internet Explorer

“Internet Explorer has encountered a problem with an add-on and needs to close. The following add-on was running when this problem occurred: Flash10a.ocx”

http://kb2.adobe.com/cps/408/kb408620.html

Update 5.5.11: I’ve written a better macro that doesn’t require a separate batch file and registry merge file. Please check out the new post at:

Programmatically re-enabling Word COM add-ins

A few months ago, I wrote a post on fixing Word 2007 add-in issues with a registry merge. In this post, I’ll take that idea a little further and explain how to automatically detect and fix add-ins through the use of a macro that runs each time Word is opened and a batch file that runs the registry merge file. All the end-user needs to do to repair the missing functionality is close and reopen Word.

The idea is that, in a corporate environment, there are certain important add-ins that must be running in order for Word to work normally. A good example would be an add-in that integrates Word with a document management system. Should that integration be lost because the add-in failed to load, data may be lost. Because there is no way to force Word to load certain add-ins, and there is no built-in function in Word for warning users when critically important don’t load, I decided to come up with a method for alerting the user to the problem and then fixing it with as little inconvenience as possible.

The example code in this post assumes the workstation is running Office 2007 on Windows XP (32-bit). I would think that the method could be adapted to other environments (Windows 7, Office 2010) without too much trouble. I’ve tried to note where differences come up on Windows 7 and 64-bit operating systems.

The process has four components:

  • an autoexec Word 2007 macro that runs each time Word is opened
  • a batch file that runs the registry merge file and writes an entry to a log file
  • the registry merge file that contains the correct LoadBehavior settings for the add-ins
  • a text file that acts as a log

The macro can be added to Normal.dotm or saved to a new .dotm file placed in the startup directory. The .bat batch file, .reg registry file, and .txt log file can be put anywhere, but in this example, they will be saved to a new folder C:\Word Add-ins fix\.

In the code examples below, I’ll be using the Acrobat PDFMaker Office COM Addin as the add-in that must always be loaded. This plugin is installed with Acrobat versions 8.1 and above and adds an Acrobat tab to the ribbon.

The macro

The first thing to do is to collect some information on the COM add-ins that are currently installed. Microsoft Support provides a simple macro for listing all of the COM add-ins at Some COM add-ins are not listed in the COM Add-Ins dialog box in Word. I recommend using this macro to identify the ProgID of your add-ins. The text to the left of the hyphen is the add-in’s Description and the text to the right of the hyphen is the ProgID.

Running the macro from the Microsoft site shows us that the ProgID for the Acrobat PDFMaker Office COM Addin is PDFMaker.OfficeAddin.
In Microsoft jargon, an add-in with a LoadBehavior of 3 is ‘Connected’. The COMAddIn object has a property called Connect that will be True if the add-in is Connected and False if it is not. The macro first checks the Connect property of each add-in and writes the ProgID of each Connected add-in to a string. It then checks to see if the string contains a match for each of the required add-ins. If the required add-in does not exist in the string, the macro will display a message to the user and fire the batch file to reset the LoadBehavior. It also passes the names of any not connected add-ins to the batch file as a parameter, so that information can be logged.

I found this article from MSDN on the COMAddIn object very helpful.

Sub AutoExec()
'
' FindMissingAddins Macro
' Display a message box with any critical but not 'Connected' COM add-ins
'

   Dim msg As String
   
   Dim MyAddin As COMAddIn
   Dim i As Integer, stringOfAddins As String
   
   For Each MyAddin In Application.COMAddIns
      If MyAddin.Connect = True Then
          stringOfAddins = stringOfAddins & MyAddin.ProgID & " - "
      End If
   Next
   
' Update the number of elements in the array
' Example: change to "requiredAddIns(0 To 4)" if you were checking 5 total add-ins)
   Dim requiredAddIns(0 To 0) As String
   
' Add each required AddIn to the array
   requiredAddIns(0) = "PDFMaker.OfficeAddin"
'   requiredAddIns(1) = ""
'   requiredAddIns(2) = ""
'   requiredAddIns(3) = ""
'   requiredAddIns(4) = ""
   
   For Each requiredAddIn In requiredAddIns
      If InStr(stringOfAddins, requiredAddIn) Then
         msg = msg
      Else
         msg = msg & requiredAddIn & vbCrLf
         listOfDisconnectedAddins = requiredAddIn & " " & listOfDisconnectedAddins
         listOfDisconnectedAddins = Trim(listOfDisconnectedAddins)
      End If
   Next
   
   If msg = "" Then
   Else
        MsgBox "The following important add-ins are not running: " & vbCrLf & vbCrLf & msg & vbCrLf & vbCrLf & "Please save your work, then close and reopen Word."
' Run a batch file that corrects the add-in problems in the registry and pass the list of unconnected add-ins as an argument
        Shell """C:\Word Add-ins fix\fixWordAddins.bat"" """ & listOfDisconnectedAddins & """"
   End If
   
End Sub

Edit the macro to fit your environment. You will need to specify each required add-in’s ProgID in the requiredAddIns array and update the number of add-ins in the array’s definition. The macro needs to be named AutoExec in order to run when Word starts.

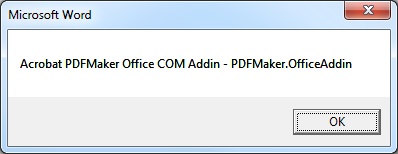
This is the message that the user will receive if the macro finds that a required add-in is not Connected.
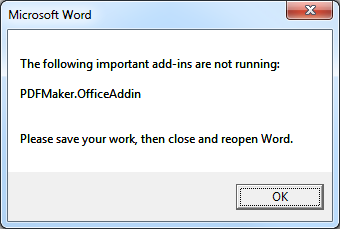
Clicking OK runs the batch file and closes the window.

The batch file

The batch file is called by the macro when any of the add-ins are not registered and currently connected. The batch file references the .reg file that contains the correct LoadBehavior settings and writes an event to the log with information on the username, the machine name, the datetime that the problem was discovered and which add-in(s) were not connected.

Copy the code and save it as fixWordAddins.bat to the C:\Word Add-ins fix\ directory or wherever you want.

:: A batch file for running a registry merge to set the LoadBehavior for Word add-ins
::
@echo off

REGEDIT /S "C:\Word Add-ins fix\fixWordAddins.reg"

:: Let's create a little log file and output which user ran the script and at what date and time
:: Set some variables for the date. US format - not localized!
@For /F "tokens=2,3,4 delims=/ " %%A in ('Date /t') do @( 
	Set Month=%%A
	Set Day=%%B
	Set Year=%%C
)

:: Set some variables for the time.
@For /F "tokens=1,2,3 delims=/: " %%A in ('Time /t') do @( 
	Set Hours=%%A
	Set Minutes=%%B
	Set Meridiem=%%C
)

:: Output to a log file
@echo %username% at %computername% on %Month%/%Day%/%Year% at %Hours%:%Minutes% %Meridiem% (%1) >> "C:\Word Add-ins fix\log.txt"

The registry merge

Add-ins can be ‘hard-disabled’ or ‘soft-disabled’ by Word 2007. Please see my post at fixing Word 2007 add-in issues with a registry merge for more information about what this means. The following registry merge will address both issues.

The registry merge will have to be edited for your environment, too. First, find the LoadBehavior value in the the registry for each of your add-ins in either of two locations:
HKEY_LOCAL_MACHINE\SOFTWARE\Microsoft\Office\Word\Addins\
HKEY_CURRENT_USER\Software\Microsoft\Office\Word\Addins\

If you don’t find your add-in in either of those locations, search the registry for the ProgID.

A LoadBehavior of 3 = loaded (this corresponds to a checked box in Word Options/Add-Ins)
A LoadBehavior of 2 = not loaded (this corresponds to an unchecked box in Word Options/Add-Ins)

The only add-ins that you need to worry about here are those that you want to always run (those that normally have a LoadBehavior of 3). Export those keys and add them to the .reg file.

Copy the code and save it as fixWordAddins.reg to the C:\Word Add-ins fix\ directory or wherever you want. Edit it for the add-ins you wish to load.

Windows Registry Editor Version 5.00

[-HKEY_CURRENT_USER\Software\Microsoft\Office\12.0\Word\Resiliency]

[-HKEY_LOCAL_MACHINE\SOFTWARE\Microsoft\Office\12.0\Word\Resiliency]

[HKEY_LOCAL_MACHINE\SOFTWARE\Microsoft\Office\Word\Addins\PDFMaker.OfficeAddin]
"LoadBehavior"=dword:00000003

On 64-bit versions of Windows, the add-ins can be found in:
HKEY_LOCAL_MACHINE\SOFTWARE\Wow6432Node\Microsoft\Office\Word\Addins\

The log file

If the log file doesn’t already exist, the batch file will create it. Each time the batch file runs, it adds a line to the end of the log file.

An entry will look something like this:

USERNAME at MACHINENAME on 06/17/2010 at 01:02 PM ("PDFMaker.OfficeAddin")

Caveats

The macros in a *.dotm can’t be edited if that template was opened from the startup location. Open a copy in another location, make your changes and save, and then overwrite the version in the startup location.

Windows 7

Note that in Windows 7, the UAC needs your permission to run a .bat file.

The Word startup location in Windows 7 (put any custom *.dotm files here):
\AppData\Roaming\Microsoft\Word\STARTUP

The default location of Normal.dotm in Windows 7:
\AppData\Roaming\Microsoft\Templates