Tag Archives: troubleshooting

I’m in the middle of troubleshooting a printing problem that has arisen with our in-development Windows 7 image. We’re running 64-bit Windows 7 Enterprise with Office 2010 and using the HP Universal Print Driver for Windows PCL6 version 5.4.0 dated 1 Dec 2011 (the current version). The printer driver is installed on a Windows server using default settings and the printer connections on the workstations are created either as per-machine connections by running printui.exe /ga or as per-user connections by running the Find Printers wizard in an Office application. The printers themselves are HP 4250n and HP P4015 models with relatively up-to-date firmware.

The problem is that certain print jobs produce many pages of apparent gibberish instead of the intended file or email message. The gibberish pages begin like this:

"
 @PJL SET JOBATTR="JobAcct8=USERNAME"
                                     @PJL SET JOBATTR="JobAcct9="
                                                                 @PJL SET RET=OFF

I’ve done some research into the lines beginning @PJL, and my understanding is that PJL (Printer Job Language) commands are part of the standard job header output from the Universal Printer Driver, and that when everything is working normally, they are processed by the printer as instructions instead of printed as text.

For more reading about PJL commands, I can recommend the page at: http://www.sxlist.com/techref/language/pcl/lj1686.htm

Almost immediately, I was able to rule out the per-machine connections as being the cause, as the problem also occurred on per-user connections. The same files that printed problematically to the networked HP printers printed normally to locally-installed printers using non-UPD PCL 6 drivers. It seemed logical to pursue this as a driver-related problem.

What is PCL 6

It’s probably worth pausing here for a bit of explanation of PCL 6.

The Enhanced PCL XL or PCL6 driver that is included with the HP LaserJet printers provides enhanced WYSIWYG and enhanced performance with application support over the Standard (PCL5e) driver. PCL XL is a new page description language by HP that is part of PCL6 and is closer to GDI, which many applications use. Less translation takes place by the driver, which means increased WYSIWYG capabilities and better performance with applications that support escapes implemented by the Enhanced driver. The output from the Enhanced (PCL XL) driver may not be the same as the output from the Standard driver. If the output is not as expected, choose the Standard (PCL5e) driver instead.
What is the Enhanced PCL XL or PCL6 Driver?

The part that catches my eye is “better performance with applications that support escapes implemented by the Enhanced driver”. Are we encountering applications that do not support escapes?

Eliminating possible causes

Possible causes of the PJL commands being output as text include the driver not prefixing the PJL statements (at the beginning of each job) with a Universal Exit Language (UEL) escape sequence. (http://www.tek-tips.com/viewthread.cfm?qid=1618494)

To rule this out, one can use the “print to file” option in the print dialog box to produce a file that contains the instructions that would be sent to the printer.

Choose File | Print in your application, then check the “Print to file” box in the print dialog box. (In Office 2010, the Print Options button under the available printers menu displays the print dialog box.) Choose a name for the .prn file and save it somewhere, then open the resultant *.prn file in something that displays escape characters, such as Notepad++ (or even Notepad). The first character should be an escape character, and the first line of text will begin something like this:

{ESC}%-12345X

If the PJL initialization command looks correct, it’s possible that the printer is not properly configured to accept PJL commands. Older printers may not be PJL-aware, but I knew our printers to work fine with older 32-bit HP UPDs installed on our Windows XP machines. The ‘Personality’ attribute on HP printers can be checked by going to the printer’s web admin panel and browsing to Settings | Configure Device | System Setup. Setting the Personality to PS is probably going to cause problems, but either Auto or PCL should work. I confirmed that our printers were set to Auto, further ruling out the printers themselves as the cause of the problem.

I next looked at disabling the advanced features of the driver (a little skeptically, I’ll admit). This can be done by going into the printer’s properties and unchecking the “Enable advanced printing features” box on the Advanced tab. (http://h30499.www3.hp.com/t5/Print-Servers-Network-Storage/12345X-PJL-Printing-on-Dot-Matrix-Printers/td-p/1132391) I was curious about how this affected the job sent to the printer – would the entire series of JPL commands be removed?

To test, I unchecked the “Enable advanced printing features” and printed an email message to a *.prn file, then checked the box and printed the same email to a second *.prn file, then compared the two files. The only difference in the PJL commands was that “@PJL SET SEPARATORPAGE=OFF” was present with advanced printing features enabled, and absent with advanced printing features disabled.

I found the separator page line to be an interesting difference, as banner pages/separator pages had been suggested as a possible cause, but our drivers were not configured to print separator pages. (http://www.oasq.com/PJL-SET-JOBATTR-thread-252568-1-1.html)

So, that’s where the issue currently stands. I’m waiting to see if turning off advanced printing features has any effect. To be thorough, I need to test whether the UPD PS driver prints without error and whether the problem continues with a printer connected via TCP/IP and with a manually installed driver. I can also bring the printers up to the latest version of the firmware, although this would be a less satisfactory resolution, as we have a variety of printer models and not all of them have firmware updates available.

Update 17 Feb. 2012

The Application event log on the print server contains a number of errors, though we’re unsure of whether there is a direct correlation between the errors and attempts by Windows 7 users to print, or jobs in the spooler being processed, or any other activity.

Description:
Faulting application name: PrintIsolationHost.exe, version: 6.1.7600.16385, time stamp: 0x4a5bd3b1
Faulting module name: hpzuiwn7.dll, version: 0.3.7071.0, time stamp: 0x4a5bdfcb
Exception code: 0xc0000005
Fault offset: 0x00000000000d6971
Faulting process id: 0x900
Faulting application start time: 0x01ccea9860e17377
Faulting application path: C:\Windows\system32\PrintIsolationHost.exe
Faulting module path: C:\Windows\system32\spool\DRIVERS\x64\3\hpzuiwn7.dll
Report Id: 3eaa21e6-568c-11e1-b7a4-005056a50027

It certainly does look like the 64-bit HP driver is at fault here. More searching has turned up a number of reports of this error with HP’s UPD PCL6 driver, going back to 2010.

Because we have a small number of Windows 7 users, we’re removing the network printers from the Windows 7 machines temporarily, to see if the server stabilizes.

Update 21 Feb. 2012

We were able to take a closer look at the print server today. We searched the registry for hpzuiwn7.dll and noted the printers that had this DLL listed among the supporting files. Many, but not all, of the printers included this DLL. We also reviewed the printers in Print Management and made an odd discovery. There seemed to be two varieties of the model-specific PCL 6 driver in use: one is named “HP LaserJet 4250 PCL 6” and the other is “HP LaserJet 4250 PCL6“. The difference in the naming is that the later driver has a space between PCL 6. While most of the printers used the UPD, a handful were using one of the model-specific drivers. When we looked at the Additional Drivers, we found that one of them had only the 64-bit version available. I expect that only 32-bit workstations are printing to those printers, so I’m not sure how they even functioned, but it would seem that the next step would be to either add the matching 32-bit drivers for that model printer or change the assigned driver to UPD PCL 6. I suspect that we were not diligent enough about exactly matching the printer driver names (let alone the version numbers) when we were installing drivers on the server.

Update 1 Mar. 2012

After installing the missing 32-bit driver that complemented the stray 64-bit driver, all of the printing problems, including the error messages in the Application log on the server, have subsided.
In Windows, the Num Lock key state (on or off) can be set in the registry. It can be set in either of two locations, depending on when you wish to set the state, or both, if you want to force the state at boot and change it after the user logs in.

The Num Lock key state after logon can be set as a registry value for the current user in the key HKEY_CURRENT_USER\Control Panel\Keyboard. To set the state of the Num Lock key before logon (the key state will be set before the Ctrl+Alt+Del screen), change the registry value in the key HKEY_USERS\.Default\Control Panel\Keyboard. For both keys, the data for the InitialKeyboardIndicators value determines the state of the NumLock key. There are three possible settings.

0 = Num Lock is turned OFF after/at logon.
1 = Disable Num Lock.
2 = Num Lock is turned ON after/at logon.

A registry merge file that sets Num Lock on for the current user after logon is below.

Windows Registry Editor Version 5.00

[HKEY_CURRENT_USER\Control Panel\Keyboard]
"InitialKeyboardIndicators"="2"

It’s also (typically) possible to configure the Num Lock key state in the BIOS, although I personally don’t see the advantage of setting in the BIOS something that is configurable in Windows.

Note that users of full-sized keyboards with distinct Num keypads generally prefer to have the Num Lock key enabled and laptop users typically have Num Lock disabled. Much like the Function key is used to change the behavior of certain laptop keys, laptop keyboards without dedicated Num keypads map numbers to regular character keys. This could potentially cause some confusion, when users begin hitting the letter keys and get numbers instead.

Autonegotiation

Network autonegotiation is easily misunderstood. Consider two 10/100Mb devices attached to one another – a PC connected to a router. For each of these devices, it’s possible to configure the connection to use either 1) a fixed speed and duplex or 2) to negotiate the optimal shared speed and duplex with whatever it is connecting to. What is not intuitive is that both devices must be configured with the same settings. The connection will suffer a performance hit, or may not work at all, if the two devices are configured differently.

A common misconception about autonegotiation is that it is possible to manually configure one link partner for 100 Mbps full-duplex and autonegotiate to full-duplex with the other link partner. In fact, an attempt to do this results in a duplex mismatch. This is a consequence of one link partner autonegotiating, not seeing any autonegotiation parameters from the other link partner, and defaulting to half-duplex.

http://www.cisco.com/en/US/products/hw/switches/ps4324/products_tech_note09186a0080094713.shtml#auto_neg

If both devices are configured to autonegotiate speed and duplex, then each will attempt to make the best possible connection among the possibilities they have in common. However, if one of the devices is set to use a fixed speed and duplex and the other device is set to autonegotiate, the autonegotiating device can determine the speed but not the duplex of the other device and so falls back to its default duplex mode. In the case of Cisco switches, the default duplex mode is half-duplex.

…it is possible for a[n autonegotiating] link partner to detect the speed at which the other link partner operates, even though the other link partner is not configured for auto-negotiation. In order to detect the speed, the link partner senses the type of electrical signal that arrives and sees if it is 10 Mb or 100 Mb.

It is not possible to detect the correct duplex mode in the same method that the correct speed can be detected. In this case, the […] port of [the autonegotiating] switch […] is forced to select the default duplex mode. On Catalyst Ethernet ports, the default mode is auto-negotiate. If auto-negotiation fails, the default mode is half-duplex.

http://www.cisco.com/en/US/tech/tk389/tk214/technologies_tech_note09186a0080094781.shtml

Half-duplex as a default duplex mode is not unique to Cisco switches. Below is a link to an article on www.dell.com written by Rich Hernandez, a senior engineer with the Server Networking and Communications Group at Dell, that contains a table summarizing “all possible combinations of speed and duplex settings, both on 10/100/1000-capable switch ports and on NICs.” Included are combinations that would yield no link or link fail conditions, as well as combinations that would yield a duplex mismatch.

http://www.dell.com/content/topics/global.aspx/power/en/ps1q01_hernan?c=us&cs=555&l=en&s=biz

The importance of using identical settings on both sides of a network connection is stressed in a KB article from www.symantec.com with information on how an autonegotiating port may report that it has established a full-duplex connection with a NIC configured for 100MBs/Full, but in fact is communicating at less than expected capacity.

Only by explicitly setting both sides of the link to the same duplex mode would the link work flawlessly.

http://www.symantec.com/business/support/index?page=content&id=TECH87827

Understanding link data errors

The page at the link below contains two tables that explain the various errors and counters logged by a network switch and the possible causes.

http://www.cisco.com/en/US/products/hw/switches/ps708/products_tech_note09186a00800a7af0.shtml#ustand

Troubleshooting Ethernet Collisions

Collisions may appear to indicate communication problems with a network connection, but as a technote from cisco.com states, collision counters alone are not indicative of network problems.

…collisions are a way to distribute the traffic load over time by arbitrating access to the shared medium. Collisions are not bad; they are essential to correct Ethernet operation.

There is no set limit for “how many collisions are bad” or a maximum collision rate.

In conclusion, the collisions counter does not provide a very useful statistic to analyze network performance or problems.

http://www.cisco.com/en/US/products/hw/modules/ps2033/products_tech_note09186a008009446d.shtml

Late Collisions

When a collision is detected by a station after it has sent the 512th bit of its frame, it is counted as a late collision.

The station that reports the late collision merely indicates the problem; it is generally not the cause of the problem. Possible causes are usually incorrect cabling or a non-compliant number of hubs in the network. Bad network interface cards (NICs) can also cause late collisions.

http://www.cisco.com/en/US/products/hw/modules/ps2033/products_tech_note09186a008009446d.shtml

I have a Windows XP guest running in VMWare Workstation 7 on a Windows 7 Ultimate host machine. This is working pretty well. The XP guest is nice and responsive. I have only one gripe. I’d like all of the buttons on my Logitech MX510 (the best mouse ever) to be mappable in the guest.

Starting from square one, I decided to try installing the current version of SetPoint in the guest OS. The installation went fine, but the usual functionality of the SetPoint settings utility was absent.

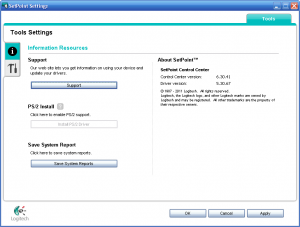
SetPoint Settings in an XP virtual machine

SetPoint Settings in an XP virtual machine

As shown in the screenshot, the SetPoint Settings utility displays only the Tools tab. It is missing the My Mouse tab (and if a keyboard were installed, I presume it would be missing the Keyboard tab, too).

After some Googling around, it appears to be a due to the way VMware approximates the physical mouse. VMware seems to treat USB mice connected to the host as PS/2 devices in the guest. SetPoint, then, doesn’t detect any Logitech hardware that it can configure.

The question of how to obtain SetPoint functionality in virtual machines is one that has been asked many, many times before, without a satisfactory answer. More on that in a little bit.

The best work around

Thankfully, it seems that, at least in the case of a Windows host and a Windows guest, installing SetPoint inside the virtual machine is not necessary. Installing it on the host seems to make all of the functionality available in the guest. This is the solution that I’m implementing now, and it is what I would recommend, provided you have rights to install software on the host.

Paths to follow if you want to pursue installing SetPoint inside a VMware virtual machine

I applaud your courage. There are a few settings that can be tweaked that may get you closer to a working installation.

Possible setting number one

From the post at http://coreygilmore.com/blog/2008/04/30/better-multi-button-mouse-support-with-vmware-fusion-and-workstation/

Add the following line to the virtual machine’s .vmx file:

mouse.vusb.enable = "TRUE"

From what I can tell, this setting allows me to use the Forward and Back buttons on the mouse, but does not make the mouse detectable by SetPoint. The remaining mouse buttons do nothing.

Possible setting number two

From the post at http://superuser.com/questions/35830/back-forward-mouse-buttons-do-not-work-in-vmware-workstation-6-5-guest-os/304583#304583

The solution given (which did not work for me) is to:

First add the following line to the virtual machine’s .vmx file:

usb.generic.allowHID = "TRUE"

An explanation of what this does, by a VMware associate, can be found in the thread at http://communities.vmware.com/thread/110919?start=15&tstart=0

If you’re feeling really adventurous and/or desperate, you can take out the mouse.vusb.enable line and add this option instead:

usb.generic.allowHID = “TRUE”

Then, you’ll notice that your main mouse and keyboard (if they are USB) are available to pass through into the guest via the USB devices menu.

The dangerous part here is that once you pass through the mouse, it is actually disconnected from the host, so you won’t be able to ungrab from the guest just by mousing out of the Fusion window. You can still ungrab with the keyboard (ctrl-cmd I believe is the shortcut?). If you actually pass through your keyboard and your mouse, you’ll be stuck in the guest and you’ll have to shut it down (or worse, reboot your physical machine).

This sounded like a great idea, and I was willing to set up a second, PS/2 mouse to control just the host, if necessary. Without connecting a second mouse, I tried passing the Logitech mouse as a USB device to the VM, just as I would an external hard drive, but VMware prevented this, with a warning message:

[Machine Name] – VMware Workstation
Cannot connect “Logitech USB-PS/2 Optical Mouse” to this virtual machine. The host requires this device for input.
[OK]

The second step would have been to go into Device Manager, click Actions, and then choose “Scan for hardware changes”.

I didn’t get to the second step, as I was too lazy to track down a PS/2 mouse to keep attached to the host, and I still wanted to find a software solution. I suspect, though, that this would be were to begin, were I to need to get SetPoint running in the guest OS.

Summary

While I wasn’t able to figure out how to install SetPoint on a guest OS, the workaround of installing SetPoint on the host OS seems to accomplish my goal.

While setting up a new MySQL account at a GoDaddy hosted web site, I kept getting an error when logging in to phpMyAdmin.

Error
#1045 – Access denied for user

For things like database usernames/passwords and other things that I’ll never have to remember or type, I like to use a long string of random characters. One excellent source of such strings is GRC’s Ultra High Security Password Generator. I typically use a subset of the 63 random alpha-numeric characters (a-z, A-Z, 0-9) in the bottom box. This gives me a good mix of uppercase, lowercase, and numbers, which satisfies the requirements of most password systems that require even minimum complexity.

So, I picked a string of characters for the database name and a different string for the password (making sure the password contained at least 1 uppercase character and 1 number), pasted them into the config.php file I was going to use on the project and then pasted them into the database setup form and created my database. No problem.

I gave it 10 or 15 minutes to get all set up and then launched phpMyAdmin. I copied and pasted the username and password from my config file into the log in fields and wham, I got the #1045.

After much second guessing and more copying and pasting, all with no luck, I tried resetting the password back in the Hosting Control Center. I waited a few more minutes for good measure and tried again. Still, #1045 – Access denied for user.

Then it was time to Google, which turned up a thread full of people with the same experience at http://community.godaddy.com/groups/web-hosting/forum/topic/mysql-login-error-1045-access-denied-for-user/?sid&sp=1&topic_page=1&num=15.

Back in the Control Center, I noticed that the mixed case characters I’d used for the database/username had been converted to lowercase. So I tried using the lowercase version at phpMyAdmin and still no luck.

I submitted a support ticket, as recommended in the thread, and then called Customer Support for good measure.

The guy confirmed that the database was in good shape and that the last password reset took effect, then had me reset it again. And of course, when I tried to log into phpMyAdmin a moment later with the lowercase username, it went right in.

The fix (or a plausible explanation, at least)

The lesson learned here, is that even though the new MySQL database setup form will accept mixed case characters as the database name/username, it will silently convert them to lowercase on you. The phpMyAdmin login, then, is case sensitive, so you may want to copy and paste from the Control Center into phpMyAdmin to be sure you’re feeding it the correct username.

I’ve been using the FileZilla FTP client for many years and in that time have had only a few occasions where the application didn’t perform with the default settings.

One of those instances was yesterday, when I was trying to connect to my firm’s FTP site from an external network connection. From inside the office, using the internal IP address, FileZilla connected normally and displayed the contents of the root directory after I authenticated.

From outside the office, connecting via the hostname ftp.domain.com, FileZilla would connect normally and authenticate successfully, but it would not display the contents of the root directory. Instead, the server would send a “425 Can’t open data connection” message. FileZilla would then report “Error: Failed to retrieve directory listing”.

Here’s the complete conversation between the client and the server (names and IP addresses changed to protect the firm’s identity):

Status: Resolving address of ftp.domain.com
Status: Connecting to 38.98.xxx.xxx:21...
Status: Connection established, waiting for welcome message...
Response: 220-Microsoft FTP Service
Response: 220 Company Name
Command: USER ftp_username
Response: 331 Password required for ftp_username.
Command: PASS **********
Response: 230-Welcome to the Company Name FTP service.  Unauthorized use is strictly prohibited.
Response: 230 User ftp_username logged in.
Status:	Connected
Status:	Retrieving directory listing...
Command: PWD
Response: 257 "/" is current directory.
Command: TYPE I
Response: 200 Type set to I.
Command: PASV
Response: 227 Entering Passive Mode (192,168,0,114,13,156).
Status: Server sent passive reply with unroutable address. Using server address instead.
Command: LIST
Response: 425 Can't open data connection.
Error: Failed to retrieve directory listing
Response: 421 Timeout (120 seconds): closing control connection.
Error: Could not read from socket: ECONNRESET - Connection reset by peer
Error: Disconnected from server

The interesting thing, I thought, was that when the server agreed to use passive mode, it did so with a port on the internal IP address, which is unroutable from outside the network.

The fix is to use active mode

OK, if you’re reading this, you probably just want to know how to make it work. FileZilla uses passive mode by default, but due to the network configuration of certain servers, active mode is required to establish a data connection. A bit of background reading with some explanation is farther down.

In FileZilla, click on Edit | Settings.

Under Connection, click on FTP and choose Active as the Transfer Mode.

Under Connection, under FTP, click on Active mode and choose “Ask your operating system for the external IP address” (the default setting).

Under Connection, under FTP, click on Passive mode and choose “Fall back to active mode” (this is an optional setting).

What is the difference between active and passive mode?

According to the FileZilla wiki page on network configuration:

In passive mode, which is recommended (see below), the client sends the PASV command to the server, and the server responds with an address. The client then issues a command to transfer a file or to get a directory listing, and establishes a secondary connection to the address returned by the server.

In active mode, the client opens a socket on the local machine and tells its address to the server using the PORT command. Once the client issues a command to transfer a file or listing, the server will connect to the address provided by the client.

The difference, then, is which side gets to determine the address used during the connection. In passive mode, the server provides the address, while in active mode, the client provides the address.

Why do I need to use active mode?

You probably shouldn’t need to use active mode, and in fact, it requires more configuration by the user of the FTP client to use active mode.

In passive mode, the router and firewall on the server side need to be configured to accept and forward incoming connections. On the client side, however, only outgoing connections need to be allowed (which will already be the case most of the time).

Analogously, in active mode, the router and firewall on the client side need to be configured to accept and forward incoming connections. Only outgoing connections have to be allowed on the server side.

http://wiki.filezilla-project.org/Network_Configuration#Technical_background

So, it boils down to who’s going to be responsible for the NAT and firewall configuration. Using passive mode places the responsibility on the server side of the connection, while using active mode places it on the client side. Typically, the FTP server administrator should be better equipped to handle this responsibility than the average FTP client user.

Passive mode

In passive mode, the client has no control over what port the server chooses for the data connection. Therefore, in order to use passive mode, you’ll have to allow outgoing connections to all ports in your firewall.

Active mode

In active mode, the client opens a socket and waits for the server to establish the transfer connection.

http://wiki.filezilla-project.org/Network_Configuration#Setting_up_FileZilla_Client

I’m behind a NAT router and I’ve never had any problems with passive mode. On the other hand, I seem to be able to connect to all my sites without any problem with the client in active mode, too, and I haven’t had to open any ports in Windows Firewall or forward any ports on my router. So maybe active mode doesn’t require as much configuration as the wiki page leads me to believe. Or maybe I’m just getting lucky and I’ll eventually run into problems if I continue to run in active mode.

Why does the server respond with the local IP address?

The FileZilla people offer a a partial explanation for why I’m seeing the internal IP address when I connect using the hostname. Back in Settings, under Connection | FTP | Passive mode, is some support text that reads: Some misconfigured remote servers which are behind a router, may reply with their local IP address.

The wiki page is pretty good reading, and has some interesting stuff on NAT, but I think that I’ll offer this plain-language, local IP address explanation when troubleshooting FTP connections.

The other day, I needed to extract a 7 GB zip file containing a VMware virtual machine onto the hard drive of a nearly stock 64-bit Windows 7 Professional machine. Because this machine did not have a third-party compression utility installed, I tried to extract it using Windows’ native zip utility, called Compressed Folders.

This failed with a pretty neat error.

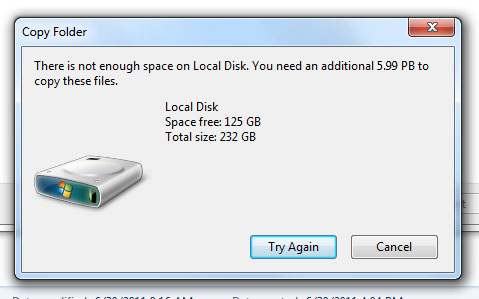
You need an additional 5.99 PB to copy these files.

As you can see in the screenshot above, Windows reported that…

Copy Folder

There is not enough space on Local Disk. You need an additional 5.99 PB to copy these files.

Local Disk
Space free: 125 GB
Total size: 232 GB

[Try Again] [Cancel]

I found the 5.99 petabyte requirement pretty amusing, but I was in a hurry, so I downloaded the excellent 7-Zip, unpacked the file, and set about building the vm.

I had meant to write a post about the error message, but some time passed and I forgot all about it. Then, about three weeks later, someone else in the department tried to extract a copy of the file on a 32-bit Windows XP Professional machine and got the same error. At that point, I had to investigate.

The Compressed Folders native Windows utility seemed to be unable to accurately calculate the free space needed to extract the file. The file was admittedly pretty large, but was size the only reason?

According to the Wikipedia page on ZIP files, there are a number of known limitations of Compressed Folders.

ZIP64, AES Encryption, split or spanned archives, and Unicode entry encoding are not known to be readable or writable by the Compressed Folders feature in Windows XP or Windows Vista.

http://en.wikipedia.org/wiki/ZIP_(file_format)#Windows_compressed_folders

None of these things applied to my file, but I found a rather telling and simultaneously ambiguous (go figure) KB article at Microsoft Support: Compressed folder becomes corrupted when larger than 2 gigabytes.

According to various threads, the popular theory is that the problem stems from size limitations on compressed files. Windows Vista and later have a 4 GB limit (compressed and uncompressed size), while XP has a 2 GB limit.

Strangely, the same error appears before a copy process when the OS encounters a file that exceeds its maximum individual file size, which I can understand, but find a bit confusing in the context of a zip file. Certainly, both Windows 7 and XP (NTFS) were able to handle the file to begin with, and only had a problem when decompressing it.

My best guess is that the file was created using the Compressed Folders feature on XP. The file exceeded the maximum size limit for that version of Windows, but due to the bug described in MS KB article 301325, the file was created anyway using 32-bit headers. When the file was later opened by Compressed Folders, the 64-bit headers were read (as a file of that size would naturally use 64-bit headers), but that information was garbage, preventing Windows from accurately calculating the space required to extract.

If anyone has a more complete understanding of the cause of this error, please leave me a comment.

I’m running XAMPP 1.7.4 [PHP: 5.3.5] (not as a service) on 64-bit Windows 7 Professional.

I installed XAMPP to E:\xampp, and I have pinned the XAMPP Control Panel (xampp-control.exe) to the taskbar for easier access, but starting up xampp-control.exe from that shortcut throws an error:

XAMPP Control

XAMPP Component Status Check failure [3].

Current directory: E:\xampp

Run this program only from your XAMPP root directory.

[OK] [Cancel]

Strangely enough, I even get this error even when running xampp-control.exe from my XAMPP root directory, which really is E:\xampp.

The last post in the thread at http://www.apachefriends.org/f/viewtopic.php?f=16&t=44320&sid=a41029c6a36bbf5b3bb5817f37842340&start=60 offers a simple solution: change the Install_Dir value under HKEY_LOCAL_MACHINE to point to C:\xampp. According to the thread, the error message is due to a bug where the Install_Dir is checked against a hard-coded path on C:\. That may or may not be the case, but the suggested work-around seems to be effective.

Here’s a registry merge for Windows 7 64-bit that will make the change for you.

Windows Registry Editor Version 5.00

[HKEY_LOCAL_MACHINE\SOFTWARE\Wow6432Node\xampp]
"Install_Dir"="C:\\xampp"

Now xampp-control.exe launches without the error, and I haven’t noticed anything (PHP, MySQL, etc.) not working because of the bogus path.

While making changes to my WordPress theme, I noticed that the error_log file in my theme folder contained dozens of PHP Fatal error lines:

...
[01-Jun-2011 14:25:15] PHP Fatal error:  Call to undefined function  get_header() in /home/accountname/public_html/ardamis.com/wp-content/themes/ars/index.php on line 7
[01-Jun-2011 20:58:23] PHP Fatal error:  Call to undefined function  get_header() in /home/accountname/public_html/ardamis.com/wp-content/themes/ars/index.php on line 7
...

The first seven lines of my theme’s index.php file:

<?php ini_set('display_errors', 0); ?>
<?php
/**
 * @package WordPress
 * @subpackage Ars_Theme
*/
get_header(); ?>

I realized that the error was being generated each time that my theme’s index.php file was called directly, and that the error was caused by the theme’s inability to locate the WordPress get_header function (which is completely normal). Thankfully, the descriptive error wasn’t being output to the browser, but was only being logged to the error_log file, due to the inclusion of the ini_set(‘display_errors’, 0); line. I had learned this the hard way a few months ago when I found that calling the theme’s index.php file directly would generate an error message, output to the browser, that would reveal my hosting account username as part of the absolute path to the file throwing the error.

I decided the best way to handle this would be to check to see if the file could find the get_header function, and if it could not, simply redirect the visitor to the site’s home page. The code I used to do this:

<?php ini_set('display_errors', 0); ?>
<?php
/**
* @package WordPress
* @subpackage Ars_Theme
*/
if (function_exists('get_header')) {
	get_header();
}else{
    /* Redirect browser */
    header("Location: http://" . $_SERVER['HTTP_HOST'] . "");
    /* Make sure that code below does not get executed when we redirect. */
    exit;
}; ?>

So there you have it. No more fatal errors due to get_header when loading the WordPress theme’s index.php file directly. And if something else in the file should throw an error, ini_set(‘display_errors’, 0); means it still won’t be sent to the browser.

Attempting to run the W3C Link Checker against //ardamis.com/ returns an error message.

Error: 406 Not Acceptable

This is what the W3C says about the 406 HTTP status header:

406 Not Acceptable
The resource identified by the request is only capable of generating response entities which have content characteristics not acceptable according to the accept headers sent in the request.

http://www.w3.org/Protocols/rfc2616/rfc2616-sec10.html

In other words, the W3C Link Checker requests the web page, and tells the web server that, by the way, it can only accept a responses in a certain format. The web server then regrets to inform the requestor that it cannot fulfill this request, because it cannot return a response that would be acceptable to the requestor. It does this in the form of a 406 Not Acceptable HTTP header. The W3C Link Checker then outputs this error.

Other W3C apps, like Unicorn – W3C’s Unified Validator and the W3C HTML Validator don’t seem to be sending the same HTTP headers. (But I did note that there were a few small issues preventing the home page from passing the test, which I then fixed.)

Ardamis runs on WordPress, with a custom theme originally developed years ago from the Kubrick theme and a handful of plugins (as more completely described at the colophon page). I tinker with the site, from time to time, trying to speed it up or what-have-you. But no amount of tinkering seemed to resolve this problem. Over the course of a few months, I’d try various changes to the site to see if there was something I could do to fix this problem. I had pretty much convinced myself that it was going to be an issue for my web host when, miraculously, after making some changes to the .htaccess file, my theme and disabling one of the plugins (which I can’t see how would possibly affect the HTTP headers) the Link Checker began working.

In the results page for www.ardamis.com, it lists some of the headers used:

Settings used:

  • Accept: text/html, application/xhtml+xml;q=0.9, application/vnd.wap.xhtml+xml;q=0.6, */*;q=0.5
  • Accept-Language: en-US,en;q=0.8
  • Referer: sending
  • Sleeping 1 second between requests to each server

I’m not sure what I did to make this work, or even if it was something I did. But further troubleshooting would have involved disabling all plugins, trying a different theme, and then ruling out WordPress entirely.