Tag Archives: Hardware

I’m in the middle of troubleshooting a printing problem that has arisen with our in-development Windows 7 image. We’re running 64-bit Windows 7 Enterprise with Office 2010 and using the HP Universal Print Driver for Windows PCL6 version 5.4.0 dated 1 Dec 2011 (the current version). The printer driver is installed on a Windows server using default settings and the printer connections on the workstations are created either as per-machine connections by running printui.exe /ga or as per-user connections by running the Find Printers wizard in an Office application. The printers themselves are HP 4250n and HP P4015 models with relatively up-to-date firmware.

The problem is that certain print jobs produce many pages of apparent gibberish instead of the intended file or email message. The gibberish pages begin like this:

"
 @PJL SET JOBATTR="JobAcct8=USERNAME"
                                     @PJL SET JOBATTR="JobAcct9="
                                                                 @PJL SET RET=OFF

I’ve done some research into the lines beginning @PJL, and my understanding is that PJL (Printer Job Language) commands are part of the standard job header output from the Universal Printer Driver, and that when everything is working normally, they are processed by the printer as instructions instead of printed as text.

For more reading about PJL commands, I can recommend the page at: http://www.sxlist.com/techref/language/pcl/lj1686.htm

Almost immediately, I was able to rule out the per-machine connections as being the cause, as the problem also occurred on per-user connections. The same files that printed problematically to the networked HP printers printed normally to locally-installed printers using non-UPD PCL 6 drivers. It seemed logical to pursue this as a driver-related problem.

What is PCL 6

It’s probably worth pausing here for a bit of explanation of PCL 6.

The Enhanced PCL XL or PCL6 driver that is included with the HP LaserJet printers provides enhanced WYSIWYG and enhanced performance with application support over the Standard (PCL5e) driver. PCL XL is a new page description language by HP that is part of PCL6 and is closer to GDI, which many applications use. Less translation takes place by the driver, which means increased WYSIWYG capabilities and better performance with applications that support escapes implemented by the Enhanced driver. The output from the Enhanced (PCL XL) driver may not be the same as the output from the Standard driver. If the output is not as expected, choose the Standard (PCL5e) driver instead.
What is the Enhanced PCL XL or PCL6 Driver?

The part that catches my eye is “better performance with applications that support escapes implemented by the Enhanced driver”. Are we encountering applications that do not support escapes?

Eliminating possible causes

Possible causes of the PJL commands being output as text include the driver not prefixing the PJL statements (at the beginning of each job) with a Universal Exit Language (UEL) escape sequence. (http://www.tek-tips.com/viewthread.cfm?qid=1618494)

To rule this out, one can use the “print to file” option in the print dialog box to produce a file that contains the instructions that would be sent to the printer.

Choose File | Print in your application, then check the “Print to file” box in the print dialog box. (In Office 2010, the Print Options button under the available printers menu displays the print dialog box.) Choose a name for the .prn file and save it somewhere, then open the resultant *.prn file in something that displays escape characters, such as Notepad++ (or even Notepad). The first character should be an escape character, and the first line of text will begin something like this:

{ESC}%-12345X

If the PJL initialization command looks correct, it’s possible that the printer is not properly configured to accept PJL commands. Older printers may not be PJL-aware, but I knew our printers to work fine with older 32-bit HP UPDs installed on our Windows XP machines. The ‘Personality’ attribute on HP printers can be checked by going to the printer’s web admin panel and browsing to Settings | Configure Device | System Setup. Setting the Personality to PS is probably going to cause problems, but either Auto or PCL should work. I confirmed that our printers were set to Auto, further ruling out the printers themselves as the cause of the problem.

I next looked at disabling the advanced features of the driver (a little skeptically, I’ll admit). This can be done by going into the printer’s properties and unchecking the “Enable advanced printing features” box on the Advanced tab. (http://h30499.www3.hp.com/t5/Print-Servers-Network-Storage/12345X-PJL-Printing-on-Dot-Matrix-Printers/td-p/1132391) I was curious about how this affected the job sent to the printer – would the entire series of JPL commands be removed?

To test, I unchecked the “Enable advanced printing features” and printed an email message to a *.prn file, then checked the box and printed the same email to a second *.prn file, then compared the two files. The only difference in the PJL commands was that “@PJL SET SEPARATORPAGE=OFF” was present with advanced printing features enabled, and absent with advanced printing features disabled.

I found the separator page line to be an interesting difference, as banner pages/separator pages had been suggested as a possible cause, but our drivers were not configured to print separator pages. (http://www.oasq.com/PJL-SET-JOBATTR-thread-252568-1-1.html)

So, that’s where the issue currently stands. I’m waiting to see if turning off advanced printing features has any effect. To be thorough, I need to test whether the UPD PS driver prints without error and whether the problem continues with a printer connected via TCP/IP and with a manually installed driver. I can also bring the printers up to the latest version of the firmware, although this would be a less satisfactory resolution, as we have a variety of printer models and not all of them have firmware updates available.

Update 17 Feb. 2012

The Application event log on the print server contains a number of errors, though we’re unsure of whether there is a direct correlation between the errors and attempts by Windows 7 users to print, or jobs in the spooler being processed, or any other activity.

Description:
Faulting application name: PrintIsolationHost.exe, version: 6.1.7600.16385, time stamp: 0x4a5bd3b1
Faulting module name: hpzuiwn7.dll, version: 0.3.7071.0, time stamp: 0x4a5bdfcb
Exception code: 0xc0000005
Fault offset: 0x00000000000d6971
Faulting process id: 0x900
Faulting application start time: 0x01ccea9860e17377
Faulting application path: C:\Windows\system32\PrintIsolationHost.exe
Faulting module path: C:\Windows\system32\spool\DRIVERS\x64\3\hpzuiwn7.dll
Report Id: 3eaa21e6-568c-11e1-b7a4-005056a50027

It certainly does look like the 64-bit HP driver is at fault here. More searching has turned up a number of reports of this error with HP’s UPD PCL6 driver, going back to 2010.

Because we have a small number of Windows 7 users, we’re removing the network printers from the Windows 7 machines temporarily, to see if the server stabilizes.

Update 21 Feb. 2012

We were able to take a closer look at the print server today. We searched the registry for hpzuiwn7.dll and noted the printers that had this DLL listed among the supporting files. Many, but not all, of the printers included this DLL. We also reviewed the printers in Print Management and made an odd discovery. There seemed to be two varieties of the model-specific PCL 6 driver in use: one is named “HP LaserJet 4250 PCL 6” and the other is “HP LaserJet 4250 PCL6“. The difference in the naming is that the later driver has a space between PCL 6. While most of the printers used the UPD, a handful were using one of the model-specific drivers. When we looked at the Additional Drivers, we found that one of them had only the 64-bit version available. I expect that only 32-bit workstations are printing to those printers, so I’m not sure how they even functioned, but it would seem that the next step would be to either add the matching 32-bit drivers for that model printer or change the assigned driver to UPD PCL 6. I suspect that we were not diligent enough about exactly matching the printer driver names (let alone the version numbers) when we were installing drivers on the server.

Update 1 Mar. 2012

After installing the missing 32-bit driver that complemented the stray 64-bit driver, all of the printing problems, including the error messages in the Application log on the server, have subsided.
I’m trying to find a way to save some Xbox 360 achievements that I’ve earned while my console was offline. Typically, just connecting to Xbox Live will sync up your gamertag and the offline achievements will be added to you profile. This works because, usually, the gamertag is associated with a single Xbox 360, which goes offline and then back online. My situation is different, and it seems like I’m going to lose my offline achievements.

The set up

I have a single gold account and two Xbox 360 consoles. One of these consoles is always online and is used exclusively for watching Netflix (because the drive tray is broken). The other console works fine for games, but is physically located where wired Ethernet isn’t available, and I haven’t purchased a wireless adapter. In order to get the same gamertag on both consoles, I used the recover gamertag feature to bring it down to the online console. This means that the Netflix gamertag is regularly connecting to Xbox Live while my gaming is done on the same gamertag, but offline.

Microsoft doesn’t seem to want to support this sort of arrangement, as it appears that gamertags are associated with individual Xbox consoles and that only the last-to-be-connected gamertag is seen as legit.

The problems

The first problem I’m facing is how to get all of these achievements that were earned offline sync’d up with my Live profile. One might reasonably think that simply connecting the offline Xbox to Xbox Live and logging in would do this, but Live sees the account as invalid (presumably because the account associated with the other box has connected more recently). Upon connecting to Xbox Live, I’m prompted to recover my gamertag, which I know from experience will erase my offline achievements (I’ll get the gamertag as it exists on the online console – which will also render the gamertag on the online console invalid).

I also tried to use a USB flash drive to move my gamer profile from the offline box to the online box. The move itself was successful, but when I tried to connect to Live, it again found the account to be invalid and invited me to recover my gamertag. I was able to move the gamer profile back to the USB drive, remove the drive, and then recover the online gamertag in order to keep using Netflix, but I was back to square one.

I haven’t yet tried moving the offline console’s hard drive with the gamertag to the online console. As of right now, this is the only thing I can think to try.

The second problem I’m facing is that the offline Xbox doesn’t yet have the new dashboard and some of my games have updates available that are supposed to fix some bugs. I’ve read that it should be possible to get these updates by creating a silver account and logging into Xbox Live under that account. That would be somewhat helpful, but unnecessary if I can solve the first problem.

Autonegotiation

Network autonegotiation is easily misunderstood. Consider two 10/100Mb devices attached to one another – a PC connected to a router. For each of these devices, it’s possible to configure the connection to use either 1) a fixed speed and duplex or 2) to negotiate the optimal shared speed and duplex with whatever it is connecting to. What is not intuitive is that both devices must be configured with the same settings. The connection will suffer a performance hit, or may not work at all, if the two devices are configured differently.

A common misconception about autonegotiation is that it is possible to manually configure one link partner for 100 Mbps full-duplex and autonegotiate to full-duplex with the other link partner. In fact, an attempt to do this results in a duplex mismatch. This is a consequence of one link partner autonegotiating, not seeing any autonegotiation parameters from the other link partner, and defaulting to half-duplex.

http://www.cisco.com/en/US/products/hw/switches/ps4324/products_tech_note09186a0080094713.shtml#auto_neg

If both devices are configured to autonegotiate speed and duplex, then each will attempt to make the best possible connection among the possibilities they have in common. However, if one of the devices is set to use a fixed speed and duplex and the other device is set to autonegotiate, the autonegotiating device can determine the speed but not the duplex of the other device and so falls back to its default duplex mode. In the case of Cisco switches, the default duplex mode is half-duplex.

…it is possible for a[n autonegotiating] link partner to detect the speed at which the other link partner operates, even though the other link partner is not configured for auto-negotiation. In order to detect the speed, the link partner senses the type of electrical signal that arrives and sees if it is 10 Mb or 100 Mb.

It is not possible to detect the correct duplex mode in the same method that the correct speed can be detected. In this case, the […] port of [the autonegotiating] switch […] is forced to select the default duplex mode. On Catalyst Ethernet ports, the default mode is auto-negotiate. If auto-negotiation fails, the default mode is half-duplex.

http://www.cisco.com/en/US/tech/tk389/tk214/technologies_tech_note09186a0080094781.shtml

Half-duplex as a default duplex mode is not unique to Cisco switches. Below is a link to an article on www.dell.com written by Rich Hernandez, a senior engineer with the Server Networking and Communications Group at Dell, that contains a table summarizing “all possible combinations of speed and duplex settings, both on 10/100/1000-capable switch ports and on NICs.” Included are combinations that would yield no link or link fail conditions, as well as combinations that would yield a duplex mismatch.

http://www.dell.com/content/topics/global.aspx/power/en/ps1q01_hernan?c=us&cs=555&l=en&s=biz

The importance of using identical settings on both sides of a network connection is stressed in a KB article from www.symantec.com with information on how an autonegotiating port may report that it has established a full-duplex connection with a NIC configured for 100MBs/Full, but in fact is communicating at less than expected capacity.

Only by explicitly setting both sides of the link to the same duplex mode would the link work flawlessly.

http://www.symantec.com/business/support/index?page=content&id=TECH87827

Understanding link data errors

The page at the link below contains two tables that explain the various errors and counters logged by a network switch and the possible causes.

http://www.cisco.com/en/US/products/hw/switches/ps708/products_tech_note09186a00800a7af0.shtml#ustand

Troubleshooting Ethernet Collisions

Collisions may appear to indicate communication problems with a network connection, but as a technote from cisco.com states, collision counters alone are not indicative of network problems.

…collisions are a way to distribute the traffic load over time by arbitrating access to the shared medium. Collisions are not bad; they are essential to correct Ethernet operation.

There is no set limit for “how many collisions are bad” or a maximum collision rate.

In conclusion, the collisions counter does not provide a very useful statistic to analyze network performance or problems.

http://www.cisco.com/en/US/products/hw/modules/ps2033/products_tech_note09186a008009446d.shtml

Late Collisions

When a collision is detected by a station after it has sent the 512th bit of its frame, it is counted as a late collision.

The station that reports the late collision merely indicates the problem; it is generally not the cause of the problem. Possible causes are usually incorrect cabling or a non-compliant number of hubs in the network. Bad network interface cards (NICs) can also cause late collisions.

http://www.cisco.com/en/US/products/hw/modules/ps2033/products_tech_note09186a008009446d.shtml

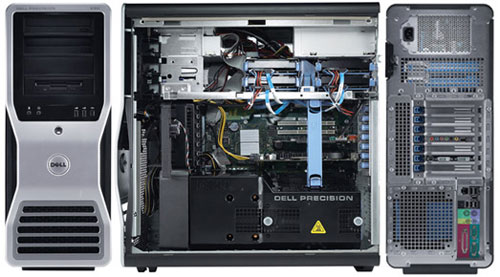
I just picked up an old Dell Precision 690 workstation, which I intend to develop into a file server, a Windows IIS server, and an Ubuntu LAMP server. This monster was built in 2006, but it still has some neat specs and tons of capacity (7 PCI slots, 4 hard drive bays, etc…), should I want to expand further.

Dell Precision 690

Dell Precision 690 Workstation

The main specs

CPU: Dual Core Intel Xeon 5060 3.2GHz, 4M Cache, 1066 MHz FSB
RAM: 2GB DDR2 PC2-5300, CL=5, Fully Buffered, ECC, DDR2-667
HD: SAS Fujitsu MAX3073RC 73GB, 15000 RPM, 16MB Cache
Video: Nvidia Quadro NVS 285 PCI-Express, 128MB

This is not a normal tower

Right away, the size of this thing suggests it isn’t a normal tower. It’s about up to my knee and weights 70 lbs. It feels like it’s made with heavier gauge steel than the typical chassis, but that may be me projecting.

I immediately shopped around for more RAM, obviously. 2GB seems a little thin, even by 2006 standards, when considering the way everything else is high-end. The mainboard has 8 slots and supports up to 32GB, but I figure 6GB is a safe place to start.

The workstation has three enormous fans, like, big-as-your-hand big. Running it with the chassis open causes some sort of thermal protection system to kick in and it spins the fans up to the point that they were blowing stuff on the floor half-way across the room.

The CPU has a big, passive heat sink with six copper pipes and sits between two of those fans. I’m tempted to buy a second CPU, but I’ll hold off.

I’m still on the fence about the SCSI drive. It should be super fast, but I’m a little spoiled by the SSD in my machine at work, so it’s hard to get excited about a mechanical drive, even one running at 15k RPM.

The Nvidia Quadro card is also fanless, and has a bizarre DMS-59 connector. An adapter converts the DMS-59 connector into two DVI outputs.

I had set up a hard drive with two Windows XP installations on separate partitions and used GRUB to choose between them at boot. Eventually, I needed only one of these installations and wanted to clone/copy it to a separate drive. I happened to have an old copy of Ghost 2003, so I used that to clone the partition I wanted to keep.

But when I tried to boot that install, all I got was the word GRUB on an otherwise blank screen after the POST.

I did some Googling and found the How to remove GRUB loader!? post at ntcompatible.com.

Basically, you can get around this problem by replacing the boot sector and MBR.

  1. Boot into Recovery Console with the XP install media by choosing the Repair option
  2. Choose the installation to work on
  3. At the command prompt (assuming your installation is on C:), enter: fixboot c:
  4. Proceed through any warnings
  5. At the command prompt, enter: map
  6. Record the name of the device on which you will be writing the new master boot record
  7. At the command prompt, enter: fixmbr [device_name] (where the device name is something like DeviceHardDisk0
  8. Proceed through any warnings
  9. Exit Recovery Console and reboot

Resources: Windows XP Professional Product Documentation – fixboot and Windows XP Professional Product Documentation – fixmbr

I replaced the shattered color wheel on my 61″ Samsung HLN617W DLP television using the excellent instructions at http://www.jangro.com/items/samsung-dlp-replace-color-wheel/.

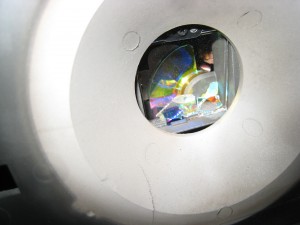
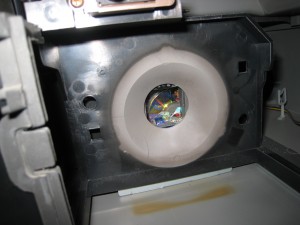
A shattered Samsung HLN617W DLP color wheel

A shattered Samsung HLN617W DLP color wheel

A color wheel is six separate pieces of glass attached to a hub through which the light from the lamp is cast. The wheel spins insanely fast, and over time the bearings wore and it developed a wobble. Once the wobble became pronounced enough, the wheel tore itself apart. I should have known something was up, because the TV had been making a sound like a vacuum cleaner for a few months.

A shattered Samsung HLN617W DLP color wheel (closeup)

A shattered Samsung HLN617W DLP color wheel (closeup)

While the lamps on DLP sets are easily accessed, replacing the color wheel requires tearing the guts out of the thing. Still, if you’re comfortable with electronics, you shouldn’t have too much trouble with it.

I like DLP, even though the components are subject to wear and replacement, because you don’t get much more analog than using a high-pressure mercury-vapor metal halide arc lamp to generate a pretty intense beam of light, sending that beam of light through a mechanical spinning color wheel and then scattering it with a reflective micromirror chip against a surface.

I like using the Import Pictures and Videos wizard in Windows 7 when transferring pictures from my digital camera because it can create a separate folder for each date. But it lacks the ability to rename the individual files based on date. I want my image filenames to be YYYY.MM.DD_001.jpg, where the trailing number increments for that date.

To get the filename just right, I use Advanced Renamer, a free program for renaming multiple files or folders at once. Advanced Renamer can read information from the image file (like the date the picture was taken).

Importing the images

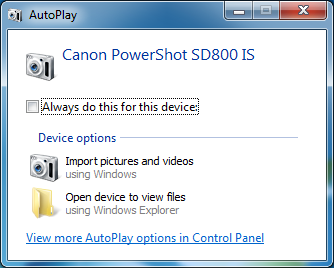
Connect the device or memory card to your computer. In the AutoPlay dialog box that appears, click Import pictures and videos using Windows.

Windows 7 AutoPlay dialog box

Windows 7 AutoPlay dialog box

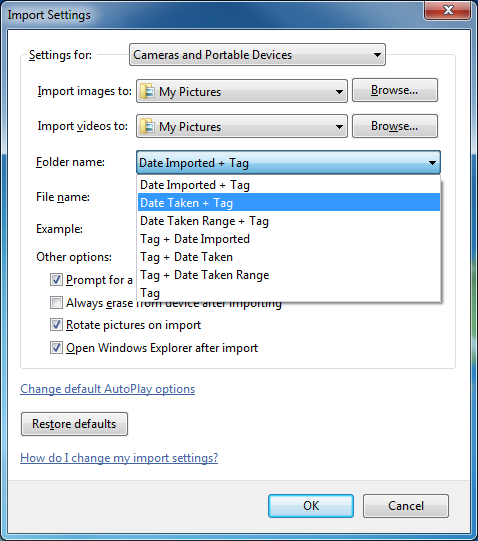
The default settings will create a single folder with today’s date, which is not what we want. To change the settings that are used when importing pictures and videos, click Import settings in the Import Pictures and Videos dialog box.

Windows 7 Import Settings dialog box

Windows 7 Import Settings dialog box

Under the Folder name menu, choose Date Taken + Tag and click OK. The import process will restart and you’ll be prompted to enter a tag. The tag isn’t important, so just click Import.

Configuring Advanced Renamer

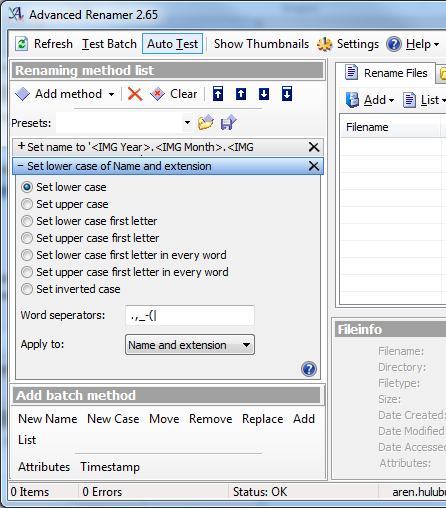
It takes two methods to get the names the way I want them. The first method changes the filename to use the year, month, and day information, and increment a trailing number. The second method changes the new filename to lowercase. If you prefer your file extensions to be in uppercase, you can skip the second method.

Advanced Renamer - Renaming method list

Advanced Renamer - Renaming method list

Under Add batch method, click New Name, and either select the desired date conventions from the options, adding any separator characters you wish, or copy the code below to use YYYY.MM.DD_001.EXT.

<IMG Year>.<IMG Month>.<IMG Day>_<Inc NrDir:001>.<Ext>

Under Add batch method, click New Case and then choose Set lower case. In the Apply to menu, choose Name and extension.

Click the Add button and browse to the parent folder. The files should appear in the list, and the new filename will be displayed. Check for any errors or problems with the filename, then click Start Batch.

Move the files into a single directory

Now that the pictures are all correctly named, I no longer need them to be in date-based folders. It’s more convenient to have them in a single folder from which I can organize them.

To do this, I use a batch file that moves any files in a sub-folder into the parent folder.

Set sOriginFolder="PATH\TO\PARENT\DIRECTORY"

For /f "Tokens=*" %%a in ('Dir %sOriginFolder% /a-d /s /b') do (
	move "%%a" %sOriginFolder%
)

Replace PATH\TO\PARENT\DIRECTORY with the full path to the parent folder, then run the batch file.

That’s it. Now I have a single folder of images that are uniquely named according to date taken.

I wanted to connect a non-wireless device (an Xbox 360) to a spare AirPort Extreme Base Station (AEBS) via ethernet cable, then join the Airport Extreme to an existing wireless network created by a non-Apple (D-Link) wireless router. After much searching, it appears that the ethernet ports on the AEBS will not function when the AWD is connected to a wireless network created by a non-Apple device, such as a D-Link wireless router.

But, I was able to find lots of useful links, which I’ve posted here for future reference.

Default AirPort Base Station passwords are “public.”

Resetting an AirPort Base Station or Time Capsule FAQ (with pictures of the different models)
http://support.apple.com/kb/HT3728

AirPort Utility 5.5.3 for Windows
Post Date: June 14, 2011
http://support.apple.com/kb/DL1391

Time Capsule and AirPort Extreme Base Station Firmware Update 7.5.1
Post Date: March 31, 2010
http://support.apple.com/kb/DL965

AirPort Extreme Firmware Update 5.7 for Windows (AirPort Extreme 802.11g – drop shaped)
Post Date: January 03, 2006
http://support.apple.com/kb/DL411

All about Time Capsule, AirPort Extreme, and AirPort Express base station firmware updates
http://support.apple.com/kb/HT1218

To download and install any available firmwares on your AWD, simply open AirPort Utility. An alert indicates that an update is available (if one is). Click the Update button. If you are updating more than one base station, click Show Details to select the base stations you want to update.

AirPort + Time Capsule (General support page)
http://www.apple.com/support/airport/

Using the AirPort Admin Utility to create a WDS network with multiple base stations
http://support.apple.com/kb/HT4262

AirPort Extreme Base Station Setup Guide
http://manuals.info.apple.com/en/airportextremebasestationsetupguide.pdf

AirPort: Slow 802.11n connection speed when connected using older WEP or WPA security mechanisms
(Use WPA2 Personal authentication)
http://support.apple.com/kb/TS3361