Category Archives: IT

Posts arising from problems or situations encountered while working in the IT field.

I recently worked with Microsoft to resolve a problem in our Windows 8.1 environment where Group Policy Preference Drive Mappings to shares on the DFS were failing when users logged in immediately after a computer restart. Through the use of procmon boot logging, we were able to identify that the ApplySettingsTemplateCatalog.exe process, which is part of UE-V 2.1 and which is triggered at computer startup by the Microsoft\UE-V\Template Auto Update scheduled task, was attempting to access the DFS soon after the Offline Files service started and before the network was initialized. Offline Files recognized that the DFS was not available and transitioned the DFS root to offline mode. If a user logged on before Offline Files re-evaluated the DFS root two minutes later, the drive mappings would fail, along with any other attempts to access locations on the DFS.

To work around this problem, we added a one minute delay to the “at startup” trigger on the Template Auto Update task. The task therefore does not attempt to access a location on the DFS before the network is ready, and consequently Offline Files does not step in and take the DFS offline.

Some background on our environment and observations of the problem

Our users’ home drives are specified in each user’s account in AD. The home drive is connected to a path on the DFS and is assigned to drive letter H.

The Documents folder is redirected into the user’s home drive on the DFS via Group Policy and is automatically made available offline.

GPP drive mappings to shares on the DFS fail when users log on after a computer restart.

GPP drive mappings to non-DFS locations (shares on various servers) are always successful.

The Offline Files/Operational event log contains “Path disconnected” (Event ID 9) entries to the DFS root and the parent directory of the user’s home drive during boot and logon when the drive mappings fail. The log contains “Path reconnected” (Event ID 10) entries to the DFS root and the parent directory of the user’s home drive shortly after logon.

When the drive mappings fail, if File Explorer is opened immediately after logon, only the redirected Documents folder and the UE-V SettingsPackages folders are visible in the user’s home drive. Navigating into the Documents folder and highlighting a file shows the state as “Offline status: Offline (not connected).” in the details pane of File Explorer. This indicates that Offline Files has transitioned the path to “Auto offline mode”. After a few moments, the rest of the folders in the user’s home drive will appear in File Explorer and the state of the files in the Documents folder will change to “Online”.

If Offline Files is disabled via Group Policy, or if the CSC kernel driver is disabled via a registry value, the drive mappings are always successful.

If the CSC is re-initialized by creating the FormatDatabase registry value and rebooting the computer, the user is able to log in with successful drive mappings.

Obscuring the cause

As is often the case, I could have arrived at the cause more quickly if I had let the facts tell their story.

In the beginning of my troubleshooting, I ruled out a network problem by running a few Wireshark captures that showed that the computer was not attempting any network connections to the DFS when the drive mappings failed. This took a few hours, but was fun and informative, so it wasn’t a waste of time by any means.

I also spent considerable time making changes to the Offline Files settings in Group Policy, the GPP drive map options, and the user’s home drive, and testing the effects of these changes. I gained quite a bit of new understanding in these areas, but was, in hindsight, off base.

I would occasionally see that the HOMESHARE environment variable was missing, and that the HOMEDRIVE and HOMEPATH variables had incorrect values. This, too, was a very interesting observation that did not get me any closer to the cause of the problem.

The Offline Files Operational log entries, when matched up chronologically against the System log events, would have shown that the DFS was being transitioned offline before the network was up, but I was distracted by all of the user-specific elements involved. The problem was occurring much earlier in the startup process than I realized.

Procmon illuminates the root cause

At Microsoft’s suggestion, I enabled boot logging in procmon and captured the events during computer startup. With this new source of information available, I finally got around to looking at what was happening on the computer at the time that Offline Files was transitioning the DFS to offline mode.

The critical piece of the puzzle, I believe, was that we were locating our UE-V Template Catalog directory on the DFS as well. It was this path that was being evaluated on boot – not any path to do with the users’ home drives or the redirected Documents folder. When UE-V attempted to access the Template Catalog path before the network was initialized by way of the Template Auto Update scheduled task, Offline Files properly transitioned the DFS to offline mode. Offline Files transitioned the DFS back to online two minutes later, but by this time, the user had already logged on and the GPP drive mappings had already failed.

Closing thoughts

It seems to me that this problem would occur with some frequency, as it may be reproduced in what I imagine to be a pretty typical corporate environment:

  1. hardware capable of starting up the Client Side Caching kernel driver and running the Template Auto Update scheduled task before the network is available
  2. Offline Files enabled (it is enabled by default)
  3. user home drives located on the DFS at a path like \\domain\dfsroot\users\%username%
  4. Documents folder redirected to a location on the DFS like \\domain\dfsroot\users\%username%\documents
  5. UE-V Template Catalog directory located on the DFS at a path like \\domain\dfsroot\data
  6. GPP drive maps to shares on the DFS at paths like \\domain\dfsroot\public_documents

In this completely reasonable scenario, two pretty amazing Microsoft technologies, at their default settings, fail to work well together and cause the failure of a third technology.

The Microsoft support engineer handling this case also explained why the HOMESHARE variable was occasionally not set:

The HOMESHARE environment variable is set by the profile service while a user is logging in and has a home drive specified on their account. This will be set upon successful mapping of the home drive. If that is not mapped successfully then it is not set and HOMEDRIVE and HOMEPATH are set to c:\ and \USERS\<username> respectively. This is just a symptom of the root being taken offline earlier and maybe for a user that hasn’t logged onto the machine and cached any information yet with the root being offline. Also with the root being offline, the user’s home drive may map successfully, but other mapped drives that map into the DFS Namespace can fail.

This is just a quick post on creating a operating system-based collection query rule for Windows 10 in SCCM 2012. In preparation for the release of Windows 10, I have been working on an OSD task sequence that applies the Windows 10 Enterprise Insider Preview and creating collections in SCCM. There are a number of different ways to construct an operating system-based collection, but one method works more quickly than an alternative.

As you know, the System Center Configuration Manager client reports back details of the workstation or server environment to the SCCM management point, including information about the operating system. This information can be used to populate device collections through WQL queries of information in the SCCM database. But similar, if not equivalent, information is collected through different processes by the client, resulting in the SCCM primary site server potentially having incomplete details of a device. This is particularly evident when looking for details about a workstation computer shortly after it has completed an OSD task sequence.

After a Hardware Inventory cycle is run, SCCM will have access to the Operating System.Caption value, which will be, for the Windows 10 Insider Preview, “Microsoft Windows 10 Enterprise Insider Preview”. This query can be made more general by using the LIKE operator and then wrapping the search term in percent symbols: %Windows 10 Enterprise%.

But, if you want to be able to add computers to a collection before a Hardware Inventory cycle is run, you can use System Resource.Operating System Name and Version, which will be, for the Windows 10 Insider Preview, “Microsoft Windows NT Workstation 10.0”. This can be made more general by using LIKE operator and wrapping the search term in percent symbols: %Windows NT Workstation 10%.

The Query Statement that I am using to populate my collection of Windows 10 workstations is:

select SMS_R_SYSTEM.ResourceID,SMS_R_SYSTEM.ResourceType,SMS_R_SYSTEM.Name,SMS_R_SYSTEM.SMSUniqueIdentifier,SMS_R_SYSTEM.ResourceDomainORWorkgroup,SMS_R_SYSTEM.Client from SMS_R_System where SMS_R_System.OperatingSystemNameandVersion like "%Microsoft Windows NT Workstation 10%"

This SMS_R_System.OperatingSystemNameandVersion query is useful because it is able to locate computers in SCCM within a few minutes after they have been reimaged, before the client has run a Hardware Inventory cycle. My hunch is that the operating system name and version are being sent to the management point as part of a Heartbeat Discovery that happens soon after the computer finishes the OSD task sequence. I’ll check the logs to confirm this.

This article is intended for systems administrators who use Group Policy/Group Policy Preferences to manage computers in a domain environment.

Among the many challenges faced by Windows desktop engineers, configuring Internet Explorer in a corporate environment to provide a good balance of security and convenience stands out as particularly difficult to get right. I cannot think of any other piece of software that has required more of my time and effort to tailor to our needs than IE. Nor can I think of another application that generates as many non-error-related calls to our help desk. My project this week has been to develop a process for allowing approved ActiveX controls (ie., vetted controls used by business-purpose sites) to be silently installed and enabled by end users without granting sites more rights than needed.

While working on this project, I found that there is a good deal of interplay among multiple Group Policy settings that, once configured, permit standard users to download, install, and enable ActiveX controls so that web sites “just work”. This blog post should help you configure those settings in three steps.

Step 1: Download

The first order of business is to allow a standard user to download the ActiveX control files from sites in the Internet Zone. This can be done by configuring the “Download signed ActiveX controls” and the “Download unsigned ActiveX controls” Group Policy settings in Computer Configuration/Policies/Administrative Templates/Windows Components/Internet Explorer/Internet Control Panel/Security Page/Internet Zone. My understanding is that signed code from trusted publishers is always downloaded silently if the “Download signed ActiveX controls” setting is Enabled and the drop down menu item is set to Enable or Prompt. (It’s not clear to me why signed add-ons from trusted publishers wouldn’t be separately configurable here.) I have set “Download signed ActiveX controls” to Enable, and “Download unsigned ActiveX controls” to Prompt, although the more secure setting would be to Disable downloading unsigned controls.

Step 2: Install

The next order of business is to allow a standard user to install ActiveX controls for specific sites. This can be done by configuring the “Approved Installation Sites for ActiveX controls” setting in Computer Configuration/Policies/Administrative Templates/Windows Components/ActiveX Installer Service.

For each web site, enter the full domain name of the site where the ActiveX control is hosted (wildcards are not allowed) and provide a series of values governing the installation of trusted and signed, signed, and unsigned files, along with exceptions to HTTPS certificate errors. The default series of values is “2,1,0,0”, and I’ll expand on this later in the post. You may need to relax these settings for individual sites depending on whether the control is signed or if the site has HTTPS errors. Enter a detailed comment explaining the rationale for configuring the item (who configured it, when and why), so that you or another administrator can periodically revisit the list and evaluate whether the entries are still necessary and whether the settings are still correct.

A decent amount of thought needs to be given to the significance of the values, which are described more fully at Implementing and Administering the ActiveX Installer Service. The first three numbers in the default setting of “2,1,0,0” will (1) allow an ActiveX control that is signed by a certificate in the Machine or Enterprise Trusted Publishers store to be installed silently, (2) prompt the user before installing an ActiveX control that is signed by a certificate that is not in the Trusted Publisher Store, (3) and not install an unsigned ActiveX control.

For example, if we wish to allow the “Microsoft Update Catalog” ActiveX control to be silently installed when a user visits http://catalog.update.microsoft.com/v7/site/Install.aspx, we can add the domain name “http://catalog.update.microsoft.com” to the list and give it the values “2,1,0,0”. Because this ActiveX control is signed by a certificate in the Machine or Enterprise Trusted Publishers store, the first value “2” allows the silent installation.

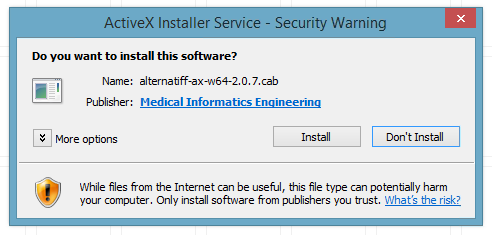
If the user encounters an ActiveX control that can be downloaded but is not permitted to be installed silently, the user will receive a Security Warning pop-up window from the ActiveX Installer Service similar to the screen capture below.

Prompting the user for permission to install

Prompting the user for permission to install

In this case, the user encountered a signed ActiveX control that was not signed by a certificate in the Machine or Enterprise Trusted Publishers store. If we want to suppress this prompt so that the control will be installed silently, we would need to change the second number in the series to “2”, as so: “2,2,0,0”.

Step 3: Enable

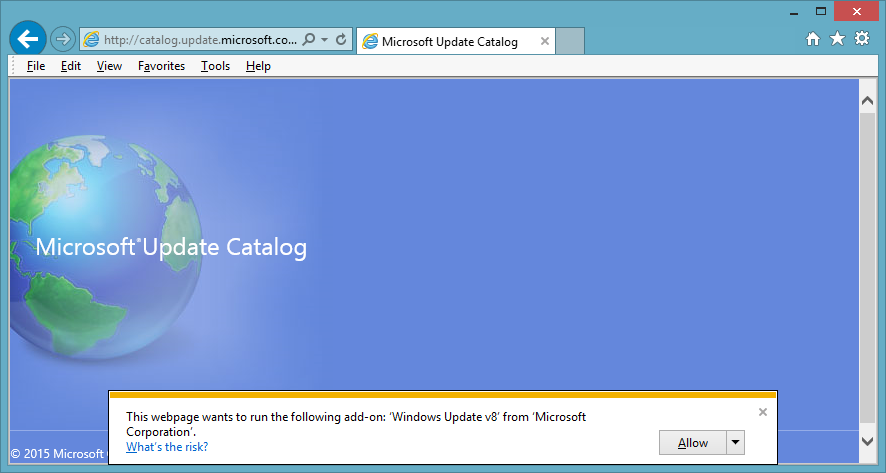
As conscientious system engineers concerned about removing distractions for our users, we may wish to suppress the “This webpage wants to run the following add-on: ‘<add-on name>’ from ‘<company name>’.” warning/alert that appears in Internet Explorer when a user visits a site that loads an ActiveX control that has been downloaded and installed, but for which the ActiveX control is not yet enabled for the user.

This webpage wants to run the following add-on

This webpage wants to run the following add-on

To silently enable a specific ActiveX control for a specific domain for the current user, we can use Group Policy Preferences to create a registry value under HKCU with the Class ID (CLSID) of the add-on and the domain name where it is allowed to run. Be sure to enter a detailed comment explaining the rationale for configuring the item. The Class ID can be found via the Manage Add-ons dialog box (which means that the add-on will at least need to be downloaded).

For example, if we intend to allow the “Microsoft Update Catalog” ActiveX Control to be silently enabled to run on microsoft.com or any subdomain of microsoft.com, we may create the following registry key:

[HKEY_CURRENT_USER\Software\Microsoft\Windows\CurrentVersion\Ext\Stats\{5AE58FCF-6F6A-49B2-B064-02492C66E3F4}\iexplore\AllowedDomains\microsoft.com]

If we intend to allow the ActiveX Control to run on any site, we would create a key named “*” (an asterisk) in place of the domain name, for example:

[HKEY_CURRENT_USER\Software\Microsoft\Windows\CurrentVersion\Ext\Stats\{5AE58FCF-6F6A-49B2-B064-02492C66E3F4}\iexplore\AllowedDomains\*]

That’s all there is to it. When a user encounters a site that requires an approved ActiveX control, the control will be downloaded, installed, and enabled in the background.

How can I enable an add-on and prevent users from disabling it?

The Group Policy setting “Add-on List”, available in both the User Configuration and Computer Configuration, accepts a CLSID and a numerical value indicating how the add-on should be handled. A 0 (zero) indicates that the add-on should be disabled and users should be prevented from enabling it. A 1 (one) indicates that the add-on should be enabled and users should be prevented from disabling it. A 2 (two) indicates that the add-on should be enabled and users should be permitted to enable and disable the add-on through the Manage Add-ons dialog box.

However, in my experience, configuring an add-on with a value of 2 does not automatically enable the add-on for users, and they will see the yellow bar asking them if they want to enable or disable it when they open IE. I can’t quite see the use case for the value of 2.

The (User) setting is found at User Configuration\Administrative Templates\Windows Components\Internet Explorer\Security Features\Add-on Management. The registry keys for add-ons configured via the “Add-on List” setting in the User Configuration, named by CLSID, can be found as subkeys under:

[HKEY_CURRENT_USER\Software\Microsoft\Windows\CurrentVersion\Policies\Ext\CLSID]

How do I get more information about an add-on?

The details of each downloaded or installed add-on can be viewed using the Manage Add-ons dialog box in IE. Locate the add-on in the list and click the More Information link to view the Class ID as well as other information. For example, the details of the Microsoft Update Catalog control referenced throughout this post look like this:

Name: Microsoft Update Catalog
Publisher: Microsoft Corporation
Type: ActiveX Control
Architecture: 64-bit
Version: 7.4.7057.249
File date: ‎Thursday, ‎June ‎20, ‎2013, ‏‎10:56 AM
Date last accessed: ‎Today, ‎April ‎16, ‎2015, ‏‎3 minutes ago
Class ID: {5AE58FCF-6F6A-49B2-B064-02492C66E3F4}
Use count: 8
Block count: 30
File: MicrosoftUpdateCatalogWebControl.dll
Folder: C:\Windows\System32

How do I get information about the ActiveX control file itself?

The binary file itself will be referenced in the HTML of the page that requires or installs the control. My preferred method of finding the binary is to use the DOM Explorer in IE’s F12 Developer Tools to view the rendered HTML of the page where the control is installed, and the search for the string “codebase”.

If we look at the HTML of the page at http://catalog.update.microsoft.com/v7/site/Install.aspx, we can find an OBJECT tag that contains the CODEBASE attribute which contains a relative path to a .cab file that is the control. As of this writing, the path is “ClientControl/en/x86/MuCatalogWebControl.cab?1429300094107#version=9.0.1268.0”. To find the absolute path to the .cab file, so that we can download it and inspect it, we need to join the URL of the page up to the last folder with the contents of the CODEBASE attribute, like so:

http://catalog.update.microsoft.com/v7/site/ClientControl/en/x86/MuCatalogWebControl.cab?1429300094107#version=9.0.1268.0

Entering that URL in a browser will allow you to download the file and look at it. In the case of a digitally signed file, viewing the Properties of the file will reveal a Digital Signatures tab with more details about the signer and the certificate. An ActiveX control can be a .cab, a .dll, or a .ocx file.

So why don’t I need to enable the Adobe Flash ActiveX control in this way?

According to the MSDN blog post Controlling ActiveX in Internet Explorer, certain controls are exempt from requiring user approval to be enabled, including Adobe Flash. You can find the Class IDs for these pre-approved controls at:

[HKEY_LOCAL_MACHINE\SOFTWARE\Microsoft\Windows\CurrentVersion\Ext\PreApproved]

As an alternative to the GPP HKCU registry method of approving ActiveX controls described above, an administrator could create a Class ID subkey under the PreApproved registry key to pre-approve the ActiveX control for all users of the computer on all web sites. Setting such a subkey still permits the user to Disable and Enable the add-on through the Manage Add-ons dialog box.

For example, if we intend to approve the “Microsoft Update Catalog” ActiveX control to run on any site, we would create the following HKLM key, for example, during operating system deployment:

[HKEY_LOCAL_MACHINE\SOFTWARE\Microsoft\Windows\CurrentVersion\Ext\PreApproved\{5AE58FCF-6F6A-49B2-B064-02492C66E3F4}]

Using Trusted Sites

It is also possible to use the Trusted Sites zone as the mechanism for controlling installation policy for ActiveX controls. This can be done by configuring the “Establish ActiveX installation policy for sites in Trusted zones” setting in Computer Configuration/Policies/Administrative Templates/Windows Components/ActiveX Installer Service. The same options for trusted/signed, signed, and unsigned controls as well as exceptions for HTTPS errors exist in this setting, but they apply to any site in the Trusted Sites zone. Consider this carefully – once this setting is enabled and configured, any site in the Trusted Sites zone will be allowed to silently install ActiveX controls, even those sites that you may not wish to do so, and exceptions for signed/unsigned controls and HTTPS errors will be applied to all sites. This setting therefore offers far less granularity than configuring each site individually using the “Approved Installation Sites for ActiveX controls” setting described above.

You may need to disable unwanted ActiveX controls installed from these sites via GP by Class ID.

Sites can be added to the Trusted Sites zone via the “Site to Zone Assignment List” setting in User Configuration/Policies/Windows Components/Internet Explorer/Internet Control Panel/Security Page.

Microsoft’s recommendations

The Deployment Guy’s Enterprise Management of ActiveX Controls using ActiveX Installer Service blog post on TechNet describes some recommendations, including to install ActiveX controls only from reputable organizations, deploy commonly used ActiveX controls through your organization’s software deployment system rather than allowing controls to be installed automatically via the ActiveX Installer Service, and using only HTTPS hosted controls. These are excellent suggestions, but it’s not likely that your organization can follow all of these recommendations all of the time.

Troubleshooting

If ActiveX Filtering is enabled, IE prevents ActiveX controls from running on all web sites, except for those sites that have been added to the per-site exception list by the user. In IE11, if ActiveX filtering is enabled, a blue circle with a slash through it will appear on the right-hand side of the address bar.

See the MSDN blog post ActiveX Filtering for Consumers for an explanation of ActiveX Filtering.

If ActiveX Filtering is enabled via Group Policy, per-site exceptions can be created by a standard user by clicking on the blue circle with a slash through it in the address bar. Sites that have been added to the per-site exception list will be saved as registry values to the key at:

[HKEY_CURRENT_USER\Software\Microsoft\Internet Explorer\Safety\ActiveXFilterExceptions]

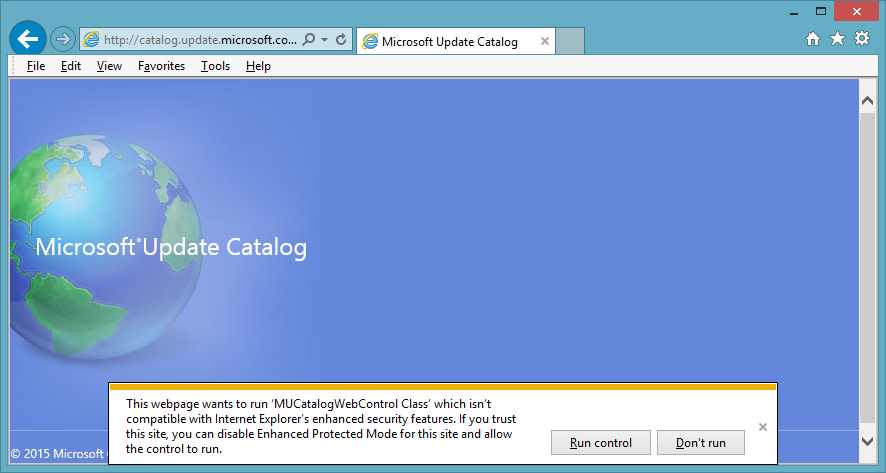
If Enhanced Protected Mode is enabled, add-ons must be compatible with Enhanced Protected Mode in order to run without user intervention.

Internet Explorer's Enhanced Protected Mode

Internet Explorer’s Enhanced Protected Mode

As with ActiveX Filtering, it is possible to populate a per-site exception list for Enhanced Protected Mode. Sites that have been added to the exception list by clicking the “Run control” button in the alert box will be saved as registry values to the key at:

[HKEY_CURRENT_USER\Software\Microsoft\Internet Explorer\TabProcConfig]

The Data for the values is a bit confusing, but the blog post How Internet Explorer Enhanced Protected Mode (EPM) is enabled under different configurations begins to explain the settings.

I recommend reading the MSDN blog post Understanding Enhanced Protected Mode, which is a pretty technical explanation of the subject, noting the differences in its implementation between Windows 7 and Windows 8.

ActiveX control blocking

Internet Explorer 8 through 11 includes a feature called out-of-date ActiveX control blocking, which is another candidate for configuration through Group Policy. If left unconfigured, scary looking security warnings may be displayed to users stating that certain controls are out of date.

A problem arises in Citrix when Internet Explorer (iexplore.exe) is specified as a launch method for a file type in OpenText eDOCS DM and the full path to the executable is not specified.

For example, assume that Microsoft Visio Viewer 2010 or Visio Viewer 2013 is installed on a Citrix server and Internet Explorer is set as the launch method in Library Maintenance for opening Visio VSD files. In this scenario, when a user double-clicks a Visio document in DM Extensions Explorer, Internet Explorer is launched to open the document, but the user receives a “file not found” message and the document does not open. The problem only occurs when the launch method’s location field in Library Maintenance contains only the “iexplore.exe” value and not the full path to “C:\Program Files\Internet Explorer\iexplore.exe” (for 64-bit IE 10+).

The problem appears to be due to the presence of another “iexplore.exe” executable that is part of Citrix XenApp 6.5 and is located in “C:\Program Files (x86)\Citrix\system32\iexplore.exe”. The Citrix “iexplore.exe” executable is necessary for content redirection. The resolution is to modify the launch method in Library Maintenance for the file type in question (ex. the application handling VSD files) by browsing to the 64-bit version of iexplore.exe at “C:\Program Files\Internet Explorer\iexplore.exe”.

My best technical explanation for this problem, based solely on observing the behavior, is that in the absence of a full path in the launch method location field, eDOCS DM will search the system folders for an executable with a name that matches that in the location field. In the case of a system with Citrix XenApp 6.5 installed, the iexplore.exe executable that DM finds and chooses to use is “C:\Program Files (x86)\Citrix\system32\iexplore.exe”. When a user double-clicks on a file that is to be opened using iexplore.exe, DM launches “C:\Program Files (x86)\Citrix\system32\iexplore.exe” and passes the file path as an argument, which is a legitimate way of opening a VSD file in IE. When the Citrix iexplore.exe process starts up, it realizes that it is not needed, so it calls the Windows version of iexplore.exe and passes along the argument, and then the Citrix iexplore.exe process quits. In order to clean up files from the Temp directory, DM watches the processes that it starts. DM watches for the Citrix iexplore.exe process to end, and when it does, DM deletes the document from the DM Temp location. By the time that the Windows version of iexplore.exe is ready to open the file, the file no longer exists. So, the user gets a “file not found” message instead of the document.

Using Process Explorer, it’s possible to observe the dm.exe process deleting the document from the DM Temp location moments after it is created.

Unfortunately, OpenText itself provides the bad advice that causes this problem. See Knowledge Center article number 32382552 (free registration necessary):

In Document Management, eDOCS Edition (eDOCS DM), how can you set up the Microsoft Visio 2010 Viewer application to work within DM?

The Visio 2010 Viewer application included with Microsoft Office 2010 uses Microsoft Internet Explorer to open Visio documents. To allow the Viewer application to function within DM, create a launch method as follows:

Location = IEXPLORE.EXE
Command Line Parameters = -nohome %FULLPATH
Integration = No Integration

There are no DDE Settings intended.
Please note this configuration only allows viewing Visio documents.

https://knowledge.opentext.com/knowledge/cs.dll?func=ll&objId=32382552&objAction=ArticleView&viewType=1

Note that if the launch method’s location value is not configured correctly, such that the executable handling the file type cannot be located at the path specified, then the “No valid launch method” message is displayed when the user double-clicks a file in DM Extensions Explorer. When configuring the launch method to use the full path, our systems administrators received this “No valid launch method” message when they copied and pasted the path into the location field, but successfully resolved the problem by browsing to the executable at “C:\Program Files\Internet Explorer\iexplore.exe”.

While we have chosen to use the 64-bit version of iexplore.exe in our launch method, either of the IE executables can be used to open a VSD file when launched from a command line:

“C:\Program Files\Internet Explorer\iexplore.exe” -nohome “C:\DM\test_601\DMS\SAN_FRANCISCO-#17907-v1-Test_Visio.VSD”
or
“C:\Program Files (x86)\Internet Explorer\iexplore.exe” -nohome “C:\DM\test_601\DMS\SAN_FRANCISCO-#17907-v1-Test_Visio.VSD”

However, I have not tested whether the 32-bit version of iexplore.exe works as a launch method for systems with Internet Explorer 10+.

I had been looking off and on for a few years for a way to insert a timestamp into a file in Notepad++, preferably by a hotkey. The no-longer-in-development TextFX plugin frequently comes up in Google searches as one way of doing this, but the plugin doesn’t offer any ability to customize the format of the date or time stamp.

I found this article: http://sourceforge.net/p/notepad-plus/discussion/331753/thread/3458d1da that explains, briefly, how to do this using the Python Script plugin. I’ve been curious about Python for awhile, too, so I was willing to give it a shot. The SourceForge project page for Python Script is at http://sourceforge.net/projects/npppythonscript/.

So, here’s a quick tutorial on adding a customizable insert datestamp/timestamp macro to Notepad++.

Download the Python Script plugin from http://npppythonscript.sourceforge.net/download.shtml and install it. Do not download it from within Notepad++ by clicking Plugins | Plugin Manager | Show Plugin Manager, scrolling down the Available plugins list to Python Script, checking the box and clicking Install, because it just won’t work (and you may get an older version of the plugin).

Restart Notepad++ and you’ll find that Python Script has been added to the Plugins menu.

To create the script that will insert the timestamp, click Plugins | Python Script | New Script. Enter a filename for the script file you are about to create, like “Time.py”, and click Save.

A new, blank tab will appear in Notepad++. Paste in the following text:

import time 
editor.addText( time.strftime( '%Y-%m-%d %I:%M %p' ) )

Save the Time.py file to the default location in your user profile.

Add the Time.py script to Notepad++ by clicking on Plugins | Python Script | Configuration, highlighting Time.py, clicking the Add button above Menu items, and then clicking OK.

But, you probably want to be able to run this as a macro from a keyboard shortcut. Close the Time.py tab and then exit and relaunch Notepad++. Click on Settings | Shortcut Mapper… and choose the Plugin commands tab. The Time script should be listed here somewhere (in my case, it is usually somewhere around number 27). Highlight it, click Modify and assign it to a shortcut.

I choose to map my Time script to F5, because this mirrors the timestamp functionality built into Windows notepad.exe, but Notepad++ already uses that keystroke for the Run command. I never use the Run command, so I just remove the shortcut from that command by clicking on Settings | Shortcut Mapper… and choosing the Main menu tab, scrolling down to the Run item and either removing the mapping by changing the shortcut to None or changing it to something else, such as Ctrl+F5. For me, Run was located in the Shortcut mapper under Main menu around number 208. Close the Shortcut Mapper and you’re ready to use your new timestamp hotkey.

You can change the datetime formatting using variables! Just modify the contents of the Time.py file located at “%AppData%\Notepad++\plugins\Config\PythonScript\scripts”. See: https://docs.python.org/2/library/time.html#time.strftime

This post is a collection of some of the more commonly used command line utilities when doing basic troubleshooting in a Windows domain environment.

To open a command window within a directory from Windows Explorer, hold the Shift key and right-click on the directory, then choose “Open command window here”.

cd

Displays the name of the current directory or changes the current folder.
http://www.microsoft.com/resources/documentation/windows/xp/all/proddocs/en-us/ntcmds.mspx?mfr=true

Used within a command window to change the current active directory, allowing navigation through the computer’s mapped drives and their directory structures.

Usage:

cd
Displays the current directory path.

cd
Moves to the root of the current drive.

cd /d e:
Moves to the E: drive from another drive. It’s also possible to move to a different drive by typing only the drive letter followed by a colon, ex: D:

cd..
Moves to the parent directory of the current directory (move up one directory toward the root).

cd “People to sue next”
Moves from the current directory into the subdirectory named “People to sue next”. A handy trick is to just type the first few characters of the directory name, and then hit the tab key to auto-complete the rest of the directory name from the first alphabetical match found, and even wrap it in double quotes if it contains spaces. For example, the same command as above can by typed: cd peop <tab>

If the current directory contains multiple matches for the characters typed, hitting tab again will cycle to the next match.

The tab method can be used more than once, to chain together a series of directories. For example, to move to the C:\Users\Public\Documents directory from a command prompt at the root of C:, one can type: cd u <tab> p <tab> d <tab> <tab> <enter>

dir

Displays a list of a directory’s files and subdirectories.
http://www.microsoft.com/resources/documentation/windows/xp/all/proddocs/en-us/dir.mspx?mfr=true

Usage:

dir
Displays the directories and files in the current directory.

dir /s
Displays the directories and files in the current directory and all sub directories.

Dir can also be used to search for a file, and in many cases it works better than the Windows Explorer search.

dir c:\findme.txt /s
Displays a list of all instances of a file named “findme.txt” on the C: drive. It’s also possible to navigate to a location, such as the root of C:, and type: dir /s findme.txt to search that location and all subdirectories for a file named “findme.txt”.

Wildcards are allowed in the form of an asterisk. For example, type: dir c:\*.doc /s to search the C: drive for all files with a .doc or .docx extension (I’m not sure why it also locates .docx files, when there is no wildcard specified at the end of the extension, but it does).

Another command line utility for searching for files is where, but the syntax is slightly more complicated.

gpupdate

Refreshes local and Active Directory-based Group Policy settings, including security settings.
http://www.microsoft.com/resources/documentation/windows/xp/all/proddocs/en-us/refrgp.mspx?mfr=true

If you absolutely must reapply all settings, you can use the /force switch. After reading about the difference between gupdate and gpupdate /force, I now feel that gupdate is sufficient to reapply group policy nearly all of the time, and the /force switch shouldn’t automatically be used.

Usage:

gpupdate
Reapplies group policy.

gpresult

Displays Group Policy settings and Resultant Set of Policy (RSOP) for a user or a computer.
http://www.microsoft.com/resources/documentation/windows/xp/all/proddocs/en-us/ntcmds.mspx?mfr=true

Usage:

gpresult /r
Displays RSoP summary data, which includes the last time group policy was applied, from which server group policy was applied, and the groups for which the current user is a member.

gpresult /h gpreport.html
Generates a report of the applied group policy settings and saves it in HTML format as a file named gpreport.html. When generating a report as a user that is not a local administrator, either supply a full path to a valid location for gpreport.html, or navigate to a location (like the Public Documents directory) before running the command, or else the utility may be unable to create the report due to insufficient rights to the current directory.

ipconfig

Displays all current TCP/IP network configuration values and refreshes Dynamic Host Configuration Protocol (DHCP) and Domain Name System (DNS) settings. Used without parameters, ipconfig displays the IP address, subnet mask, and default gateway for all adapters.
http://www.microsoft.com/resources/documentation/windows/xp/all/proddocs/en-us/ipconfig.mspx?mfr=true

Usage:

ipconfig
Display the computer’s IP address and default gateway, for each network adapter.

ipconfig /all
Displays full TCP/IP information, including the MAC address, DHCP server, and DNS servers, for each network adapter.

net use

Connects a computer to or disconnects a computer from a shared resource, or displays information about computer connections. The command also controls persistent net connections. Used without parameters, net use retrieves a list of network connections.
http://www.microsoft.com/resources/documentation/windows/xp/all/proddocs/en-us/net_use.mspx?mfr=true

Usage:

net use
Lists all of the computer’s connections (mapped network drives).

net use e: \\ComputerName\ShareName
Maps the E: drive to the ShareName shared resource on the ComputerName computer. To map the local E: drive to the C: drive (which is a hidden share) of a remote machine named Loomer, type: net use e: \\loomer\c$

net use e: /delete
Removes the connection currently mapped to the local E: drive.

If you are connecting to a network share that your regular account does not have rights to access, you will be prompted for a username. You will need to also supply the domain, ex: domainusername

nslookup

Displays information that you can use to diagnose Domain Name System (DNS) infrastructure.
http://www.microsoft.com/resources/documentation/windows/xp/all/proddocs/en-us/nslookup.mspx?mfr=true

Usage:

nslookup <ipaddress or computername>
Queries the local computer’s default DNS name server for information on the specified IP address or computer name. Supply either piece of information and nslookup will return both pieces. It’s also possible to specify a particular DNS name server to be queried, which is useful when troubleshooting whether DNS is propagating/replicating correctly.

ping

Verifies IP-level connectivity to another TCP/IP computer by sending Internet Control Message Protocol (ICMP) Echo Request messages. The receipt of corresponding Echo Reply messages are displayed, along with round-trip times. Ping is the primary TCP/IP command used to troubleshoot connectivity, reachability, and name resolution.

You can use ping to test both the computer name and the IP address of the computer. If pinging the IP address is successful, but pinging the computer name is not, you might have a name resolution problem.
http://www.microsoft.com/resources/documentation/windows/xp/all/proddocs/en-us/ping.mspx?mfr=true

Usage:

ping <ipaddress or computername>
Makes four attempts to contact the computer at the specified IP Address or with the specified computer name, and reports back whether the machine could be contacted and the time taken for the request to travel to the remote computer, be acknowledged, and the acknowledgement received by the local computer.

ping <ipaddress or computername> -t
Repeatedly attempts to contact the remote computer until interrupted by pressing Ctrl+Break or Ctrl+C. This is sometimes called a persistent ping.

systeminfo

Displays detailed configuration information about a computer and its operating system, including operating system configuration, security information, product ID, and hardware properties, such as RAM, disk space, and network cards.
http://www.microsoft.com/resources/documentation/windows/xp/all/proddocs/en-us/systeminfo.mspx?mfr=true

The systeminfo command also reveals installed hotfixes and some information about the computer that isn’t readily available in Device Manager or other MMC Snap-ins, such as the BIOS version.

Usage:

systeminfo
Displays information about the local computer.

systeminfo /s computername /u domainuser
Displays information about a remote computer named computername.

systeminfo /s computername | find “System Model:”
Retrieves information about a remote computer named computername, but pipes the output of systeminfo to the find command, which returns only the line containing the string “System Model:”. This output in the command window shows only “System Model:” followed by the model of the remote computer.

The systeminfo report can be sent to a text file, ex: systeminfo > systeminforeport.txt

Bonus commands

getmac

Returns the media access control (MAC) address and list of network protocols associated with each address for all network cards in each computer, either locally or across a network.
http://www.microsoft.com/resources/documentation/windows/xp/all/proddocs/en-us/getmac.mspx?mfr=true

Usage:

getmac /v
Shows MAC addresses for the local computer.

getmac /s computername /u domainusername /v
Shows MAC addresses for a remote computer named computername while authenticating as a different user.

(Need to test this.)

msg

Sends a message to a user (this may be turned off in many environments). Run msg /? for usage information.

I needed to insert a short delay between two processes, so I whipped up a little VBScript that accepts an argument in seconds and then sleeps for that amount of time. If no argument is passed, it sleeps for 3 seconds. It writes to the Application event log before it sleeps and after it wakes.

Usage: sleep.vbs 5

It could be better, sure, but I’m humble about it. It doesn’t validate that the argument is an integer, for example. But it does the trick when used correctly.

sleep.vbs

Option Explicit

'Accepts input in seconds and converts the input to microtime, then sleeps for that long

Dim WshShell
Dim strEventInfo
Dim intSeconds, intMicrotime

Set WshShell = CreateObject("WScript.Shell")

If WScript.Arguments.Count > 0 Then
	intSeconds = WScript.Arguments.Item(0)
Else
	intSeconds = 3
End If

intMicrotime = intSeconds * 1000

LogEvent "The sleep.vbs script is sleeping for " & intSeconds & " seconds."

'Sleep briefly to allow processes to finish
WScript.Sleep intMicrotime 

LogEvent "The sleep.vbs script is done sleeping."

'******************************************************
'* Subroutine: LogEvent(strEventInfo)
'*   Creates a Windows Event Log information entry with the specified text
'******************************************************
Sub LogEvent(strEventInfo)
	WshShell.LogEvent 4, strEventInfo
End Sub

The VBScript code below creates a text file in your %TEMP% directory using datestamp and timestamp data as part of the file name. The file name uses the following format: YYYYMMDD-HHMMSS.txt.

It seems like I am forever writing log files for my VBScript projects, and this is a pretty good way of giving them meaningful and generally unique file names. Extend it to suit your purposes.

Option Explicit

'#########################################################
'##  Initialize global variables and objects
'#########################################################

Dim WshShell
Dim strSafeDate, strSafeTime, strDateTime, strLogFilePath, strLogFileName

Set WshShell = CreateObject("WScript.Shell")

strLogFilePath = WshShell.ExpandEnvironmentStrings("%TEMP%")

strSafeDate = DatePart("yyyy",Date) & Right("0" & DatePart("m",Date), 2) & Right("0" & DatePart("d",Date), 2)

strSafeTime = Right("0" & Hour(Now), 2) & Right("0" & Minute(Now), 2) & Right("0" & Second(Now), 2)

'Set strDateTime equal to a string representation of the current date and time, for use as part of a valid Windows filename
strDateTime = strSafeDate & "-" & strSafeTime

'Assemble the path and filename
strLogFileName = strLogFilePath & "\" & strDateTime & ".txt"

'Create the file and write a line of text to it
CreateLog strLogFileName, strDateTime

'******************************************************
'* Subroutine: CreateLog(strLogFileName,strEventInfo)
'*   Creates text file containing a line of text
'******************************************************
Sub CreateLog(strLogFileName,strEventInfo)
	'http://msdn.microsoft.com/en-us/library/5t9b5c0c(v=vs.84).aspx
   Dim objFSO, objTextFile
   Set objFSO = CreateObject("Scripting.FileSystemObject")
   Set objTextFile = objFSO.CreateTextFile(strLogFileName, True)
   objTextFile.WriteLine(strEventInfo)
   objTextFile.Close
End Sub

Easy peasy.

Microsoft has a nifty tool called Orca.exe that lets you directly edit options within msi installer files and msp patch files.

Orca.exe is a database table editor for creating and editing Windows Installer packages and merge modules. The tool provides a graphical interface for validation, highlighting the particular entries where validation errors or warnings occur.

This tool is only available in the Windows SDK Components for Windows Installer Developers. It is provided as an Orca.msi file. After installing the Windows SDK Components for Windows Installer Developers, double click Orca.msi to install the Orca.exe file.
http://msdn.microsoft.com/en-us/library/windows/desktop/aa370557(v=vs.85).aspx

Orca.msi was originally included in the Windows Installer 4.5 SDK, which is no longer available as a stand-alone download. Orca.exe version 5.0.7693.0 and other tools for working with msi files are part of the Microsoft Windows SDK for Windows 7 and .NET Framework 4 (or for previous versions, try the older Microsoft Windows SDK for Windows 7 and .NET Framework 3.5 SP1). The package that includes Orca.msi is available as an a la carte selection from the Microsoft Windows SDK web installer. Proceed through the web installer wizard and then select only the “Debugging Tools for Windows” under “Common Utilities” for the minimum install. Orca.Msi will be saved to “C:\Program Files\Microsoft SDKs\Windows\v7.1\Bin\”.

If you prefer a massive download just to get a 2 MB executable, the entire Microsoft Windows SDK is available as a 1.4 GB ISO from Microsoft Windows SDK for Windows 7 and .NET Framework 3.5 SP1 (ISO).

Should Windows 7 be old news to you, you can try the Windows Software Development Kit (SDK) for Windows 8. (I have no idea what’s in there.)

It’s often useful to know what logical and physical drives are available to Windows, and sometimes this needs to be done from the command line.

Logical drives

Here’s a handy command to return a list of logical drives in Windows.

wmic logicaldisk get caption,description,drivetype,providername,volumename

The Win32_LogicalDisk WMI class represents a data source that resolves to an actual local storage device on a computer system running Windows. While Caption, Description, DriveType, ProviderName, and VolumeName are useful in most cases, more properties are available, and a complete list is available at http://msdn.microsoft.com/en-us/library/windows/desktop/aa394173(v=vs.85).aspx. The output will be formatted as a table, the properties will be the column headings, and they will be placed into alphabetical order.

Caption is the drive letter of the logical disk. The Name property also returns the drive letter.

Description is the type of disk. For example: Local Fixed Disk, CD-ROM Disc, or Removable Disk.

DriveType is returned as an integer that corresponds to the type of disk drive the logical disk represents (and this matches the Description, making DriveType sort of superfluous).

0 = Unknown
1 = No Root Directory
2 = Removable Disk
3 = Local Disk
4 = Network Drive
5 = Compact Disc
6 = RAM Disk

ProviderName is the network path to the logical device.

VolumeName is the volume name of the logical disk.

Physical drives

And here is a command to return a list of physical drives.

wmic diskdrive list brief /format:list

The Win32_DiskDrive WMI class represents a physical disk drive as seen by a computer running Windows. Like the Win32_LogicalDisk WMI class, it has lots of properties, as listed at http://msdn.microsoft.com/en-us/library/windows/desktop/aa394132(v=vs.85).aspx.

For simplicity, though, and ease of reading in command window, wmic diskdrive list brief /format:list does the trick, particularly in combination with wmic logicaldisk.