Tag Archives: XAMPP

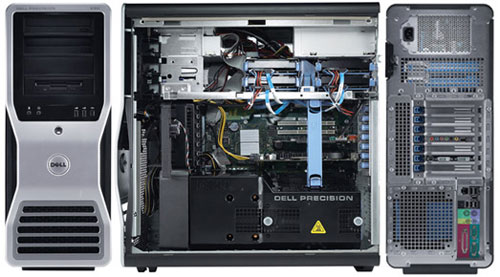
I just picked up an old Dell Precision 690 workstation, which I intend to develop into a file server, a Windows IIS server, and an Ubuntu LAMP server. This monster was built in 2006, but it still has some neat specs and tons of capacity (7 PCI slots, 4 hard drive bays, etc…), should I want to expand further.

Dell Precision 690

Dell Precision 690 Workstation

The main specs

CPU: Dual Core Intel Xeon 5060 3.2GHz, 4M Cache, 1066 MHz FSB
RAM: 2GB DDR2 PC2-5300, CL=5, Fully Buffered, ECC, DDR2-667
HD: SAS Fujitsu MAX3073RC 73GB, 15000 RPM, 16MB Cache
Video: Nvidia Quadro NVS 285 PCI-Express, 128MB

This is not a normal tower

Right away, the size of this thing suggests it isn’t a normal tower. It’s about up to my knee and weights 70 lbs. It feels like it’s made with heavier gauge steel than the typical chassis, but that may be me projecting.

I immediately shopped around for more RAM, obviously. 2GB seems a little thin, even by 2006 standards, when considering the way everything else is high-end. The mainboard has 8 slots and supports up to 32GB, but I figure 6GB is a safe place to start.

The workstation has three enormous fans, like, big-as-your-hand big. Running it with the chassis open causes some sort of thermal protection system to kick in and it spins the fans up to the point that they were blowing stuff on the floor half-way across the room.

The CPU has a big, passive heat sink with six copper pipes and sits between two of those fans. I’m tempted to buy a second CPU, but I’ll hold off.

I’m still on the fence about the SCSI drive. It should be super fast, but I’m a little spoiled by the SSD in my machine at work, so it’s hard to get excited about a mechanical drive, even one running at 15k RPM.

The Nvidia Quadro card is also fanless, and has a bizarre DMS-59 connector. An adapter converts the DMS-59 connector into two DVI outputs.
I’m running XAMPP 1.7.4 [PHP: 5.3.5] (not as a service) on 64-bit Windows 7 Professional.

I installed XAMPP to E:\xampp, and I have pinned the XAMPP Control Panel (xampp-control.exe) to the taskbar for easier access, but starting up xampp-control.exe from that shortcut throws an error:

XAMPP Control

XAMPP Component Status Check failure [3].

Current directory: E:\xampp

Run this program only from your XAMPP root directory.

[OK] [Cancel]

Strangely enough, I even get this error even when running xampp-control.exe from my XAMPP root directory, which really is E:\xampp.

The last post in the thread at http://www.apachefriends.org/f/viewtopic.php?f=16&t=44320&sid=a41029c6a36bbf5b3bb5817f37842340&start=60 offers a simple solution: change the Install_Dir value under HKEY_LOCAL_MACHINE to point to C:\xampp. According to the thread, the error message is due to a bug where the Install_Dir is checked against a hard-coded path on C:\. That may or may not be the case, but the suggested work-around seems to be effective.

Here’s a registry merge for Windows 7 64-bit that will make the change for you.

Windows Registry Editor Version 5.00

[HKEY_LOCAL_MACHINE\SOFTWARE\Wow6432Node\xampp]
"Install_Dir"="C:\\xampp"

Now xampp-control.exe launches without the error, and I haven’t noticed anything (PHP, MySQL, etc.) not working because of the bogus path.

Updated for XAMPP version 1.6.5

Some time ago, I decided to start phasing out static xhtml in favor of pages using PHP includes. To test these new pages, I used apachefriends.org’s wonderful XAMPP (which I really can’t recommend highly enough) to install Apache, MySQL, and PHP (among other things). Once I had my local server running, I put each dev site into its own folder in \htdocs\ and navigated to them by http://127.0.0.1/foldername/.

This setup was functional but far from ideal, as the index pages for these local sites weren’t in what could be considered a root directory, which lead to some tip-toeing around when creating links.

Then I discovered the NameVirtualHost feature in Apache. NameVirtualHost allows the server admin to set up multiple domains/hostnames on a single Apache installation by using VirtualHost containers. In other words, you can run more than one web site on a single machine. This means that each dev site (or domain) can then consider itself to have a root directory. You will be able to access each local site as a subdomain of “localhost” by making a change to the HOSTS file. For example, I access the local dev version of this site at http://ardamis.localhost/.

This works great for all sorts of applications that rely on the site having a discernible root directory, such as WordPress.

Unfortunately, setting up NameVirtualHost can be kind of tricky. If you are having problems configuring your Apache installation to use the NameVirtualHost feature, you’re in good company. Here’s how I managed to get it working:

For XAMPP version 1.6.5

  1. Create a folder in drive:\xampp\htdocs\ for each dev site (adjust for your directory structure). For example, if I’m creating a development site for ardamis.com on my d: drive, I’d create a folder at:
    d:\xampp\htdocs\ardamis\
  2. Edit your HOSTS file (in Windows XP, the HOSTS file is located in C:\WINDOWS\system32\drivers\etc\) to add the following line, where sitename is the name of the folder you created in step 1. Don’t change or delete the existing “127.0.0.1 localhost” line.
    127.0.0.1 sitename.localhost
    

    Add a new line for each dev site folder you create.

    Continuing with the example, I’ve added the line:
    127.0.0.1 ardamis.localhost

  3. Open your drive:\xampp\apache\conf\extra\httpd-vhosts.conf file and add the following lines to the end of the file, using the appropriate letter in place of drive. Do this step only once. We’ll add code for each dev site’s folder in the next step. (Yes, keep the asterisk.)
    NameVirtualHost *:80
    <VirtualHost *:80>
        DocumentRoot "drive:/xampp/htdocs"
    ServerName localhost
    </VirtualHost>
    

    My DocumentRoot line would be:
    DocumentRoot "d:/xampp/htdocs"

  4. Immediately after that, add the following lines, changing sitename to the name of the new dev site’s folder, again using the appropriate letter in place of drive. Repeat this step for every folder you’ve created.
    <VirtualHost *:80>
        DocumentRoot "drive:/xampp/htdocs/sitename"
        ServerName sitename.localhost
    </VirtualHost>
    

    My DocumentRoot line would be:
    DocumentRoot "d:/xampp/htdocs/ardamis"
    My ServerName line would be:
    ServerName ardamis.localhost

  5. Reboot your computer to be sure it’s using the new HOSTS file (you’ll have to at least restart Apache). You should now be able to access each dev domain by way of:
    http://sitename.localhost/

For XAMPP version 1.4

If you are using an older version of XAMPP (like XAMPP version 1.4) without the httpd-vhosts.conf file, use the instructions below.

  1. Create a folder in your drive:\apachefriends\xampp\htdocs\ for each local version of your site. For example, if I’m creating a development site for ardamis.com on my f: drive, I’d create a folder at:
    f:\apachefriends\xampp\htdocs\ardamis\
  2. Open your HOSTS file (in Windows XP, the HOSTS file is located in C:\WINDOWS\system32\drivers\etc\) and add the following line, where sitename is the name of the folder you created in step 1. Repeat this step, as necessary, for each folder you create. Don’t change or delete the existing “127.0.0.1 localhost” line.
    127.0.0.1 sitename.localhost
    

    Continuing with the example, I’ve added the line:
    127.0.0.1 ardamis.localhost

  3. Open your drive:\apachefriends\xampp\apache\conf\httpd.conf file and add the following lines to the end of the file, using the appropriate letter for drive. Do this step only once. We’ll add code for each dev site’s folder in the next step. (Yes, keep the asterisk.)
    NameVirtualHost *:80
    <VirtualHost *:80>
        DocumentRoot "drive:/apachefriends/xampp/htdocs"
    ServerName localhost
    </VirtualHost>
    

    My DocumentRoot line would be:
    DocumentRoot "f:/apachefriends/xampp/htdocs"

  4. Immediately after that, add the following lines, changing sitename to the name of the new folder, using the appropriate letter for drive and repeating this step for every folder you’ve created.
    <VirtualHost *:80>
        DocumentRoot "drive:/apachefriends/xampp/htdocs/sitename"
        ServerName sitename.localhost
    </VirtualHost>
    

    My DocumentRoot line would be:
    DocumentRoot "f:/apachefriends/xampp/htdocs/ardamis"

  5. Reboot and restart Apache. Open a browser; you should now be able to access each folder by way of:
    http://sitename.localhost

I’m assuming that you could change the DocumentRoot line to point to any folder on any drive. I’ll experiment with pointing this at a folder on another drive later.

The official Apache.org documentation for VirtualHost is at http://httpd.apache.org/docs/2.2/vhosts/. You may want to read that for further details before you try to set up virtual hosts.

If you have any questions about the above instructions, the Apache NameVirtualHost function, XAMPP, or anything in between, post a comment, but I can’t promise that I’ll be able to help. I’m learning as I go along, too.