Tag Archives: Apache

Techcrunch just posted a story about BuiltWith – a startup that reports on the technology behind the web site. I’ve written before about ways to ID the server, the scripting language, and the CMS technology behind a site, but BuiltWith goes further and provides analysis of that data.

The BuiltWith report for ardamis.com knows that the site is running WordPress (no surprise there) on an Apache server, with the WP Super Cache plugin and Google Analytics and Google Plus One.

For each item it recognizes that a site is using, WordPress as the CMS, for example, it provides statistical data on the number of sites on the web also using that technology, along with trend information showing whether its use is increasing or decreasing. It’s really pretty sad to see that Apache use continues to steadily trend down, even while it continues to account for the majority of web servers. HTML5 as a Doctype is on the rise, though, along with the use of microdata.

BuiltWith can also tell what other sites are using that technology, but this information is a paid service, and an expensive one, too.

I just picked up an old Dell Precision 690 workstation, which I intend to develop into a file server, a Windows IIS server, and an Ubuntu LAMP server. This monster was built in 2006, but it still has some neat specs and tons of capacity (7 PCI slots, 4 hard drive bays, etc…), should I want to expand further.

Dell Precision 690

Dell Precision 690 Workstation

The main specs

CPU: Dual Core Intel Xeon 5060 3.2GHz, 4M Cache, 1066 MHz FSB
RAM: 2GB DDR2 PC2-5300, CL=5, Fully Buffered, ECC, DDR2-667
HD: SAS Fujitsu MAX3073RC 73GB, 15000 RPM, 16MB Cache
Video: Nvidia Quadro NVS 285 PCI-Express, 128MB

This is not a normal tower

Right away, the size of this thing suggests it isn’t a normal tower. It’s about up to my knee and weights 70 lbs. It feels like it’s made with heavier gauge steel than the typical chassis, but that may be me projecting.

I immediately shopped around for more RAM, obviously. 2GB seems a little thin, even by 2006 standards, when considering the way everything else is high-end. The mainboard has 8 slots and supports up to 32GB, but I figure 6GB is a safe place to start.

The workstation has three enormous fans, like, big-as-your-hand big. Running it with the chassis open causes some sort of thermal protection system to kick in and it spins the fans up to the point that they were blowing stuff on the floor half-way across the room.

The CPU has a big, passive heat sink with six copper pipes and sits between two of those fans. I’m tempted to buy a second CPU, but I’ll hold off.

I’m still on the fence about the SCSI drive. It should be super fast, but I’m a little spoiled by the SSD in my machine at work, so it’s hard to get excited about a mechanical drive, even one running at 15k RPM.

The Nvidia Quadro card is also fanless, and has a bizarre DMS-59 connector. An adapter converts the DMS-59 connector into two DVI outputs.

So I finally watched The Social Network over the weekend, and it’s made me feel jealous and a bit guilty.

In a meager effort to console myself for so far failing to be a billionaire, I’m assembling the short list of web-application type things I’ve built here.

  1. A dice roller: rollforit. Enter a name, create a room, invite your friends, and start rolling dice. For people who want to play pen and paper, table-top RPG dice games with their distant friends.
  2. A URL shortener: Minifi.de. Minifi.de comes with an API and a bookmarklet. It really works, too! The technical explanation has more details.
  3. A social networking site: Snapbase. Snapbase is a social site that shows you what’s going on in your city or anywhere in the world as pictures are uploaded by your friends and neighbors. The application extracts location information from the EXIF data embedded in images and displays recent images taken near your present location.
  4. A trouble-ticketing system for an IT help desk or technical support center. It’s really pretty extensive, with asset management, user accounts, salted encrypted passwords, and all sorts of nifty things. I really must write a full description of it at some point, but until then, the documentation is the next best thing.
  5. An account-based invoice tracking and access system for grouping invoices according to clients, then sharing invoice history with those clients and allowing them to easily pay outstanding invoices via Paypal.
  6. An account-based invoice access system where clients can view paid and unpaid invoices, and even easily pay an outstanding invoice via Paypal. I actually use this almost every day.
  7. A simple method for protecting a download using a unique URL that can be emailed to authorized users. The URL can be set to expire after a certain amount of time or any number of downloads.
  8. An update to the above download protection script to protect multiple downloads, generate batches of keys, leave notes about who received the key, the ability to specify per-key the allowable number of downloads and age, and some basic reporting.
  9. An HTML auction template generator called Simple Auction Wizard. It helps you create HTML auction templates for eBay, and uses SWFUpload and tinyMCE.

I have another project in the works that promises to be more financially viable, but the most clever thing on that list is Snapbase. It’s in something akin to alpha right now; barely usable. I really wish I had the time to pursue it.

While making changes to my WordPress theme, I noticed that the error_log file in my theme folder contained dozens of PHP Fatal error lines:

...
[01-Jun-2011 14:25:15] PHP Fatal error:  Call to undefined function  get_header() in /home/accountname/public_html/ardamis.com/wp-content/themes/ars/index.php on line 7
[01-Jun-2011 20:58:23] PHP Fatal error:  Call to undefined function  get_header() in /home/accountname/public_html/ardamis.com/wp-content/themes/ars/index.php on line 7
...

The first seven lines of my theme’s index.php file:

<?php ini_set('display_errors', 0); ?>
<?php
/**
 * @package WordPress
 * @subpackage Ars_Theme
*/
get_header(); ?>

I realized that the error was being generated each time that my theme’s index.php file was called directly, and that the error was caused by the theme’s inability to locate the WordPress get_header function (which is completely normal). Thankfully, the descriptive error wasn’t being output to the browser, but was only being logged to the error_log file, due to the inclusion of the ini_set(‘display_errors’, 0); line. I had learned this the hard way a few months ago when I found that calling the theme’s index.php file directly would generate an error message, output to the browser, that would reveal my hosting account username as part of the absolute path to the file throwing the error.

I decided the best way to handle this would be to check to see if the file could find the get_header function, and if it could not, simply redirect the visitor to the site’s home page. The code I used to do this:

<?php ini_set('display_errors', 0); ?>
<?php
/**
* @package WordPress
* @subpackage Ars_Theme
*/
if (function_exists('get_header')) {
	get_header();
}else{
    /* Redirect browser */
    header("Location: http://" . $_SERVER['HTTP_HOST'] . "");
    /* Make sure that code below does not get executed when we redirect. */
    exit;
}; ?>

So there you have it. No more fatal errors due to get_header when loading the WordPress theme’s index.php file directly. And if something else in the file should throw an error, ini_set(‘display_errors’, 0); means it still won’t be sent to the browser.

Just a few notes to myself about monitoring web sites for infections/malware and potential vulnerabilities.

Tools for detecting infections on web sites

Google Webmaster Tools

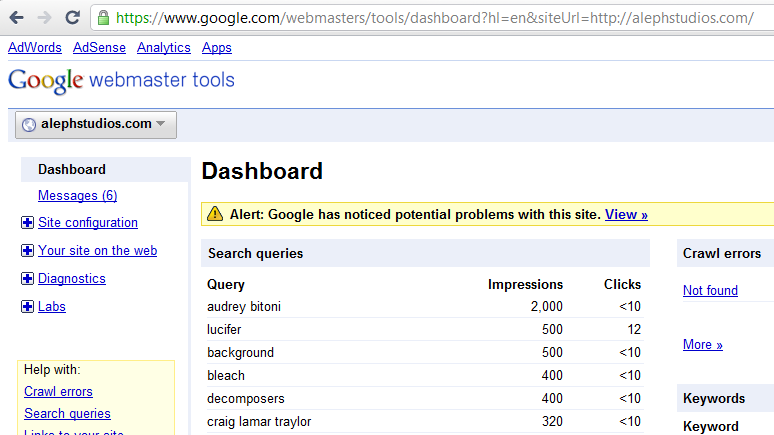
Your first stop should be here, as I’ve personally witnessed alerts show up in Webmaster Tools, even when all the following tools gave the site a passing grade. If your site is registered here, and Google finds weird pages on your site, an alert will appear. You can also have the messages forwarded to your email account on file, by choosing the Forward option under the All Messages area of the Home page.

Google Webmaster Tools Hack Alert

Google Safe Browsing

The Google Safe Browsing report for ardamis.com: http://safebrowsing.clients.google.com/safebrowsing/diagnostic?site=ardamis.com

Norton Safe Web

https://safeweb.norton.com/

The Norton Safe Web report for ardamis.com: https://safeweb.norton.com/report/show?url=ardamis.com

Tools for analyzing a site for vulnerabilities

Sucuri Site Check

http://sitecheck.sucuri.net/scanner/

The Sucuri report for ardamis.com: http://sitecheck.sucuri.net/scanner/?scan=www.ardamis.com.

Attempting to run the W3C Link Checker against //ardamis.com/ returns an error message.

Error: 406 Not Acceptable

This is what the W3C says about the 406 HTTP status header:

406 Not Acceptable
The resource identified by the request is only capable of generating response entities which have content characteristics not acceptable according to the accept headers sent in the request.

http://www.w3.org/Protocols/rfc2616/rfc2616-sec10.html

In other words, the W3C Link Checker requests the web page, and tells the web server that, by the way, it can only accept a responses in a certain format. The web server then regrets to inform the requestor that it cannot fulfill this request, because it cannot return a response that would be acceptable to the requestor. It does this in the form of a 406 Not Acceptable HTTP header. The W3C Link Checker then outputs this error.

Other W3C apps, like Unicorn – W3C’s Unified Validator and the W3C HTML Validator don’t seem to be sending the same HTTP headers. (But I did note that there were a few small issues preventing the home page from passing the test, which I then fixed.)

Ardamis runs on WordPress, with a custom theme originally developed years ago from the Kubrick theme and a handful of plugins (as more completely described at the colophon page). I tinker with the site, from time to time, trying to speed it up or what-have-you. But no amount of tinkering seemed to resolve this problem. Over the course of a few months, I’d try various changes to the site to see if there was something I could do to fix this problem. I had pretty much convinced myself that it was going to be an issue for my web host when, miraculously, after making some changes to the .htaccess file, my theme and disabling one of the plugins (which I can’t see how would possibly affect the HTTP headers) the Link Checker began working.

In the results page for www.ardamis.com, it lists some of the headers used:

Settings used:

  • Accept: text/html, application/xhtml+xml;q=0.9, application/vnd.wap.xhtml+xml;q=0.6, */*;q=0.5
  • Accept-Language: en-US,en;q=0.8
  • Referer: sending
  • Sleeping 1 second between requests to each server

I’m not sure what I did to make this work, or even if it was something I did. But further troubleshooting would have involved disabling all plugins, trying a different theme, and then ruling out WordPress entirely.

In August, 2010, I described a simple method for dramatically reducing the number of spam comments that are submitted to a WordPress blog. The spam comments are rejected before they are checked by Akismet, so they never make it into the database at all.

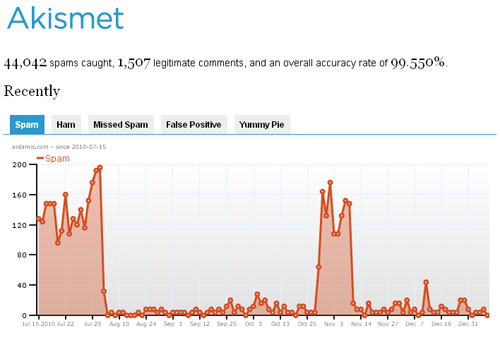
Now, a few months later, I’m posting a screenshot of the Akismet stats graph from the WordPress dashboard showing the number of spam comments identified by Akismet before and after the system was implemented.

Akismet stats for August - December, 2010

The spike in spam comments detected around November 3rd occurred after an update to WordPress overwrote my altered wp-comments.php file. I replaced the file and the spam dropped back down to single digits per day.

I’ve written a few posts on how to speed up web sites by sending the correct headers to leverage browser caching and compressing .php, .css and .js files without mod_gzip or mod_deflate.

The intended audience for this post is developers who have already applied most or all of Google’s Web Performance Best Practices and Yahoo’s Best Practices for Speeding Up Your Web Site and are wondering how to speed up WordPress sites in particular.

I assume you’re familiar with WordPress caching and are already using a caching plugin, such as WP Super Cache, W3 Total Cache or the like.

Reduce HTTP requests

Reducing HTTP requests should be the very first thing step in speeding up any site. If you are using plugins, watch them carefully for inefficiencies like added CSS and JavaScript files. Combine, minify and compress these files. Some plugins allow you to turn off their bundled CSS in the plugin’s settings page. Where possible, copy the plugin’s CSS into the current theme’s style.css and turn off the extra file.

Delete deactivated plugins

Remove any plugins you’re not using. Deactivated plugins can be deleted from the Plugins page.

Speed up the mod_rewrite code

jdMorgan from WebmasterWorld.com has written a replacement for the .htaccess rewrite rule used by WordPress. This will speed up the WordPress mod_rewrite code by a factor of more than two.

This is a total replacement for the code supplied with WP as bounded by the “Begin WP” and “End WP” comments, and fixes several performance-affecting problems. Notably, the unnecessary and potentially-problematic container is completely removed, and code is added and re-structured to both prevent completely-unnecessary file- and directory- exists checks and to reduce the number of necessary -exists checks to one-half the original count (due to the way mod_rewrite behaves recursively in .htaccess context).

http://www.webmasterworld.com/apache/4053973.htm

The following code is adapted from the original to add png, flv and swf to the list of static file formats:

# BEGIN WordPress
# adapted from http://www.webmasterworld.com/apache/4053973.htm
#
RewriteEngine on
#
# Unless you have set a different RewriteBase preceding this point,
# you may delete or comment-out the following RewriteBase directive
# RewriteBase /
#
# if this request is for "/" or has already been rewritten to WP
RewriteCond $1 ^(index\.php)?$ [OR]
# or if request is for image, css, or js file
RewriteCond $1 \.(gif|jpg|png|ico|css|js|flv|swf)$ [NC,OR]
# or if URL resolves to existing file
RewriteCond %{REQUEST_FILENAME} -f [OR]
# or if URL resolves to existing directory
RewriteCond %{REQUEST_FILENAME} -d
# then skip the rewrite to WP
RewriteRule ^(.*)$ - [S=1]
# else rewrite the request to WP
RewriteRule . /index.php [L]
#
# END wordpress 

Only load the comment-reply.js when needed

In the default WordPress template, the comment-reply.js script is included on all single post pages, regardless of whether nested/threaded comments is enabled. A simple tweak changes the theme to only include comment-reply.js on single post pages only when it makes sense to do so: if threaded comments are enabled, commenting on that post is allowed, and a comment already exists.

Remove the following line from your theme’s header.php:

<?php if ( is_singular() ) wp_enqueue_script( 'comment-reply' ); ?>

Add the following lines to your theme’s functions.php.

// Don't add the wp-includes/js/comment-reply.js?ver=20090102 script to single post pages unless threaded comments are enabled
// adapted from http://bigredtin.com/behind-the-websites/including-wordpress-comment-reply-js/
function theme_queue_js(){
  if (!is_admin()){
    if (is_singular() && (get_option('thread_comments') == 1) && comments_open() && have_comments())
      wp_enqueue_script('comment-reply');
  }
}
add_action('wp_print_scripts', 'theme_queue_js');

Only load the l10n.js when needed

In WordPress 3.1, a l10n.js script is loaded. It is “mostly used for scripts that send over localization data from PHP to the JS side using wp_localize_script().” Whether it’s safe to remove this file seems to be a matter of debate, but should you decide you want to remove it…

Add the following lines to your theme’s functions.php.

// Don't add the wp-includes/js/l10n.js?ver=20101110 script to non-admin pages
// adapted from http://wordpress.stackexchange.com/questions/5451/what-does-l10n-js-do-in-wordpress-3-1-and-how-do-i-remove-it
function remove_l10n_js(){
  if (!is_admin()){
    wp_deregister_script('l10n');
  }
}
add_action('wp_print_scripts', 'remove_l10n_js');

Replace unecessary code executions and database queries

WordPress saves settings specific to your blog in the database. These settings include what language your blog is written in, whether text is read left-to-right or vice versa, the path to the template directory, etc.

The default WordPress theme contains a number of database queries in order to figure out these things and build the correct page. The default theme needs this flexibility, but your theme does not. Joost de Valk recommends replacing these database queries with static text in your theme files in his post Speed up WordPress, and clean it up too!

An easy way to do this is to browse to your web site and then view the source code. Copy the content that won’t change from page to page and paste it into your theme, overwriting the PHP with the generated HTML.

For example, my theme’s header.php file contains this line:

<html xmlns="http://www.w3.org/1999/xhtml" <?php language_attributes(); ?>>

The source code of the rendered page displays this line:

<html xmlns="http://www.w3.org/1999/xhtml" dir="ltr" lang="en-US">

On my blog, this HTML output is never going to be anything different, so why make WordPress look these settings up in the database each time a page is loaded? This line is an excellent candidate for replacement. The footer.php file contains a handful more opportunities for replacement, but go through each of your theme’s files and look for references to the template directory and other data that won’t change as long as you’re using the theme. All told, I was able to replace 12 database queries with static HTML.

Joost also recommends checking for unnecessary or slow database queries, and installing a helpful debugging plugin, in his post on Optimizing WordPress database performance.

Clean out your MySQL database

Delete spam comments

From the Dashboard, click Comments, then click on Empty Spam.

Delete post revisions

If you don’t use post revisions, you may want to delete them from the wp_posts table. Back up your database, then run the following SQL query:

DELETE FROM wp_posts WHERE post_type = "revision";

Before: 683 records
After: 165 records

This does not delete the latest draft of unpublished posts. It’s a good idea to optimize the table after deleting the revisions.

You can stop WordPress from saving post revisions by adding the following code to wp-config.php:

define('WP_POST_REVISIONS', false );

Optimize your MySQL database

Optimizing your MyISAM tables is comparable to defragmenting your hard drive. It’s probably been a while since you’ve done that, too.

If you’re using phpMyAdmin, browse to your WordPress database. Under the Structure tab, at the bottom of the list of tables, click on the link “Check all”. In the “With selected” menu, choose “Optimize table”. (I would have recommended just optimizing tables that have overhead, but the wp_posts table can be optimized even when it doesn’t show any overhead.

For MyISAM tables, OPTIMIZE TABLE works as follows:

  • If the table has deleted or split rows, repair the table.
  • If the index pages are not sorted, sort them.
  • If the table’s statistics are not up to date (and the repair could not be accomplished by sorting the index), update them.

http://dev.mysql.com/doc/refman/5.1/en/optimize-table.html

Flush the Buffer Early

When users request a page, it can take anywhere from 200 to 500ms for the backend server to stitch together the HTML page. During this time, the browser is idle as it waits for the data to arrive. In PHP you have the function flush(). It allows you to send your partially ready HTML response to the browser so that the browser can start fetching components while your backend is busy with the rest of the HTML page. The benefit is mainly seen on busy backends or light frontends.

http://developer.yahoo.com/performance/rules.html#flush

Add flush() between the closing tag and the opening tag in header.php.

</head>
<?php flush(); // http://developer.yahoo.com/performance/rules.html#flush ?>
<body>

OK, so this isn’t technically a WordPress-specific tweak, but it’s a good idea.

As a follow-up to my post on compressing .php, .css and .js files without mod_gzip or mod_deflate, I’m documenting the changes I made to the .htaccess file on ardamis.com in order to speed up page load times for returning visitors and satisfy the Leverage browser caching recommendation of Google’s Page Speed Firefox/Firebug Add-on.

A great explanation of why browser caching helps the web deliver a better user experience is at betterexplained.com.

Two authoritative articles on the subject are Google’s Performance Best Practices | Optimize caching and Yahoo’s Best Practices for Speeding Up Your Web Site | Add an Expires or a Cache-Control Header.

I’d like to point out that in researching browser cashing, I came across a lot of information that contradicted the rather clear instructions from Google:

It is important to specify one of Expires or Cache-Control max-age, and one of Last-Modified or ETag, for all cacheable resources. It is redundant to specify both Expires and Cache-Control: max-age, or to specify both Last-Modified and ETag.

I’m not sure that this recommendation is entirely correct, as the W3C states that Expires and Cache-Control max-age are used in different situations, with Cache-Control max-age overriding Expires in the event of conflicts.

If a response includes both an Expires header and a max-age directive, the max-age directive overrides the Expires header, even if the Expires header is more restrictive. This rule allows an origin server to provide, for a given response, a longer expiration time to an HTTP/1.1 (or later) cache than to an HTTP/1.0 cache.

http://www.w3.org/Protocols/rfc2616/rfc2616-sec14.html

It would seem that Cache-Control is the preferred method of controlling browser caching going forward.

HTTP 1.1 clients will honour “Cache-Control” (which is easier to use and much more flexible).
HTTP 1.0 clients will ignore “Cache-Control” but honour “Expires”. With “Expires” you get thus at least a bit control for these old clients.

http://www.peterbe.com/plog/cache-control_or_expires

In any event, Page Speed won’t protest if you do end up sending both Expires and Cache-Control max-age, or if you remove both Last-Modified and ETag, but I was able to get the best results with just setting Cache-Control max-age and removing the ETag.

Setting the headers in .htaccess

On Apache, configuring the proper headers can be done in the .htaccess file, using the Header directive. The Header directive requires the mod_headers module to be enabled.

I’m choosing to set a far future Expires header of one year on my images files, because I tweak the CSS and JavaScript pretty often, and don’t want those file types to be cached as long.

Add the following code to your .htaccess file to set your Cache-Control and Expires headers, adjusting the date to be one year from today.

# Set Cache-Control and Expires headers
<filesMatch "\\.(ico|pdf|flv|jpg|jpeg|png|gif|swf|mp3|mp4)$">
Header set Cache-Control "max-age=2592000, private"
Header set Expires "Sun, 17 July 2011 20:00:00 GMT"
</filesMatch>
<filesMatch "\\.(css|css.gz)$">
Header set Cache-Control "max-age=604800, private"
</filesMatch>
<filesMatch "\\.(js|js.gz)$">
Header set Cache-Control "max-age=604800, private"
</filesMatch>
<filesMatch "\\.(xml|txt)$">
Header set Cache-Control "max-age=216000, private, must-revalidate"
</filesMatch>
<filesMatch "\\.(html|htm)$">
Header set Cache-Control "max-age=7200, private, must-revalidate"
</filesMatch>

Removing ETags in .htaccess

Most sources recommend simply removing ETags if they are not required.

Entity tags (ETags) are a mechanism that web servers and browsers use to determine whether the component in the browser’s cache matches the one on the origin server.

If you’re not taking advantage of the flexible validation model that ETags provide, it’s better to just remove the ETag altogether.

http://developer.yahoo.com/performance/rules.html#etags

Add the following code to your .htaccess file to remove ETag headers.

# Turn off ETags
FileETag None
Header unset ETag

Set Expires headers with ExpiresByType (optional)

If your host has the mod_expires module enabled, you can specify Expires headers by file type. Godaddy does not have this module enabled.

# Set Expires headers
ExpiresActive On
ExpiresDefault "access plus 1 year"
ExpiresByType text/html "access plus 1 second"
ExpiresByType image/gif "access plus 2592000 seconds"
ExpiresByType image/jpeg "access plus 2592000 seconds"
ExpiresByType image/png "access plus 2592000 seconds"
ExpiresByType image/x-icon "access plus 2592000 seconds"
ExpiresByType text/css "access plus 604800 seconds"
ExpiresByType text/javascript "access plus 604800 seconds"
ExpiresByType application/x-javascript "access plus 604800 seconds"

Removing the Last-Modified header in .htaccess (optional)

I’m following Google’s instructions and not removing the Last-Modified header, but if you wanted to do so, you could use:

# Remove Last-Modified header
Header unset Last-Modified

Busting the cache when files change

What happens when you change files and need to force browsers to load the new files? Christian Johansen offers two methods in his post on Using a far future expires header.

File compression is possible on Apache web hosts that do not have mod_gzip or mod_deflate enabled, and it’s easier than you might think.

A great explanation of why compression helps the web deliver a better user experience is at betterexplained.com.

Two authoritative articles on the subject are Google’s Performance Best Practices documentation | Enable compression and Yahoo’s Best Practices for Speeding Up Your Web Site | Gzip Components.

Compressing PHP files

If your Apache server does not have mod_gzip or mod_deflate enabled (Godaddy and JustHost shared hosting, for example), you can use PHP to compress pages on-the-fly. This is still preferable to sending uncompressed files to the browser, so don’t worry about the additional work the server has to do to compress the files at each request.

Option 1: PHP.INI using zlib.output_compression

The zlib extension can be used to transparently compress PHP pages on-the-fly if the browser sends an “Accept-Encoding: gzip” or “deflate” header. Compression with zlib.output_compression seems to be disabled on most hosts by default, but can be enabled with a custom php.ini file:

[PHP]

zlib.output_compression = On

Credit: http://php.net/manual/en/zlib.configuration.php

Check with your host for instructions on how to implement this, and whether you need a php.ini file in each directory.

Option 2: PHP using ob_gzhandler

If your host does not allow custom php.ini files, you can add the following line of code to the top of your PHP pages, above the DOCTYPE declaration or first line of output:

<?php if (substr_count($_SERVER['HTTP_ACCEPT_ENCODING'], 'gzip')) ob_start("ob_gzhandler"); else ob_start(); ?>

Credit: GoDaddy.com

For WordPress sites, this code would be added to the top of the theme’s header.php file.

According to php.net, using zlib.output_compression is preferred over ob_gzhandler().

For WordPress or other CMS sites, an advantage of zlib.output_compression over the ob_gzhandler method is that all of the .php pages served will be compressed, not just those that contain the global include (eg.: header.php, etc.).

Running both ob_gzhandler and zlib.output_compression at the same time will throw a warning, similar to:

Warning: ob_start() [ref.outcontrol]: output handler ‘ob_gzhandler’ conflicts with ‘zlib output compression’ in /home/path/public_html/ardamis.com/wp-content/themes/mytheme/header.php on line 7

Compressing CSS and JavaScript files

Because the on-the-fly methods above only work for PHP pages, you’ll need something else to compress CSS and JavaScript files. Furthermore, these files typically don’t change, so there isn’t a need to compress them at each request. A better method is to serve pre-compressed versions of these files. I’ll describe a few different ways to do this, but in both cases, you’ll need to add some lines to your .htaccess file to send user agents the gzipped versions if they support the encoding. This requires that Apache’s mod_rewrite be enabled (and I think it’s almost universally enabled).

Option 1: Compress locally and upload

CSS and JavaScript files can be gzipped on the workstation, then uploaded along with the uncompressed files. Use a utility like 7-Zip (quite possibly the best compression software around, and it’s free) to compress the CSS and JavaScript files using the gzip format (with extension *.gz), then upload them to your server.

For Windows users, here is a handy command to compress all the .css and .js files in the current directory and all sub directories (adjust the path to the 7-Zip executable, 7z.exe, as necessary):

for /R %i in (*.css *.js) do "C:\Program Files (x86)\7-Zip\7z.exe" a -tgzip "%i.gz" "%i" -mx9

Note that the above command is to be run from the command line. The batch file equivalent would be:

for /R %%i in (*.css *.js) do "C:\Program Files (x86)\7-Zip\7z.exe" a -tgzip "%%i.gz" "%%i" -mx9

Option 2: Compress on the server

If you have shell access, you can run a command to create a gzip copy of each CSS and JavaScript file on your site (or, if you are developing on Linux, you can run it locally):

find . -regex ".*\(css\|js\)$" -exec bash -c 'echo Compressing "{}" && gzip -c --best "{}" > "{}.gz"' \;

This may be a bit too technical for many people, but is also much more convenient. It is particularly useful when you need to compress a large number of files (as in the case of a WordPress installation with multiple plugins). Remember to run it every time you automatically update WordPress, your theme, or any plugins, so as to replace the gzip’d versions of any updated CSS and JavaScript files.

The .htaccess (for both options)

Add the following lines to your .htaccess file to identify the user agents that can accept the gzip encoded versions of these files.

<files *.js.gz>
  AddType "text/javascript" .gz
  AddEncoding gzip .gz
</files>
<files *.css.gz>
  AddType "text/css" .gz
  AddEncoding gzip .gz
</files>
RewriteEngine on
#Check to see if browser can accept gzip files.
ReWriteCond %{HTTP:accept-encoding} gzip
RewriteCond %{HTTP_USER_AGENT} !Safari
#make sure there's no trailing .gz on the url
ReWriteCond %{REQUEST_FILENAME} !^.+\.gz$
#check to see if a .gz version of the file exists.
RewriteCond %{REQUEST_FILENAME}.gz -f
#All conditions met so add .gz to URL filename (invisibly)
RewriteRule ^(.+) $1.gz [QSA,L]

Credit: opensourcetutor.com

I’m not sure it’s still necessary to exclude Safari.

For added benefit, minify the CSS and JavaScript files before gzipping them. Google’s excellent Page Speed Firefox/Firebug Add-on makes this very easy. Yahoo’s YUI Compressor is also quite good.

Verify that your content is being compressed

Use the nifty Web Page Content Compression Verification tool at http://www.whatsmyip.org/http_compression/ to confirm that your server is sending the compressed files.

Speed up page load times for returning visitors

Compression is only part of the story. In order to further speed page load times for your returning visitors, you will want to send the correct headers to leverage browser caching.